


Do you want to make bows for wreaths but don’t have an EZ Bow Maker or a Pro Bow to assist you? Take your bow-making game to a new level by learning how to make the Damon bow by hand with this handmade bow tutorial!
Hey, y’all! If you’re new to wreath-making, you have probably felt frustration over making bows at least once. There’s definitely a learning curve and it can feel like you don’t have enough hands to do the job! Using a bow maker, such as the EZ Bow Maker, helps simplify the process and allows you to make beautiful bows easily.
And, if you’re more of a seasoned wreath-maker, you probably know that you CAN make bows by hand, but do you know how to do it?
Today, I’m going to show you guys how you can make the Damon Bow by hand. All this handmade bow requires is some ribbon and wire. You don’t need any fancy tools – just your choice of ribbon (which can be hard enough to pick)!
If you love great bow tutorials, be sure to also check out How To Make A Simple Bow: A Tutorial By Parker and 6 Bow-Making Tutorials You Need.
How To Make A Handmade Bow: The Damon Bow
In full disclosure, I will say, that it’s much easier to make a bow using the EZ Bow Maker or the Pro Bow Hand Bow Maker. But, if you don’t have one available, you can still make a beautiful handmade bow.
Handmade Damon Bow Video Tutorial
I know learning a new skill like this can be challenging for some people, so I made a short video to walk you through the process.
Supplies Needed To Make A Homemade Damon Bow
Here’s everything you’ll need to make a bow by hand – you don’t need much! The hardest part here will be choosing your ribbon colors 😉
Handmade Bow Instructions
If you learn better by reading instructions, here is the process for making a layered homemade bow without using a bow maker.
Step 1
I’m going to layer my three ribbons, just like I would if I was going to use my Pro Bow. I want each of the loops to be five inches, so measure each ribbon 10-inches long. Then, fold it and pinch it.
Now, we have to measure the other loop for the other side.
Step 2
Keeping your ribbons layered, measure to your 10-inch mark. Pinch it, and now it’s time to do a little twist.
Step 3
Now we have this little bow tie-looking thing. Repeat the process 4 more times, creating 2 more loops of layered ribbons on each side.
Step 4
Once those are done, you can pull the tails out and trim them off.
Step 5
Cut a piece of wire 24-inches long. Wrap it around the center of your bow to secure all your ribbons in place.
Step 6
Now we just pull them apart to fluff out and fill out your bow!
Step 7
All right, so our three-ribbon bow is together. You will need to do some Terri bow tails underneath it.
Measure out 7-inches for the tail, then measure 14 more inches. Fold it in half, rotate it, and measure another 14 inches. Then, measure out your 7-inch tail.
Step 8
Finally, it’s time for the little bow tie. Take it and add it to the wire at the bottom of your bow. Repeat the process to create one more bow tie and add it to the wire underneath the bow.
Step 9
Now that all the ribbons are attached, I’m just going to fluff the bow out.
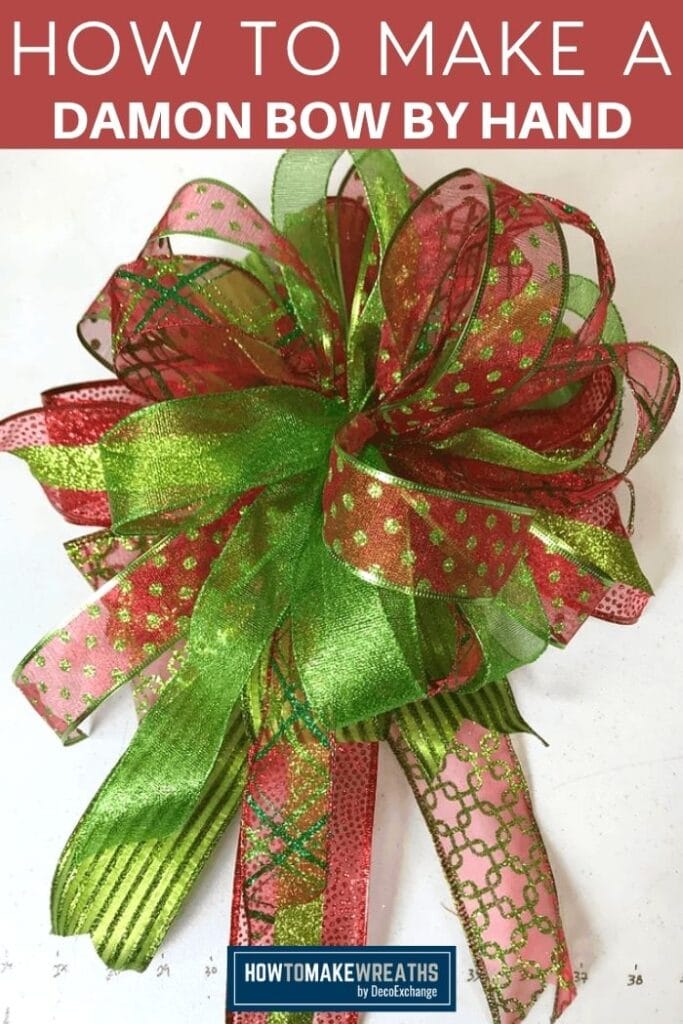
Your handmade bow is done!
FAQs
Never made a homemade bow yourself? Here are a few questions I see frequently from readers about making a homemade bow.
How do you make homemade bows?
I hope you walked through the process with me to see “up close and personal” what the process is like.
While you can do this method, it IS a little tedious and the results are not quite as good as a bow made on an EZ Bow Maker or a Pro Bow. I’ll admit- buying a Pro Bow or an EZ Bow Maker will make the process of bow-making both faster and easier.
But, it’s not impossible!
Can I use ribbon that doesn’t have wire for my bows?
I highly recommend NOT using a ribbon that doesn’t contain wire. The wire may be a little harder to cut, but it’s essential for keeping your ribbon in place and shaped the way you want it to look.
Make A Handmade Bow Yourself
There you go! The process may seem confusing at first, but keep walking through it. After you do it once or twice, you’ll get much more confident in making bows by hand. And of course, I love the Damon bow!
We hope you enjoyed this fun and easy homemade bow tutorial! Feel free to change the look of your bow by playing around with different colors, patterns, and textures according to your own preferences (then share them with us in the Facebook group!).
Once you learn how to make a bow you love, add them to projects like these:
- Designer Fall Grapevine Wreath With A Pumpkin Sign
- Cheeky Sloth Sign Wreath
- Cute Farmhouse-Style Windmill Wreath {DIY Windmill Decor}
- Freesia Grapevine Wreath
As always, feel free to leave us a comment below or share this post with a friend. We appreciate getting your feedback and can’t way to provide y’all with more amazing content!
If you’re in need of any help with bow-making, wreath-making, or crafting in general, be sure to check out more of our tutorials on How to Make Wreaths.
If you are interested in more info on learning how to make wreaths, where to buy supplies, and being in a community of like-minded crafters, check out our Creative Coaching Subscription Group.
We Think You’ll Love These Other Bow And Wreath Tutorials Too!
How To Make a Handmade Damon Bow
Materials
- 3 1.5" wired ribbon
- 3 2.5" wired ribbon
- 24-inch wire
Instructions
- Layer your three 1.5" ribbons on top of each other. I want each of the loops to be five inches, so measure them out to 10-inches long. Fold and pinch your ribbon bunch. Now we have to measure the other loop for the other side.
- Keeping your ribbons layered, measure to your 10-inch mark. Pinch and do a little twist.
- Now you have your ribbons in a bow tie shape. Repeat the process enough to create 2 more loops of layered ribbons on each side.
- Cut the tails.
- Cut a piece of wire 24 inches long and wrap it around your bow in the center to hold all the ribbon in place.
- Fluff out your bow.
- Now we need to add some Terri Bow tails to finish your ribbon. Repeat this process with each of your 2.5" ribbons:Measure out 7-inches for the tail, then measure 14 more inches. Fold it in half, rotate it, and measure another 14 inches. And then measure out your 7-inch tail. Add it to the wire on the bottom of your bow.
- Fluff out your bow to finish everything.
Video
Just pin this Damon’s handmade bow tutorial to save the instructions for later!

Love the ribbons, looks easy but I will have to try it!
Damon, you are the most down to earth designer. I truly enjoy your program and you make everything look so simple and easy.
what does it cost to subscribe?
Hi Beverly, could you be more specific as to what you are wanting to subscribe to?
is there a youtube video to show on this
Hi Linda, the post was updated and the Youtube video has been added at the end of the post. Hope this helps!