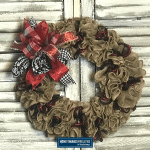
How to Make a Ruffled Burlap Wreath
Create a beautiful burlap wreath that's covered in ruffles and looks way more complicated than it actually is!
Equipment
Materials
- 1 14.5 inch wire wreath frame
- 2 rolls 5.5 inch burlap each roll is 30 feet long
- Zip Ties
- 5-6 pieces Ribbon of your color choice use wired ribbon; cut each piece to 30 inches
- Pipe cleaner
- Attachments or enhancements that you want to add to your wreath. Completely optional, since this wreath is beautiful without attachments
- Hot Glue Sticks if adding attachments
- Hot Glue Gun if adding attachments
Instructions
- Zip tie the end of your burlap onto the bottom of the 14.5-inch wreath frame. I recommend starting on one of the 6 crossbars so that your burlap stays in place. Begin on the bottom (or outside) row first.
- Take the edges of the burlap and bring them up (from the backside of the wreath frame). Use the bar as your guide. You will then begin to push the burlap up, creating your ruffle. Do this around all 6 sections of your frame. If you run out of burlap, add the zip tie to one of the crossbars and put the end you just finished and the end of the new roll of burlap into the zip tie and tighten. Then finish the bottom row.
- When finished with the bottom row, cut the burlap and zip tie it to the crossbar.
- Now begin on the top (or inner) row - it will be a little harder because we will have to use part of the bottom row to add our burlap. Zip tie your starting point and begin to ruffle. You will not need as much burlap for this row, but if you run out, see note below. Once you get used to making this wreath, you'll learn exactly how much burlap is needed for your taste.
- Cut 5-6 wired ribbon strips to at least 30 inches.
- Make your 12-inch loops and hold all loops in one hand.
- Bring your pipe cleaner around what I like to call the neck of the ribbon and tighten.
- Bring some of your streamers up in between the pipe cleaner so that your steamers go different directions. Tighten the pipe cleaner once you have finished arranging your bow.
- Decide the best place for your bow and tie into the wreath.
- Add a hanger on the wreath for easy hanging. You can use a strong floral wire or pipe cleaner. Don’t skip this step because it will allow your customer to hang the wreath the way you intended.
Video
Notes
*If you run out of burlap, try to spread the ruffles out a bit (or get a 3rd roll of burlap).