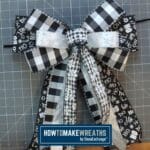
Christmas Black And White Bow Design
This bold and beautiful black and white bow will look great on any of your Christmas wreath or other holiday designs!
Yield: 1 bow
Instructions
- With your 4” ribbon, measure out a 15” tail. Pinch the ribbon in the middle and cut it off the spool about 1.5” above the pinch.Place it into the EZ Bow Maker at the pinch mark to hold it in place while you work on the next layer.
- With the same 4” ribbon, measure a 15” tail and (2) 7” loops. Cut off the ribbon about 1.5” after the 2nd loop and place this layer on top of the first layer in your EZ Bow Maker.
- Grab the 2.5” ribbon and measure a 15” tail and two 6" loops on each side.Add this layer on top of the previous layer in the EZ Bow Maker. Pull the tails towards the bottom of the bow and arrange the loops so that you can see them all.
- Next, take the first 1.5” ribbon and measure out (1) 15” tail and (1) 5.5” loop on each side. Place this ribbon layer on top of the third layer in the EZ Bow Maker.
- The final layer uses the second 1.5" ribbon and has two 15” tails and a single 4” loop as a center loop. Place it in the EZ Bow Maker directly on top of the previous layer.
- Attach two pipe cleaners together end to end so that they make an extra-long pipe cleaner.Then wrap it around the middle of your bow as you carefully pull it off of the EZ Bow Maker. Twist the pipe cleaner together in the back, then twist the bow to tighten the pipe cleaner and make your bow pop.