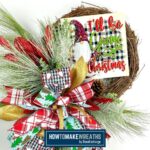
I'll Be Gnome For Christmas Grapevine Wreath
A colorful festive Christmas wreath that uses a different technique for making the bow but still comes together quickly.
Materials
- grapevine wreath
- sign/attachment "I'll Be Gnome For Christmas"
- 4 greenery sprays pine and frosted pine
- 1 greenery stems frosted eucalyptus
- Christmas Picks red glitter leaves
- 1 4" wired ribbon
- 3 2.5" wired ribbon
- 2 1.5" wired ribbon
- DAB glue
- mini clamps
- bolt cutter
- scissors
- EZ Bow Maker
Instructions
- Add a dot of glue to each corner on the back of the sign. Apply one mounting square on each glue dot. Use mini clamps to hold the squares in place until you're ready to attach the sign to the wreath.
- Use your EZ Bow Maker and your 4" ribbon to make 12” tails on the right side with one 6.5” loop to the left side. Make a corresponding loop and tails (the same size) with your first 2.5” ribbon.
- With your 2.5” ribbon make 12” tails to the right with one 6” loop to the left side. Make a similar complementing loop and tails for the other side with your last 2.5” ribbon.
- Take both of your 1.5” ribbons and repeat the technique again. Make 12” tails and one 5.5” loop with the first 1.5” ribbon. Then do it one more time with other 1.5” ribbon.
- Take the 1/2" ribbon and make tails with one center loop.
- Tightly twist a pipe cleaner around the middle of your bow to hold it together.
- Remove the clamps from your sign and attach the sign to the top of your wreath form. Next, attach your bow to the bottom portion of your wreath base.
- Cut your pine greenery apart with your bolt cutters to make it slightly smaller. Add your greenery sprigs into the wreath frame in a triangle pattern around the bow. Secure each sprig with a dab of hot glue.
- Repeat the same process with the frosted pine greenery.
- Complete the design by inserting a couple of glittery red leaf picks and eucalyptus sprigs into your wreath in a triangle pattern around your bow. Secure each one with a dab of hot glue.
- Fluff out your bow and dovetail the ribbon tails.