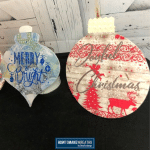
How To Make Decoupaged Wood Christmas Signs
Take your wreath-making skills to a new level by learning how to create your own decoupaged holiday signs to add to your wreath designs.
Materials
Instructions
- Paint a coat of primer on the wood cutout.
- Situate your decoupage material on your wood cutout. Your paper layer can extend past the edge of your surface and easily be trimmed off later.
- Mark your decoupage layer to act as a guide as you cut and then use scissors to cut out your paper layer.
- When you finish pressing your paper layer, prop your wood cutout on top of a small box or paint can.
- Get a sheet of plastic wrap ready.
- Apply an even layer of Mod Podge over the surface of your wood cutout with a foam brush.Gently lay your paper layer down onto the surface.
- Lay your plastic wrap over your paper layer and stretch down over the sides of the wood cutout.Carefully smooth your paper layer through the surface of the plastic wrap with your hands.
- Repeat for the next section, until your paper layer has entirely adhered. Let this dry well.
- To trim the overhanging paper edge, use a file (a nail file works great!) to gently file downwards, in one direction, along the edge of your surface, until all loose edges are trimmed away.
- Once dry, go back over the top with another layer of mod podge. Allow the 2nd layer of mod podge to dry.
- After it dries use Chalk Couture transfers with Chalkology Paste to add words over the decoupage layer.Remove your transfer from the backing. Stick your transfer to a fluffy towel and peel away to keep the transfer from stretching when you peel it away from your surface.Press your transfer down so that the entire transfer adheres.
- Spread the Chalkology paste of your choice over the screen with a squeegee. Squeegee off any excess. Then gently peel your silkscreen transfer away.
- Place your transfer into a water bath until you are able to clean. Give your project a few minutes to dry.
Adding Sign Trim
- Use a jute cord to cover a portion of the wood cut out. Attach with hot glue.
Finish The Sign
- Protect your decoupage sign by sealing it with a coat of clear matte sealant.