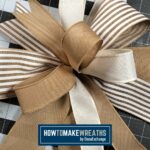
Everyday Bow Tutorial
Learn how to make a simple and elegant everyday bow with this easy tutorial.
Materials
- 2 1.5 wired ribbon Burlap ribbon, White Ribbon
- 1 2.5" wired ribbon Cabana Stripe Ribbon
- pipe cleaners
- zip tie
Instructions
- Grab your 1.5” Burlap ribbon and pull a bit off from the spool. Create a tail the length you desire, and pinch it. Make a loop, running it together to add to the first pinched piece of ribbon, and then give a twist. Repeat to make a second loop the same way - loop, pinch, twist. Pull a matching section to create your 2nd tail and cut from the spool. This is the beginning component of your bow.
- Build on your next layer behind that first Burlap ribbon, repeat the same steps with your 1.5” solid White ribbon. Maintain that firm grip as you create another 2 loops and 2 tails. All together on your bow, you will have 4 loops and 4 tails. Always remember to twist your ribbons towards you so that the pretty pattern of your ribbon is seen. No one wants an ugly bow just because the pretty side is hidden.
- Repeat next with your 2.5” Cabana Stripe ribbon. “Loop, Pinch, and Twist” method to create your 3rd layer of this handmade bow. 2 more loops and 2 more tails. 6 of each altogether now.
- Last layer of your bow will repeat the same process. Use your 2.5” Burlap ribbon as you add 2 more loops and tails. For your finished bow you should have 8 total loops and 8 tails.
- To secure your bow, grab your pipe cleaner and zip tie to have them handy. Your 3 middle fingers are holding your bow with a firm grip, maintaining the pressure. Lift your middle finger, and slide the pipe cleaner to be held in place on the back of the ribbon, Next slide the zip tie through from the front of the bow, squeezing in between your pointer finger and middle finger in the back. Connect the zip tie so it secures the ribbons and pipe cleaner together. Before cinching completely shut, fluff your loops and tails so they are all facing the direction you want. Pull tight when happy. Remove excess zip tie
- Don’t forget to dovetail those ribbon tails to give your bow a finished look
- Attach bow to wreath of choice