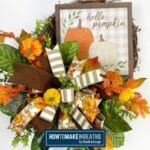
Hello Pumpkin Autumn Grapevine
Learn how to make this beautiful autumn grapevine wreath with a Hello Pumpkin sign.
Materials
- sign/attachment Hello Pumpkin
- 1 2.5" wired ribbon
- 2 1.5 wired ribbon
- grapevine wreath 14"
- greenery stems magnolia, boxwood bush, Autumn fall stem
- hot glue gun
- Scissors
- Pipe cleaners
- 4 1″ mounting square
Instructions
- Take the hanger that is on your sign and cut it off. Then place your mounting squares to the back corners of your board. Thread your pipe cleaners through the mounts. Apply a little bit of glue around your mounts.
- Clean your grapevine before you begin. Cut off any twigs that may scratch your customer’s door or snag your ribbon or picks and stems.
- To make your bow grab your EZ Bow maker. Start with your 1.5 inch ribbon and make an 8-inch tail. Make a 6-inch loop on each side and trim your ribbon at an 8-inch mark. Bring in your 2.5 inch brown making your tail and doing your loops a bit smaller. With your third ribbon repeat the same steps making your loops the same size. Bringing your first ribbon back to the top make two loops again with this ribbon. Take a strip of your brown ribbon and place it right down the center, then a strip of the patterned ribbon, and then make a ribbon loop with your strip ribbon. Take a pipe cleaner and fold it in half. Then pinch it off and give your pipe cleaner a twist and there you have your bow!
- Secure your sign using your pipe cleaners and attaching it to the wreath form. Feed them through your grapevine do not go around your grapevine. If you go around the grapevine this makes it too tight to add other things to your grapevine.
- Using your magnolia leaf stem, cut it into three sections. Once you have your sections you will want to spread the leaves out like a fan.
- Attach the bow to the bottom left side under the sign. Then dovetail your ends
- Place your Magnolia leaves in a triangle pattern. Placing the longest and biggest piece of leaf right underneath the bow. Then secure with hot glue. Then add the other two on each side of the one you just placed.
- Now add your boxwood greenery filling in any empty spaces you see. Weaving them in and out that some are underneath, and in-between. As well as add some smaller greenery pieces in your actual bow by dapping some glue on the end of the stem and sticking it around your bow loops.
- Make your autumn stem into three smaller sections. Add these pieces by placing glue on the end of your stem and pushing it right in by lifting up your bow. You want to separate your ribbon as much as possible so that when you lay your ribbon back down it seals it nice and tight.
- Continue adding your stem picks around your bow. If you find it difficult to add your stem remember it is a wired stem you can bend it and help get it nice and secured in.