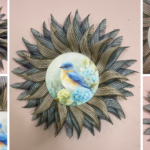
Small Mesh Wreath with a UITC Board
If you are looking for a simple mesh wreath tutorial that is beginner friendly and budget conscious, this small UITC board wreath is a great place to start.
Materials
- Small UITC Board
- 6" zip ties
- 1 roll blue mesh RE85062W
- 1 roll natural mesh RE85062X
- 1 10" wood sign
- Pipe cleaners
- ¼" staples
Instructions
Cut the Mesh
- Cut mesh into the following pieces:
- 16 pieces of blue mesh at 10 inches
- 8 pieces of natural mesh at 10 inches
- These smaller cuts create tight ruffles that work well on a small wreath board.
Create Mesh Ruffles
- Take one mesh piece and gather it in the center to form a ruffle.
- Attach Mesh to the UITC Board
- Secure each ruffle to the board using a zip tie through the holes in the board.
Alternate Colors
- Alternate between blue mesh and natural mesh as you attach them around the board.
Continue Around the Board
- Attach all 24 mesh pieces evenly around the board.
Trim Zip Ties
- Cut off excess zip tie tails for a clean finish.
Attach the Wood Sign
- Place the 10 inch wood sign in the center of the wreath.
Secure the Sign
- Attach pipe cleaners to the back of the sign using ¼ inch staples.
- Thread the pipe cleaners through the board and twist tightly on the back.
Fluff and Adjust
- Fluff the mesh ruffles and adjust them to fill any gaps and create an even shape.
Final Check
- Step back and adjust the wreath so the mesh is balanced and symmetrical.
Video
Notes
Designer Tips:
- Smaller mesh cuts create tighter and cleaner wreath designs.
- Using two mesh colors adds dimension without making the wreath look busy.
- Always attach your sign in at least two places so it stays secure.
- Trim zip ties flush so nothing scratches your door.