
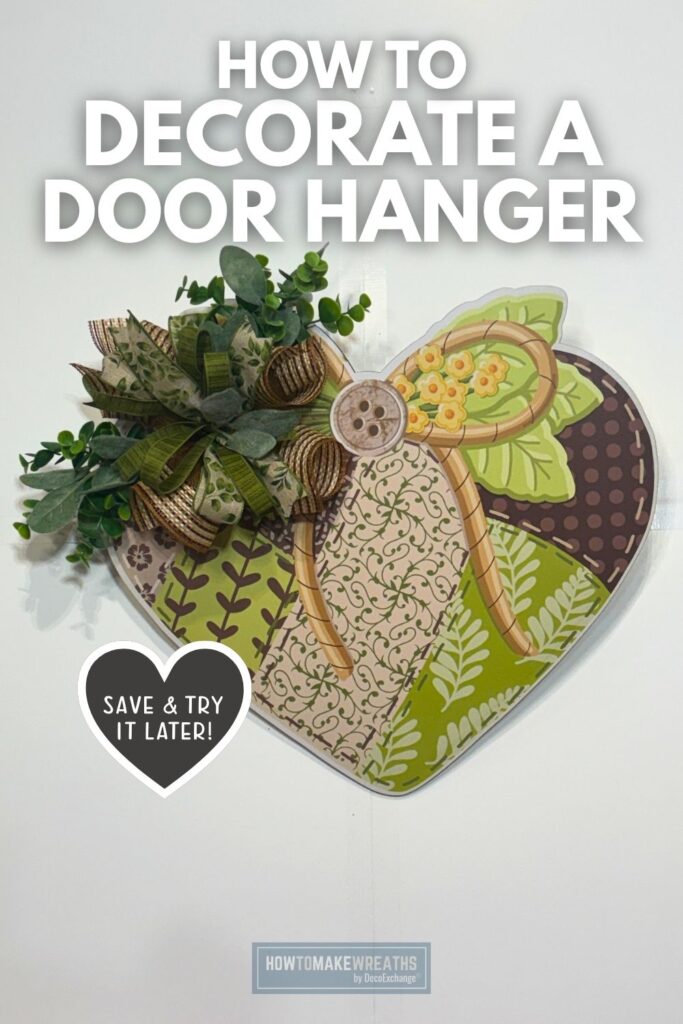
If you are looking for a door hanger that feels warm, natural, and a little more your style definitely check out this tutorial by Coach Tammy.
In this tutorial, Tammy shows how to decorate a door hanger using 10-inch mesh, two ribbons, and lamb’s ear and ivy stems for a soft, earthy greenery accent. The finished piece has a relaxed, nature-inspired look that suits a wide range of home exterior styles and works across spring, summer, and early autumn without reading as tied to a specific holiday.
Why Add Mesh to a Door Hanger?
Mesh gives a door hanger volume and dimension that ribbon and picks alone cannot create on their own. On a flat door hanger base, the surface area is limited, and florals or greenery placed directly on the board can look sparse or one-dimensional.
Mesh builds up a textured layer between the base and the finishing details, so the greenery, ribbon, and bow have something to nestle into rather than sitting flat against a hard surface.
That added fullness also makes the door hanger visible from a distance. A flat sign with a few stems reads as a sign. A sign with a mesh foundation reads as a finished, layered piece that catches the eye from the sidewalk or the end of a porch.
For this project, the brown mesh creates a warm, neutral base that pairs naturally with the olive ribbon and lamb’s ear and ivy stems. The earthy tone lets the greenery blend into the arrangement rather than sitting against a contrasting background, which gives the whole piece a cohesive, organic feel.
Supply List
- 1 door hanger (WSB Box June 2026)
- 10-inch brown mesh (RE85062T, DecoExchange WSB June 2026)
- 1 roll 1.5-inch floral ribbon (RGH116689, WSB Box June 2026)
- 1 roll 5/8-inch olive ribbon (RGF1682EW, WSB Box June 2026)
- 2 lamb’s ear and ivy stems (FG663109)
- Hot glue gun and glue sticks
- Wire cutters
- Zip ties or pipe cleaners
- Scissors
How to Decorate a Door Hanger
Step 1: Prepare Your Door Hanger Base
Lay your door hanger flat on your work surface. Check that it sits evenly and decide where the mesh will be concentrated before you start. On a door hanger, mesh is typically built across the top half or along one side of the hanger rather than all the way around as it would be on a wreath frame.
Attach a hanger or hook to the back of the door hanger now if one is not already in place. It is easier to add the hanging hardware before the front is covered with mesh and ribbon.
Step 2: Add the Brown Mesh
Cut lengths of 10-inch brown mesh and begin gathering or looping them onto the door hanger. On a door hanger frame, mesh is typically attached by folding each section and securing it with a zip tie or pipe cleaner at the base. Work across the top or along the frame of the hanger, building fullness as you go.
Alternate the direction of each mesh fold slightly so the mesh puffs outward and upward rather than lying flat. Full, fluffy mesh sections are what give the door hanger its presence and make it visible from a distance.
The brown mesh provides a warm, neutral base that will complement the olive and floral ribbon tones without overpowering them. Brown mesh also pairs naturally with the earthy green tones of the lamb’s ear and ivy stems, so the transition from mesh to greenery will look intentional rather than abrupt.
Work across the full area where you want mesh coverage before moving to ribbon and picks.
Step 3: Add the Lamb’s Ear and Ivy Stems
Separate your two lamb’s ear and ivy stems (FG663109) into individual pieces. These stems typically include both the soft, silver-green lamb’s ear foliage and ivy with its darker, more graphic leaf shape, giving you two distinct textures from a single stem pack.
Position the stems throughout the mesh arrangement, tucking them in so they appear to grow out from behind the mesh rather than sitting on top of it. Fan the stems outward and let them cascade naturally along the sides or below the main mesh section.
Lamb’s ear brings a soft, velvety texture and a silver-green tone that stands out against the brown mesh. Ivy adds a slightly more structured, trailing quality that gives the arrangement movement and a garden-gathered feel.
Hot glue or zip tie each stem securely into the mesh and door hanger frame.
Step 4: Build the Ribbon Bow
This door hanger uses two ribbon styles at different widths. Build a layered bow using the following approach:
- Use the 1.5-inch floral ribbon (RGH116689) for the main loops of the bow. This is the wider and more decorative of the two ribbons and carries the most visual weight in the bow design. Build three to four loops and position them so the floral print faces forward.
- Use the 5/8-inch olive ribbon (RGF1682EW) as accent loops tucked into the center of the bow and as bow tails. At this width, the olive ribbon is a finishing detail that ties the bow back to the greenery palette without competing with the floral print. A few small loops and two tail lengths are enough.
Secure all loops at the center with a zip tie or pipe cleaner twisted tightly at the back. Fluff each loop after securing so the bow opens fully and both ribbon styles are visible from the front.
Step 5: Attach the Bow
Position the bow at the top of the door hanger where the mesh arrangement is centered, or at the base of the mesh section where it meets the sign or lower portion of the hanger. Press the bow center flat against the surface and secure it with a staple, zip tie, or hot glue depending on the surface of your door hanger.
If the door hanger has a flat painted or wood surface at the attachment point, hot glue works well. If you are attaching into or near the mesh, a zip tie looped through the bow wire and around the hanger frame gives the most secure hold.
Adjust the bow loops from the front after attaching so they fan out evenly over the mesh and greenery.
Step 6: Final Adjustments
Step back and look at the finished door hanger from a distance. Fluff any mesh sections that have settled flat. Reposition any greenery stems that are pointing in an unintended direction. Make sure the olive ribbon tails fall naturally below the bow rather than curling or folding awkwardly.
The finished door hanger should look full and layered with the brown mesh as the base, the greenery framing the sides, and the floral ribbon bow as the clear focal point at the top.

Learn how to start, operate, and scale your creative business!
Get more info about business and creative coaching at The Makers University.
Tips for This Project
Let brown mesh surprise you. If you have not worked with brown mesh before, pull it out and fluff it before you start building to get a sense of how it looks when full and layered. Most makers who hesitate over brown mesh change their minds once they see how warm and rich it looks when it is built up properly.
Tuck greenery behind the mesh, not on top of it. Lamb’s ear and ivy stems that sit on top of the mesh look added on. Stems that are tucked in behind the mesh so they appear to grow through it look like part of the original design. Take the extra few seconds to position each stem behind the mesh before gluing.
Use the olive ribbon sparingly. At 5/8 inch wide, the olive ribbon disappears quickly inside a full mesh arrangement. Two or three small accent loops in the bow center plus two tail lengths is the right amount for this width. Using more does not add proportionally more visual interest and can make the bow look cluttered.
Match the bow size to the hanger. The bow should be proportional to the door hanger size. A bow that is too small on a full mesh hanger looks like an afterthought. A bow that is too large covers the greenery and overwhelms the design. For a standard door hanger, three to four loops of 1.5-inch ribbon produces a bow that sits right in that proportional range.
Updating a Simple Door Hanger
Equipment
- Hot Glue Gun and Glue Sticks
- Zip ties or pipe cleaners
Materials
- 1 door hanger WSB Box June 2026
- 1 10" brown mesh RE85062T, DecoExchange WSB June 2026
- 1 roll 1.5-inch floral ribbon RGH116689, WSB Box June 2026
- 1 roll 5/8-inch olive ribbon RGF1682EW, WSB Box June 2026
- 2 lamb’s ear and ivy stems FG663109
Instructions
- Lay the door hanger flat. Attach hanging hardware to the back if not already in place.
- Cut lengths of 10-inch brown mesh. Fold each section and secure to the top or along the frame with zip ties or pipe cleaners. Alternate the direction of each fold so the mesh puffs outward. Work across the full coverage area before moving on.
- Separate the two lamb’s ear and ivy stems into individual pieces. Tuck each stem behind the mesh so it appears to grow through from behind. Fan outward and let pieces cascade along the sides or below the mesh section. Hot glue or zip tie each stem in place.
- Build a layered bow. Make three to four loops with the 1.5-inch floral ribbon. Add two to three small accent loops and two tails with the 5/8-inch olive ribbon. Secure all loops at the center with a zip tie or pipe cleaner.
- Position the bow at the top of the mesh arrangement or where the mesh meets the sign. Secure with hot glue, a staple, or a zip tie depending on the surface.
- Step back and check the piece from a distance. Fluff any flat mesh sections, reposition greenery, and adjust ribbon tails so they fall naturally.
Video
Where to Display This Door Hanger
This brown mesh door hanger works well for:
- A front door as a spring, summer, or early autumn accent
- A covered porch wall or gate
- An interior entryway or mudroom for a natural, earthy seasonal piece
- A craft show booth as a neutral, broadly appealing option for buyers who prefer earthy tones over bright seasonal colors
Because the palette is not tied to a specific holiday or season, this door hanger has a longer display window than most seasonal pieces, which is a genuine selling point for craft show customers.

