
Sometimes the easiest way to create a beautiful fall wreath is to skip building the entire thing from scratch.
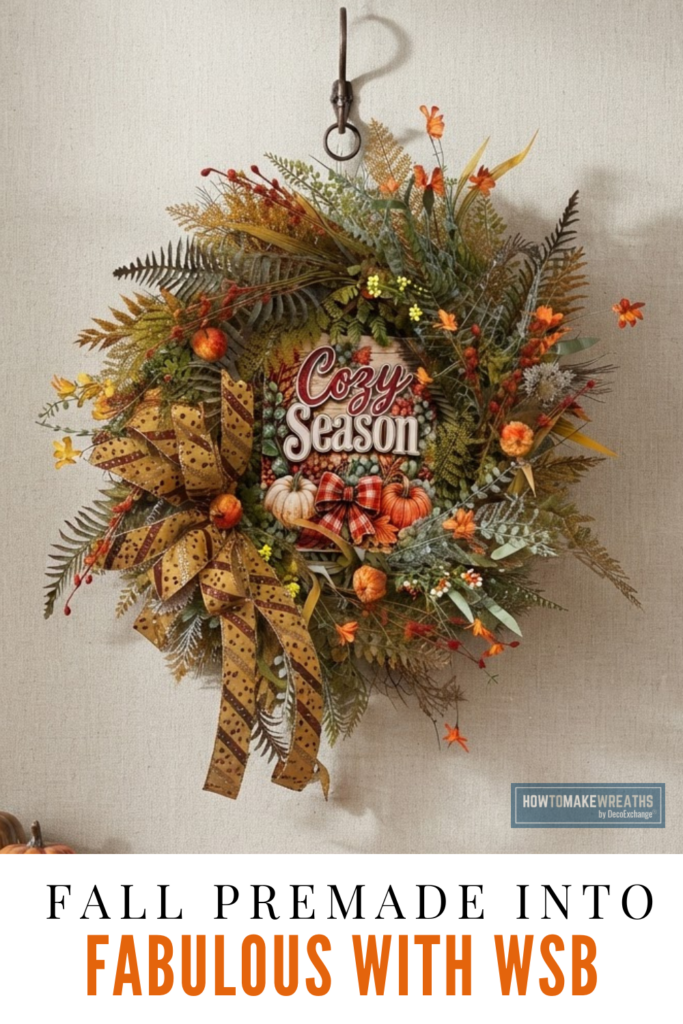
In this tutorial, Coach Tammy’s premade fall wreath makeover shows off what you can do using ribbon, fall florals, fern, and pumpkins. It is a great example of how you can start with an inexpensive premade wreath and use a few well-chosen additions to make it look fuller, more interesting, and much more personalized.
This technique is especially useful when you find seasonal wreaths on clearance, at discount stores, or tucked away in your own craft stash. Instead of looking at a premade wreath as the finished product, think of it as your wreath base.
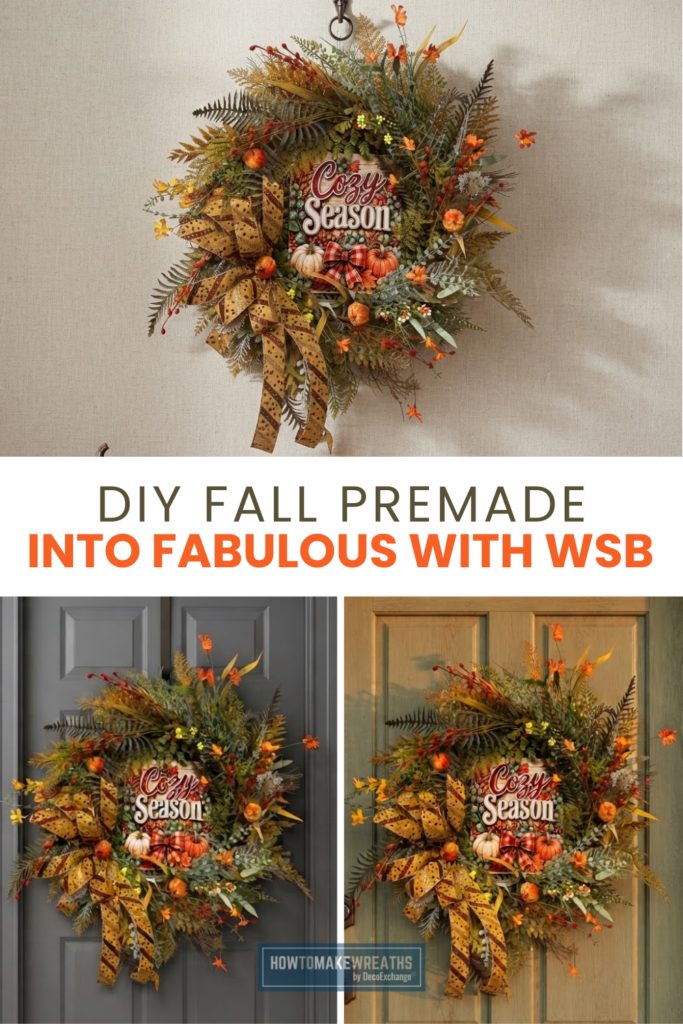
Supplies for This Fall Wreath Makeover
Tammy used a premade fall wreath originally from Joann. Similar premade wreaths have also been spotted at Ollie’s. Seasonal inventory changes quickly, so use the wreath as inspiration if you cannot find the exact style.
For the embellishments, Tammy used:
- Premade fall wreath, originally from Joann
- 1.5-inch glitter stripe ribbon, RGH1000F4, August 2026 Wreath Supply Box from DecoExchange
- Orange floral spray, 57425OR, August 2026 Wreath Supply Box from DecoExchange
- Orange and yellow 60919 look-alike spray, FH812529
- Mustard yellow fern spray, FG690253, August 2026 Wreath Supply Box from DecoExchange
- Pumpkins from Hobby Lobby, discontinued
You do not need the exact wreath or discontinued pumpkins to recreate the idea. Look for a premade fall wreath with a good basic shape, then choose embellishments that complement the colors already in it.
How to Make a Premade Fall Wreath Look Better
The trick to updating a store-bought fall wreath is figuring out what is already working before you start adding anything.
You are not trying to hide the original wreath. Instead, you want your new elements to build on its existing colors, texture, and shape.
Before attaching anything permanently, hang the wreath up or place it on your work surface and look for areas that feel sparse, flat, or repetitive. Those are the places where your new florals and accents can make the biggest difference.
Step 1: Start with the Premade Wreath
Fluff and shape the existing wreath before adding new materials.
Premade wreaths often become compressed during shipping and storage. Separating the existing foliage and adjusting the stems may reveal more fullness than you initially thought was there.
This also gives you a better idea of where additional materials are actually needed.
Step 2: Add the Mustard Yellow Fern
Bring in pieces of the mustard yellow fern spray to expand the wreath’s silhouette and introduce another fall texture.
Rather than keeping every stem close to the wreath, allow some of the fern to extend beyond the original edge. This helps transform the shape and makes the wreath feel more dimensional.
The mustard color works especially well in a fall color palette because it adds warmth without relying only on orange.
Step 3: Layer in the Orange Floral Spray
Next, add the orange floral spray.
Use these florals to create stronger areas of color throughout the wreath. Tuck the stems into the existing foliage so the new pieces look integrated with the original design instead of sitting on top of it.
As you work, turn or step back from the wreath occasionally. You want the orange to travel through the design without becoming perfectly symmetrical.
Step 4: Add the Orange and Yellow Accent Spray
Use the orange and yellow 60919-style spray to introduce smaller flowers, texture, and movement.
These lighter accent stems are helpful for bridging the space between larger elements. Allow a few pieces to extend beyond the main body of the wreath for a loose, natural fall look.
This is also where a basic premade wreath can begin to look much more like a custom floral design.
Step 5: Add the Pumpkins
Nestle the pumpkins into the wreath where they can become noticeable focal accents without covering the florals.
Because Tammy’s exact Hobby Lobby pumpkins are discontinued, this is an easy element to substitute. Small faux pumpkins, velvet pumpkins, foam pumpkins, or pumpkin picks can all work.
Choose pumpkins that coordinate with your existing palette rather than feeling like an entirely separate decoration.
Step 6: Add the Fall Ribbon
Finish the design with the glitter stripe ribbon from the August Wreath Supply Box.
The mustard, gold, brown, and copper tones in this ribbon work with the florals while adding another pattern and texture to the wreath.
Position your ribbon so it complements the focal areas you have already created instead of covering them. Once it is attached, shape the loops and tails and make sure the ribbon remains visible among the florals.
Step 7: Fluff and Finish the Wreath
Once everything is attached, give the wreath one final shaping.
Pull florals forward if they have disappeared into the greenery. Adjust the fern so the outer silhouette feels balanced. Reposition the pumpkins if necessary and shape the ribbon.
Then look at the wreath from several feet away.
That distance is surprisingly useful. Areas that seemed fine while you were working up close may suddenly look empty or crowded when you see the entire wreath.
Can You Add Decorations to a Premade Wreath?
Absolutely. In fact, customizing a premade wreath is one of the easiest ways to create seasonal decor without starting with a bare wreath form.
A premade wreath gives you the basic structure, greenery, and often some of the decorative elements. You can then add florals, ribbon, picks, pumpkins, ornaments, or other seasonal accents to make it fit your style.
It can also be a smart way to use seasonal clearance finds. A wreath does not have to be perfect when you buy it. It just needs to have a good enough foundation to build on.
How Do You Make a Cheap Fall Wreath Look Expensive?
Focus on depth, texture, and intentional placement rather than simply adding more supplies.
Mix larger focal elements with smaller filler stems. Let some greenery and florals extend beyond the original wreath. Repeat colors throughout the design, and use ribbon to connect the palette.
One of the biggest differences between a basic store-bought wreath and a custom-looking design is dimension. When everything sits at exactly the same height, the wreath tends to look flat. Layering materials at different depths creates a much richer finished look.
What Colors Work Well for a Fall Wreath?
Traditional fall decorating does not have to mean using only bright orange.
Tammy’s combination of orange, mustard yellow, warm brown, copper, and natural tones creates a softer autumn palette that still feels seasonal. You could also recreate this technique with burgundy, plum, olive green, rust, cream, or muted gold.
Use the colors already present in your premade wreath as your starting point, then introduce one or two additional shades to give the design more depth.
A Simple Way to Create Custom Fall Decor
The fun part about this project is that it changes how you look at premade wreaths.
You do not have to love every detail of a store-bought wreath for it to be useful. If you like the size, base, or general color palette, you already have something you can work with.
A few florals, some interesting greenery, pumpkins, and a great ribbon can take it in a completely different direction.
And because you are embellishing instead of starting from scratch, this can be a quicker fall wreath project for your own front door, seasonal decorating, or even inspiration for designs you sell.
Keep Building Your Design Skills
If projects like Tammy’s have you looking at ordinary craft-store finds and wondering what else you could turn them into, that is exactly the kind of creative thinking you can keep developing inside The Maker’s University Design School. You’ll find more design instruction, techniques, and ideas to help you keep experimenting and developing your own style.

