
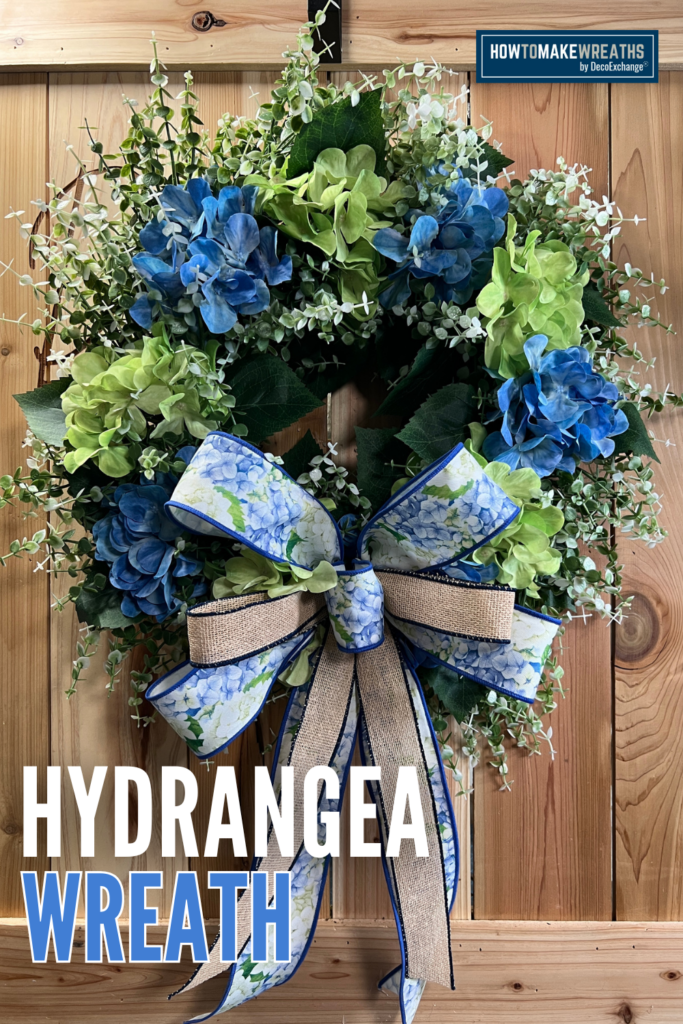
If you are looking for a spring mesh wreath tutorial that feels fresh, layered, and front door ready, this hydrangea mesh wreath with a Welcome sign is a beautiful project to try.
In this tutorial, Coach Jordan shows how to combine blue and green border mesh, layered ribbon, hydrangeas, and a Welcome sign to create a full, balanced wreath that works for spring and everyday decor.

Welcoming Hydrangea Mesh Wreath Tutorial
This design is perfect if you have searched for:
- How to make a hydrangea mesh wreath
- Spring mesh wreath with welcome sign
- Blue and green mesh wreath ideas
- How to use border mesh in a wreath
- DIY welcome wreath for front door
Supplies needed
Base
Mesh
- 10-inch blue border mesh, RE85062W, DecoExchange February WSB
- 10-inch green border mesh, RE85062X, DecoExchange February WSB
Ribbon
- 2.5-inch hydrangea ribbon, LS123203, DecoExchange February WSB
- 2.5-inch green vine ribbon, RGH129727, DecoExchange February WSB
- 1.5-inch burlap with blue edge ribbon, RGE140119, DecoExchange February WSB
- 1.5-inch blue lace edge ribbon, RGC829719, DecoExchange February WSB
Sign and Florals
- Welcome Sign, DecoExchange February WSB
- Hydrangeas, February WSB
Step-by-Step Instructions and Video
Step 1: Add the Mesh Base
Cut and prepare your mesh using your preferred technique such as ruffles or poofs.
Alternate between the blue border mesh and the green border mesh as you move around the 15 inch frame. This creates depth and prevents the wreath from looking one dimensional.
Fluff each section as you go to keep the mesh full and evenly distributed.
Step 2: Attach the Welcome Sign
Position your Welcome sign slightly off center to create a more dynamic layout.
Secure it to the frame using pipe cleaners or wire threaded through the frame. Make sure it sits flat and balanced before tightening everything fully.
If you are searching for how to attach a sign to a mesh wreath, securing it in at least two places keeps it from shifting.
Step 3: Layer the Ribbon
Use the 2.5 inch hydrangea ribbon and the 2.5 inch green vine ribbon as your primary statement ribbons.
Then add in the 1.5 inch burlap with blue edge and the 1.5 inch blue lace ribbon for texture and contrast.
Layering ribbon in different widths makes the wreath look more custom and high end. Keep the ribbon tails visible but not overwhelming.
If you have ever asked how to layer ribbon in a mesh wreath, mixing widths and patterns is the key.
Step 4: Add the Hydrangeas
Place the hydrangeas around the sign and into the mesh base.
Tuck them into the wreath so they sit slightly above the mesh, allowing the blooms to stand out.
Cluster them in small groupings rather than spacing them evenly. This creates a more natural garden look.
Hydrangea Mesh Wreath
Materials
Base
- 1 15" wreath frame XX7504W4, DecoExchange February WSB
Mesh
- 1 10" blue border mesh RE85062W, DecoExchange February WSB
- 1 10" green border mesh RE85062X, DecoExchange February WSB
Ribbon
- 1 2.5" hydrangea ribbon LS123203, DecoExchange February WSB
- 1 inch 2.5" green vine ribbon RGH129727, DecoExchange February WSB
- 1 inch 1.5" burlap with blue edge ribbon RGE140119, DecoExchange February WSB
- 1 inch 1.5" blue lace edge ribbon RGC829719, DecoExchange February WSB
Sign and Florals
- 1 Welcome Sign DecoExchange February WSB
- Hydrangeas February WSB
Instructions
Step 1: Create the Mesh Base
- Alternate blue and green mesh around the frame using ruffles or poofs.
- Fluff each section as you go to keep the wreath full and even.
Step 2: Attach the Welcome Sign
- Place the sign slightly off center.
- Secure it to the frame in at least two spots using pipe cleaners or wire.
Step 3: Layer the Ribbon
- Add 2.5 inch ribbons first for your main look.
- Layer in 1.5 inch ribbons for texture and contrast.
- Keep tails visible but balanced.
Step 4: Add the Hydrangeas
- Insert hydrangeas around the sign and into the mesh.
- Cluster flowers in small groups and let them sit slightly above the mesh for dimension.
Video
Why Border Mesh Works So Well for Spring Wreaths
Border mesh adds natural framing to your wreath. The colored edges create built in contrast and dimension without needing extra layers.
For spring wreaths, blue and green border mesh gives a soft garden inspired feel that pairs beautifully with hydrangeas and floral ribbon.
If you have ever wondered how to make a mesh wreath look more finished and less flat, border mesh is the answer.
Designer Tips for a Professional Finish
- Alternate mesh colors evenly for balance.
- Keep florals clustered near the focal point.
- Use ribbon tails to soften transitions between mesh and sign.
- Step back and adjust before final tightening.
This project is perfect for spring front door decor, gift making, or selling at craft shows.
Can You Sell a Hydrangea Mesh Wreath
Yes.
Spring mesh wreaths with welcome signs are strong sellers for:
- Spring craft fairs
- Mother’s Day markets
- Front porch decor
- Everyday seasonal transitions
Because this design uses coordinated supplies from the Wreath Supply Box, it has a cohesive look that customers love.
And if you’re just getting started or looking for more ideas like this, The Makers University Design School is a really great place to keep learning at your own pace.
No pressure, just more ways to grow your skills and try new designs.

