
If you want to add height and dimension to a standard door hanger sign without building a full wreath, a sign extender is the tool that makes it possible.
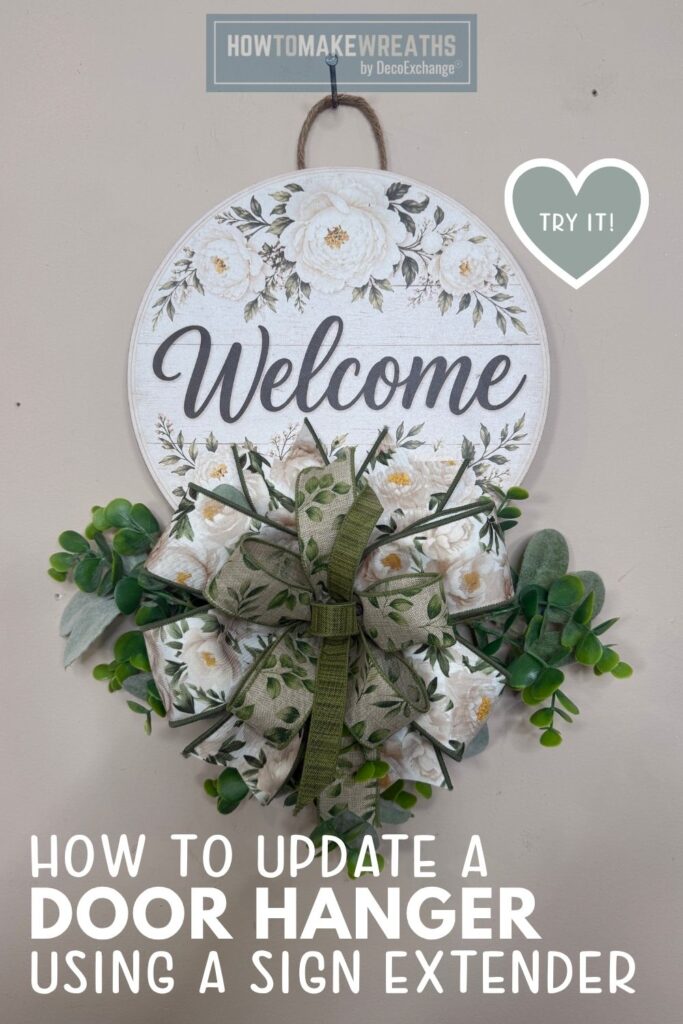
In this tutorial, Stacy shows how to build a peony-themed door hanger using a 12-inch sign, a sign extender, eucalyptus and lamb’s ear picks, and a layered bow made from three ribbons including a deluxe peony print, a floral ribbon, and a narrow green accent. The wired jute rope returns as a hanger and texture element, and staples keep the bow locked firmly in place. The finished piece has the look of a full, styled arrangement with a fraction of the build time of a wreath.
What is a Sign Extender?
A sign extender is a frame or bracket that attaches to the back of a door hanger sign and adds a horizontal or vertical extension above or below the sign face. It gives you additional surface area to attach picks, ribbon, and greenery without crowding the sign itself.
On a standard 12-inch door hanger, the sign face takes up most of the usable space. Adding a sign extender means you can build a full floral arrangement above the sign that cascades naturally downward without covering the text or design on the sign face. The result looks more like a styled floral piece than a simple sign with a bow, which increases its appeal and perceived value at craft shows and in online shops.
If you have not worked with a sign extender before, this tutorial is a practical introduction to how the technique works and why it is worth adding to your door hanger builds.
How to Make a Peony Door Hanger
Supply List
All supplies except staples and wired jute rope are from DecoExchange.
- 1 round sign, 12 inches (DecoExchange)
- 1 sign extender (DecoExchange)
- 3/8-inch staples
- 1/4-inch staples
- Pipe cleaner
- Zip ties
- Wired jute rope
- 3 eucalyptus and lamb’s ear picks (FG663109, DecoExchange)
- 1 roll 2.5-inch peony ribbon (LS1216H2, DecoExchange)
- 1 roll 1.5-inch ribbon (RGH116689, DecoExchange)
- 1 roll 5/8-inch green ribbon (RGF1682EW, DecoExchange)
Video Tutorial and Step-by-Step Instructions
Step 1: Attach the Sign Extender
Before adding any picks or ribbon, attach the sign extender to the back of the 12-inch sign. Most sign extenders clip, staple, or wire onto the back of the sign near the top edge. Follow the specific attachment method for your extender style and make sure it sits securely and level before moving forward.
The extender should be positioned so it creates a surface above the sign face where picks and bow elements can be attached without covering the front of the sign.
Attach the wired jute rope as the hanger at this stage as well. Loop the jute rope through the top of the sign extender or around the top of the sign and tie or twist it securely so the door hanger hangs at the correct angle when displayed.
Step 2: Prepare and Place the Eucalyptus and Lamb’s Ear Picks
Separate your three eucalyptus and lamb’s ear picks (FG663109) into individual stems. Each pack typically includes both eucalyptus stems with their oval leaves and lamb’s ear stems with their soft, silver-green foliage, giving you two textures to work with.
Begin placing picks on and around the sign extender, fanning them outward and upward to create a cascading greenery arrangement above the sign. Alternate eucalyptus and lamb’s ear stems as you place them so both textures are visible throughout the arrangement.
Use zip ties or pipe cleaners to attach stems to the sign extender frame rather than relying on hot glue alone for stems that will bear weight or hang freely. Once the overall arrangement looks balanced, reinforce with hot glue where needed.
Allow some stems to cascade down along the sides of the sign for a fuller, more finished look. The greenery should frame the sign rather than sitting entirely above it.
Step 3: Build the Three-Ribbon Bow
This door hanger uses three ribbon styles at different widths. Build a layered bow using the following approach:
- Use the 2.5-inch peony ribbon (LS1216H2) for the largest outer loops. This is the most decorative ribbon and the one that communicates the peony theme most clearly. Make sure the peony print faces forward in the bow.
- Add loops of the 1.5-inch ribbon (RGH116689) for the mid-size layers, working them in between the peony ribbon loops so both prints are visible from the front.
- Use the 5/8-inch green ribbon (RGF1682EW) as bow tails and small accent loops tucked into the center of the bow. At this width, the green ribbon is a finishing detail rather than a structural loop, so use it where the color will be most visible.
Secure all loops at the center with 24 gauge wire or a pipe cleaner twisted tightly at the back. Fluff each loop after securing so the bow opens fully.
Step 4: Attach the Bow with Staples
Position the bow on the sign extender or at the top of the sign, directly in front of the greenery arrangement. Press the center of the bow flat against the surface and use 3/8-inch or 1/4-inch staples to staple through the bow center into the sign extender or sign backing.
Use the size of staple that suits the thickness of the bow center and the surface you are stapling into. For a thicker bow center, the 3/8-inch staples give a more secure hold. For a thinner center on a flatter surface, the 1/4-inch staples are sufficient.
Stapling the bow rather than gluing it keeps the bow in place through outdoor heat and humidity, which is a practical advantage for any door hanger displayed outside.
Step 5: Add Wired Jute Rope Accents
Cut short lengths of wired jute rope and tuck them into the bow center and throughout the greenery arrangement. The wired jute adds rustic texture that softens the contrast between the formal peony ribbon and the natural greenery. Because the rope is wired, each piece holds exactly the shape and angle you set it to without springing back.
A few short loops or curled pieces of jute tucked into the bow center and one or two pieces nestled between the pick stems are enough to add texture without overwhelming the design.
Step 6: Final Adjustments
Step back and check the overall shape from a distance. Adjust any greenery stems that are pointing in an unintended direction. Make sure the sign face is fully visible below the pick arrangement and bow. Fluff the bow loops and confirm the jute rope accents sit naturally within the design.
The finished door hanger should look full and layered above the sign with the peony print ribbon clearly visible in the bow and the sign face unobstructed below.
Tips for This Project
Attach the sign extender before anything else. It is difficult to add an extender cleanly once picks and ribbon are already in place. Setting up the extender and the jute rope hanger as the very first step gives you a clean, stable framework to build everything else on.
Fan the picks outward, not just upward. Picks placed straight up from the sign extender look stiff and unnatural. Fanning them at slight outward angles creates a softer, more organic arrangement that reads as intentional from a distance.
Staple first, then fluff. The same principle from the pink lemonade door hanger applies here. Staple the bow center flat against the surface before adjusting and fluffing the loops. Trying to staple a fully fluffed bow is difficult and tends to crush the loops.
Use zip ties for heavier pick stems. Eucalyptus picks can be heavier than they look, especially if they include multiple stems per pack. A zip tie through the stem and around the extender frame is more reliable than hot glue alone for picks that will hang on a front door through wind and heat.
Keep the sign face clear. The sign is the reason the door hanger exists. Check frequently as you build that the picks and bow are framing the sign rather than covering it. A pick that drifts in front of the sign face is the most common issue with sign extender builds and the easiest one to prevent by checking placement before gluing.

Learn how to start, operate, and scale your creative business!
Get more info about business and creative coaching at The Makers University.
Where to Display This Door Hanger
This peony door hanger works well for:
- A front door with a standard hook or command strip
- A covered porch wall or gate
- An interior entryway or mudroom for a seasonal accent
- A craft show booth as a mid-range price point piece that shows off the sign extender technique
The sign extender technique works for any season. Swapping the picks and ribbon for a different color palette makes the same build method work for autumn, winter, or any seasonal theme throughout the year.

