
If you have ever wanted to create a wreath that looks full but still sits flat on your door, this patriotic pancake wreath is a great one to try.
In this tutorial, Melissa shows how to build a red, white, and blue wreath using a pancake style base. This design combines mesh, ribbon, florals, and a focal sign to create a wreath that feels layered without being bulky.
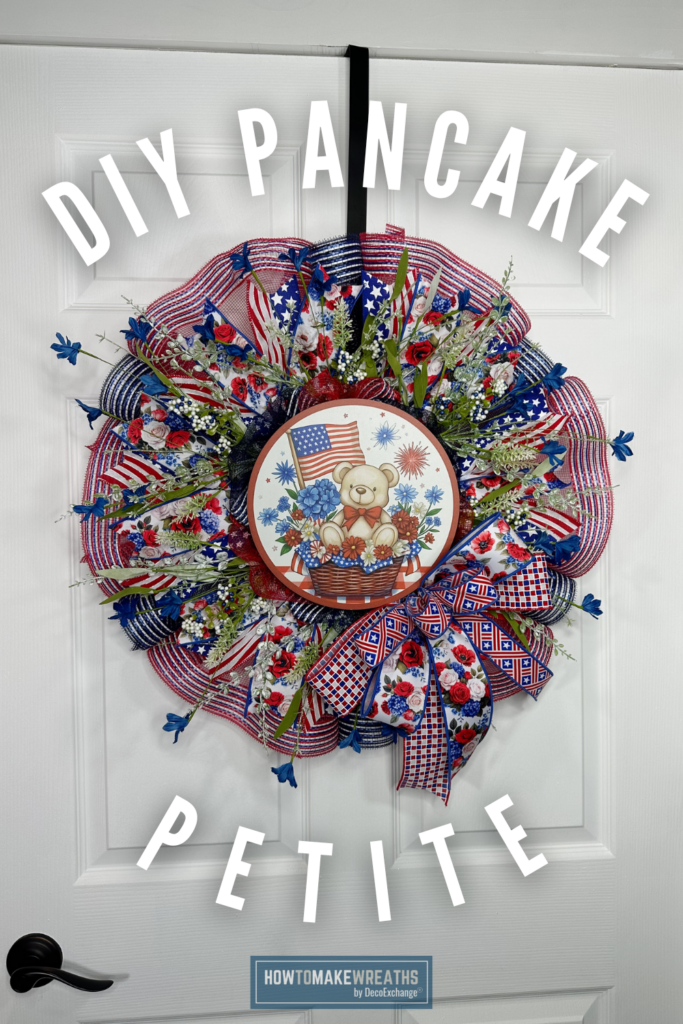
How to Make a Patriotic Pancake Wreath
This style is perfect for Memorial Day, the Fourth of July, or summer decorating.
Supplies Needed
Base
Mesh
- 10 inch red mesh RE8506H3 DecoExchange
- 10 inch blue mesh RE8506YA DecoExchange
Ribbon
- 2.5 inch red white and blue square ribbon, RGH1335A1 DecoExchange
- 1.5 inch star ribbon, RGH1298CA DecoExchange
- 2.5 inch floral ribbon, LS1246A1 DecoExchange
- 2.5 inch flag ribbon, RGH1169A1 DecoExchange
Florals and Greenery
- Blue Floral spray, FH807171 DecoExchange
Sign
- Round patriotic sign with focal design
Tools
- Pipe cleaners
- Zip ties
- Wire cutters
- Stapler or hot glue for sign if needed
Step by Step Instructions
Step 1. Build Your Mesh Base
Start by adding mesh to your pancake frame.
Cut your mesh into equal lengths and create ruffles or poofs depending on your preference. Attach each piece using pipe cleaners or zip ties.
Work your way around the frame, alternating colors to create that red, white, and blue pattern.
Because this is a pancake wreath, keep your mesh tight and controlled so it stays flat but full.
Step 2. Add a Second Layer for Depth
Once your base layer is complete, go back in with a second mesh or accent layer.
This helps fill in gaps and gives the wreath more dimension without adding too much bulk.
Alternate patterns like stripes and solids to keep the design interesting.
Step 3. Create and Attach Your Bow
Make a layered bow using your patriotic ribbons.
Start with your wider ribbon, then layer in smaller patterned ribbons to add detail. Mixing prints like florals, stars, and geometric patterns helps the bow stand out.
Attach your bow slightly off center on the wreath to create movement.
Step 4. Attach the Round Sign
Place your round sign in the center of the wreath.
Secure it using pipe cleaners through the frame or by attaching them to the back of the sign. Make sure the sign sits flat and does not shift.
If you have ever struggled with attaching a sign to a wreath, securing it in at least two places will keep it stable over time.
Step 5. Add Florals and Greenery
Now start adding your florals.
Place them around the sign and throughout the wreath to break up the mesh and ribbon. Use small clusters instead of spacing everything evenly.
Let some stems extend slightly outward to give the wreath a more natural look.
Step 6. Final Shaping and Adjustments
Take a step back and look at your wreath.
Fluff your mesh, adjust your ribbon loops, and reposition florals as needed. Make sure your colors feel balanced across the entire design.
This final step is what gives the wreath that finished, professional look.
Design Tips for Pancake Wreaths
- Keep your mesh tight to maintain a flat profile
- Alternate colors for a balanced look
- Mix ribbon patterns for visual interest
- Secure your sign in at least two places
- Use florals to break up bold mesh sections
Why This Wreath Works So Well
This design stands out because it combines:
- A structured pancake base
- Bold patriotic colors
- A clear focal point with the sign
- Layered textures from mesh, ribbon, and florals
It looks full and detailed without being overwhelming.

If you are working through your patriotic supplies or looking for a wreath that makes an impact on your front door, this is a great project to follow.
Once you understand the pancake wreath method, you can recreate this look for any season or theme.
Patriotic Pancake Petite Wreath
Materials
Base
- 1 Pancake wreath frame
Mesh
- 1 roll 10" red mesh RE8506H3 DecoExchange
- 1 roll 10" blue mesh RE8506YA DecoExchange
Ribbon
- 1 2.5" red white and blue square ribbon RGH1335A1 DecoExchange
- 1 1.5" star ribbon RGH1298CA DecoExchange
- 1 2.5" floral ribbon LS1246A1 DecoExchange
- 1 2.5" flag ribbon RGH1169A1 DecoExchange
Florals and Greenery
- Blue Floral spray FH807171 DecoExchange
Sign
- Round patriotic sign with focal design
Tools
- Pipe cleaners
- Zip ties
- Wire cutters
- Stapler or hot glue for sign if needed
Instructions
- Build your mesh base
- Cut red and blue mesh into equal lengths and form ruffles or poofs. Attach each piece to the pancake frame with pipe cleaners or zip ties, alternating colors as you work around the frame. Keep mesh tight and controlled to maintain the flat profile.
- Add a second layer for depth
- Go back in with a second mesh or accent layer to fill gaps and add dimension. Alternate stripe and solid patterns to keep the design interesting without adding bulk.
- Create and attach your bow
- Build a layered bow starting with the wider ribbon, then layer in the star, floral, and flag ribbons for detail. Attach the bow slightly off center to create movement.
- Attach the round sign
- Place the round sign in the center of the wreath and secure it using pipe cleaners through the frame in at least two places so it stays flat and does not shift.
- Add florals and greenery
- Place blue floral sprays around the sign and throughout the wreath in small clusters. Let some stems extend slightly outward for a natural look.
- Shape and adjust
- Fluff mesh, adjust ribbon loops, and reposition florals as needed. Step back and check that colors feel balanced across the full design before finishing.

