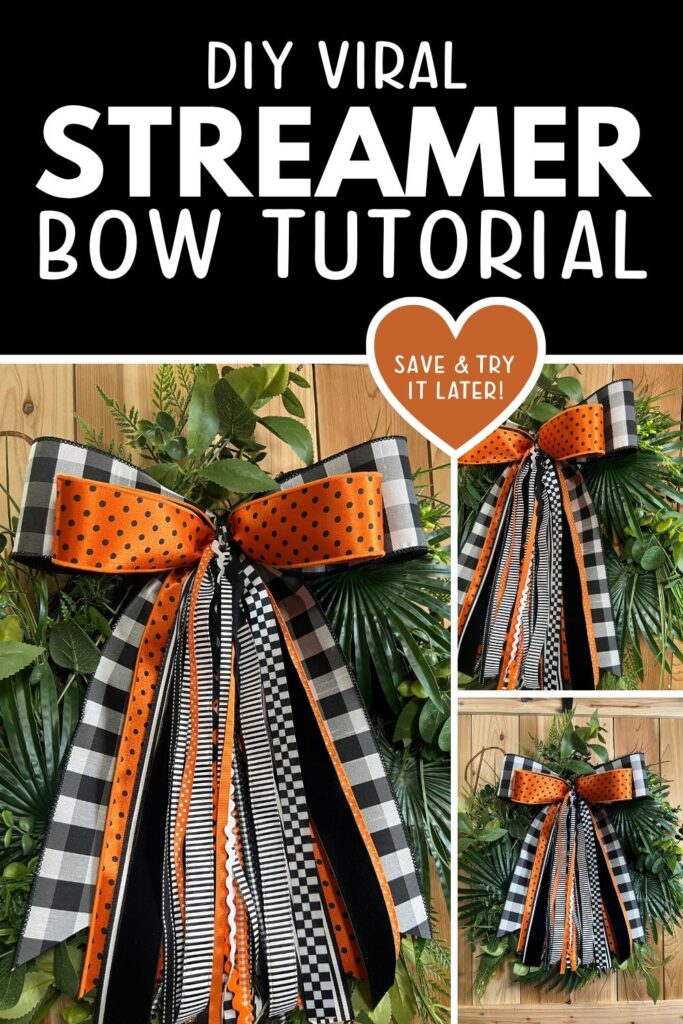
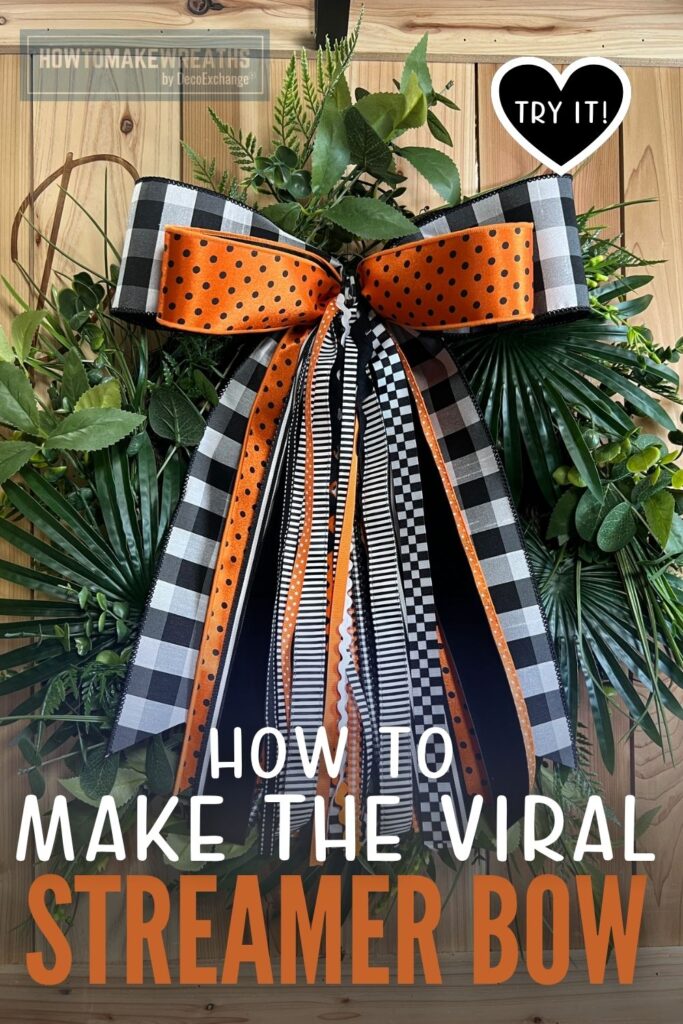
If you have seen those full, cascading bows with dozens of ribbon streamers flowing out from the center and wondered how they are made, this is the tutorial you have been looking for.
In this tutorial, Jordan shows how to build the viral streamer bow step by step using a structured wired ribbon base and 10 to 15 styles of unwired ribbon in various widths and textures. The result is a layered, flowing bow packed with ric rac, grosgrain, lace, velvet, satin, and more that works on wreaths, door hangers, gifts, lanterns, and just about anything else you want to decorate.
What is a Viral Streamer Bow?
The streamer bow is a style that took off on social media because of how full and textural it looks compared to a traditional looped bow. Instead of building the bow entirely from loops, the streamer bow uses a large wired ribbon base to establish the outer structure and then layers in dozens of unwired ribbon streamers that hang and cascade from the center. The mix of ribbon textures, including smooth satin, nubby ric rac, delicate lace, soft velvet, and crisp grosgrain, is what gives the bow its signature layered look.
The appeal of this bow style is that no two are exactly alike. Every maker ends up with a slightly different combination depending on the ribbons they choose, which makes it a great project for using up ribbon odds and ends.
Supply List
- 1 roll 4-inch wired ribbon
- 1 roll 2.5-inch wired ribbon
- 10 to 15 rolls or lengths of unwired ribbon, ranging from 1/2 inch to 1.5 inches wide, in a variety of styles including:
- Ric rac trim
- Grosgrain
- Lace
- Velvet
- Satin
- 24 gauge wire
- Scissors
How to Make the Viral Streamer Bow
Step 1: Gather and Prep Your Ribbons
Before you start building, lay out all of your ribbons. Having everything visible in front of you makes it easier to pull the right texture and color as you work rather than stopping to search mid-build.
Cut your unwired ribbons into streamer lengths. Most streamers look best between 8 and 14 inches long, but you can vary the lengths intentionally for a more cascading, layered effect. Cut more than you think you will need. It is easier to have extra streamers to pull from than to stop and cut more halfway through the bow.
Step 2: Build the Wired Ribbon Base
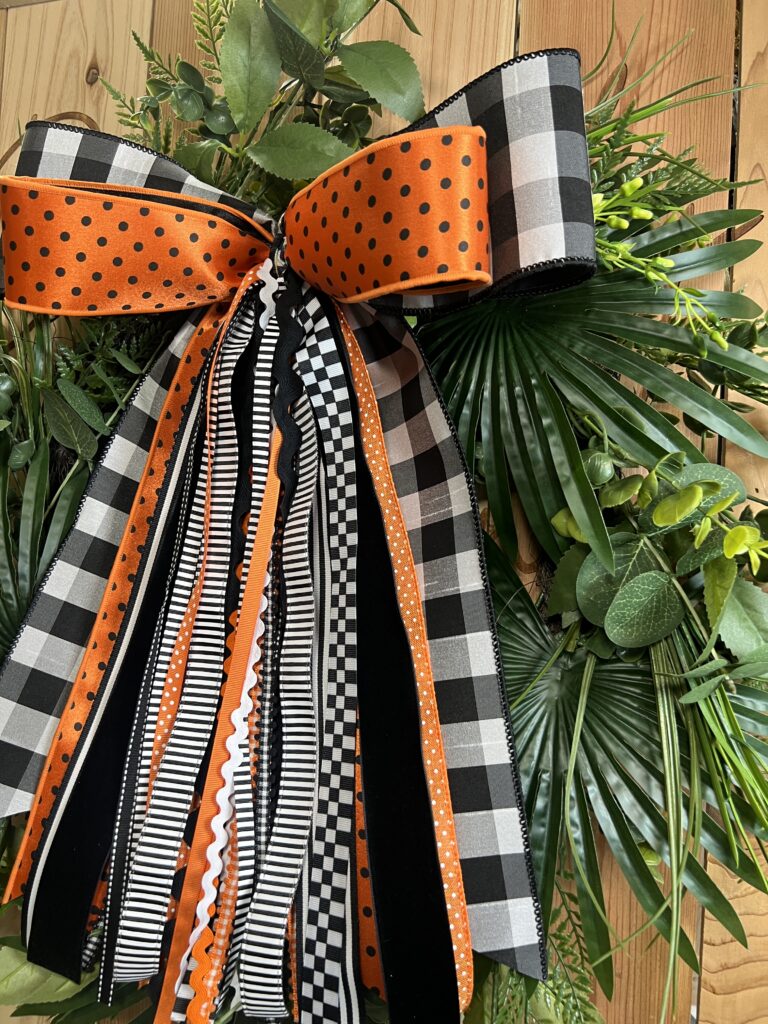
Start with the 4-inch wired ribbon. This is your widest ribbon and it forms the outer structure of the bow. Make three to four large loops with the 4-inch ribbon, pinching at the center after each loop. The 4-inch ribbon gives the bow its fullness and sets the overall size.
Add two to three loops of the 2.5-inch wired ribbon on top of the 4-inch base, positioning them slightly inside the larger loops so they add a second layer without covering the outer loops completely.
Wrap 24 gauge wire tightly around the center of both ribbon layers and twist securely at the back. Do not cut the wire tails yet because you will use them to attach the streamers and eventually secure the bow to your project.
Step 3: Add the Unwired Ribbon Streamers
This is the step that makes the streamer bow what it is. Take your pre-cut lengths of unwired ribbon and begin folding each one in half, then tucking the folded end under the wire at the center of the bow and pulling the two tails through the loop to create a lark’s head knot. Pull each streamer snug so it sits flush against the bow center.
Work through all of your ribbon styles, alternating textures as you go. Tuck in ric rac next to velvet, follow it with lace, then grosgrain, then satin. The goal is to have no two identical ribbons sitting directly next to each other so the variety of textures stays visible all the way around the bow center.
Continue adding streamers until the center of the bow is full and the wired base is no longer visible from the front. For a truly full streamer bow, 10 to 15 ribbon styles means you may end up with 30 or more individual streamer tails hanging from the center, depending on how many lengths you cut from each ribbon.
Step 4: Fluff the Wired Loops and Arrange the Streamers
Once all the streamers are in place, pull each wired ribbon loop up and out from the center to open the bow and give it dimension. The wired ribbon will hold whatever shape you set it to, so take your time positioning the outer loops until the bow looks full and balanced.
Arrange the streamer tails so they cascade naturally below and around the bow. You can leave them hanging straight for a more uniform look or separate and fan them out for a more dramatic, layered cascade. Trim any streamers that are noticeably longer than the rest, or leave the variation intentional for a relaxed, undone feel.
Step 5: Attach the Bow to Your Project
Use the wire tails from the center of the bow to attach it to a wreath, door hanger, lantern, or other project. Thread the wire tails through the attachment point and twist tightly at the back. If you are attaching the bow to a flat surface like a door hanger, hot glue works as well. Press the bow center firmly and hold for at least 30 seconds.
Tips for This Project
Use wired ribbon for the base only. The outer loops need to be wired so they hold their shape and give the bow structure. The streamers should be unwired so they hang and move naturally. Mixing wired and unwired ribbon in the streamer section makes the bow look stiff and uneven.
Vary your ribbon textures as much as possible. The visual appeal of a streamer bow comes from the mix of surfaces. A bow made entirely from grosgrain looks flat no matter how many streamers you add. Including at least one lace, one velvet, and one ric rac in your mix gives the bow the depth and texture that makes the style worth doing.
Cut streamers in at least two different lengths. Streamers all cut to the same length look uniform in a way that works against the relaxed, abundant feel of this bow style. Cutting some at 8 inches and others at 12 or 14 inches gives the finished bow a more natural cascade without looking messy.
Work with a color story, not a matched set. Streamer bows look best when the ribbons share a color palette rather than all being the exact same color family. A mix of creams, soft yellows, and blush tones in different textures reads as cohesive without being rigid. Choosing ribbons from a single tight palette keeps the bow from looking random even when the textures are very different from each other.
Pull ribbon odds and ends for this project. The streamer bow is one of the best ways to use up partial rolls and leftover lengths that are too short for a traditional bow but still have enough length for a streamer. If the ribbon fits the color story, it belongs in the bow.
Where to Use a Streamer Bow
Streamer bows work well on:
- Wreaths as a statement bow replacement
- Door hangers and wooden sign accents
- Lanterns and porch decor
- Gift wrapping for a handmade, high-end look
- Craft show displays as a featured eye-catching piece
- Garlands and swags as a bow focal point
Because the bow is built around unwired streamers, it has natural movement and looks especially good in covered outdoor spaces where a slight breeze makes the streamers shift and layer against each other.