
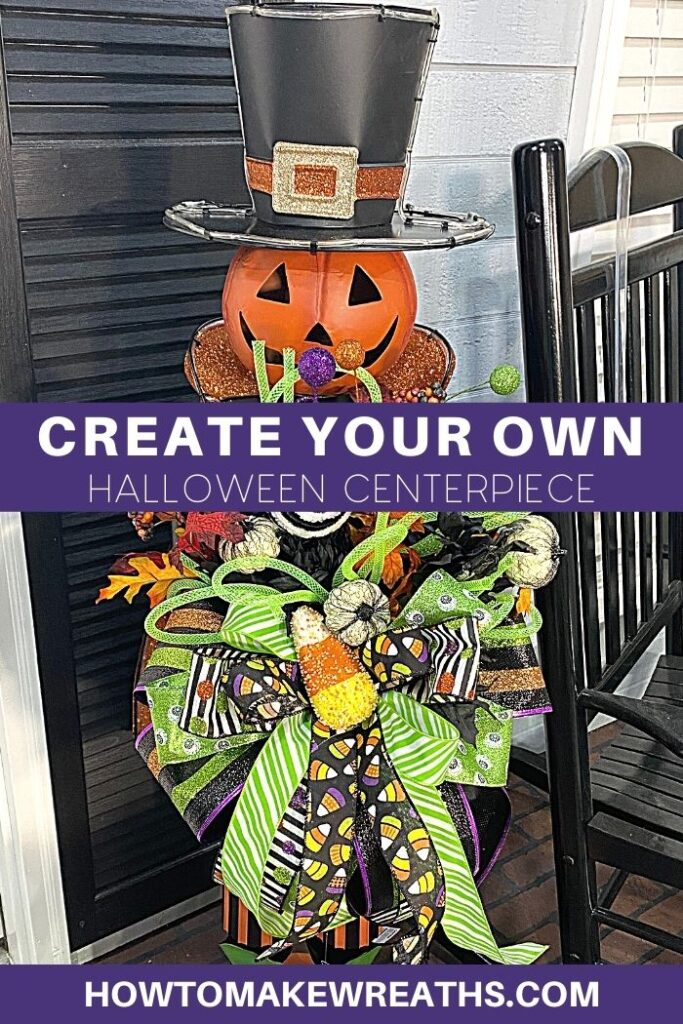
In this tutorial, I will teach you how to make the perfect Halloween centerpiece using a tin, floral foam spray, ribbon, and a lot of fun picks and sprays. The best part is that it’s so easy! You’ll be making these every year from now on.
I am an enthusiastic crafter and I love coming up with new ideas for centerpieces. This year, I wanted to make a centerpiece that was spooky but fun and perfect for Halloween! There are many different modifications you can make in this Halloween centerpiece but the one I am teaching you today is my favorite way to make this Halloween decor.
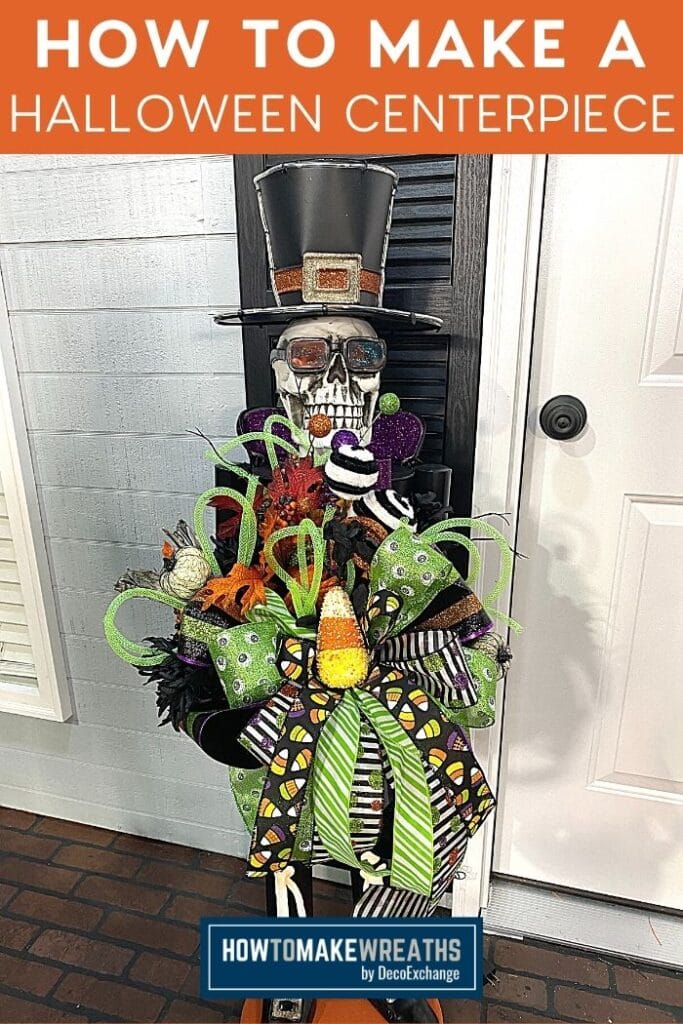
Halloween Centerpiece Tutorial
Want to add some spooky touches around your house for Halloween? Watch this tutorial or follow the step by steps below and you’ll learn how to make a brilliant centerpiece that will look great on each table. It can also be made into another type of decor. Watch and you will see exactly what I am talking about. You can also use the techniques in this guide with other holidays, so get creative!
Supplies for Halloween Centerpiece
- 2 Little Tin Buckets
- Floral Foam Filler
- 4″ wired ribbon, Halloween-themed
- 2.5″ wired ribbon decorative Halloween-themed
- 1.5” wired ribbon spring green ribbon, candy corn ribbon
- Candy Corn Pick Foam Accessories
- Fall Filler Leaf Bushes
- 2 Black Halloween Leaf Bushes
- Halloween Twirl Ball Whimsical Spray
- Deco Mesh Coil Tubing
- Floral Picks
- Pick Machine
- Hot Wire Styrofoam Cutter
- Pipe Cleaners
- Hot Glue Gun
- EZ Bow Maker
How to Make a Halloween Centerpiece
Before starting this centerpiece you will need to prep your tin buckets filling them with foam. I do this using styrofoam filler spray. Spray a bit in there and let it expand. Once it has completed expansion, use your hot wire cutting system to trim it flat. If you do not have that, just use a serrated knife. It just is a little messier that way. Once your foam is filled and set you are ready to start the steps!
Step #1: This first layer of the bow will have 3 loops. We’re going to measure out a 12-inch tail pointing down out of our Halloween colored ribbon. Pinch and twist it in the center. Slide it into the EZ Bow Maker. We want our pretty side up, ugly side down. We’re going to measure our loop out to 6.5 inches. Bringing it back through, twist it. We want a tail and a loop facing the same direction. That way we have our tail and our loop both pointing towards us. So we’re just making an X every time. Our first layer of loops will have two loops on one side and 1 loop on the other.
Step #2: For this next layer of 2.5” wired ribbon, we will have the exact opposite setup, with an ending product of 2 loops on the other side and 1 loop on the other. You will use another ribbon entirely. I chose a fun bright green ribbon with eyeballs.
Step #3: For this layer of ribbon, we will have one loop on both sides, with your tails still facing downward. I am using a 2.5” wired black and white striped ribbon, using the same technique of slide, pinch, and twist in the center of my EZ Bow Maker.
Step #4: Repeat steps to make your next layer of your bow with a 1.5” wired spring green ribbon. In this layer, there will just be 1 loop on each side and long tails.
Step #5: To finish up, I will create a 2 loop per side layer of the bow from a 1.5” candy corn wired ribbon. Cut from the spool, leaving your tails nice and long.
Step #6: Get 2 pipe cleaners and twist it together to make a longer pipe cleaner, then fold in half. Wrap it around all the layers of ribbon with the center of the pipe cleaner at the top. Hold the layers tight and holding each side of the pipe cleaner as close to the bow, twist nice and tight, and you’ll see the loops and tail start to form the bow.
Step #7: Make a second bow, just exactly the same one as the first one we just completed.
Step #8: With both bows complete, grab your pick machine. Slide your pipe cleaner in the pick machine. Push down firmly to clamp it off. Repeats for both bows.
Step #9: Insert each bow into one of your metal tins, shoving the picks down nice and deep towards the front. Your tails will flow down longer than your buckets.
Step #10: With wire cutters, trim your candy corn accessories from their picks. Hot glue directly on candy corns to add to the centers of your large bows. Hold in place.
Step #11: Grab your Fall Filler Leaf Bushes and trim the stem to fit easily inside your tin bucket. Slide down into foam so they are a start to building up your Halloween centerpiece.
Step #12: To bring in some more dark colors, grab your black Halloween Leaf Bush Sprays with white pumpkins. Trim pieces from the main stem to give you lots of pieces to work with. Fill in here and there, by bringing the black leaves to the tops of the stem so they are noticeable. Fill in both bushes, looking from all different angles so there are no gaps.
Step #13: To add some fun, pop in your Halloween Twirl Ball Whimsical Spray and insert into foam where you see fit. Have fun with it.
Step #14: Grab some Deco Mesh Coil Tubing, bright green, and put it in a bundle. Attach a pipe cleaner to the center, twisting nice and tight, to create a pick with your pick machine. This will allow for easy insertion into your Halloween Centerpiece. Slide-in several pieces where you like. Be sure to do this step for both centerpieces.
Step #15: To make your coil tubing stand up taller in your design, simply insert a floral pick into your foam. Use your pipe cleaner to wrap it around the floral pick. Add as many as you like to fill in any gaps. This gives your centerpieces a bit of funky character.
Start making your Halloween Centerpieces today!
Centerpieces are a great way to add some decorations to your Halloween decor this season. In this tutorial, I taught you how to add fun picks and stems as well as make some gorgeous bows to attach to each centerpiece. You can recreate this over and over with different holidays. Get creative and start making all the centerpieces you need ya’ll.
If you need any help with centerpiece-making, bow-making, wreath-making, or crafting in general, be sure to check out more of our tutorials on How to Make Wreaths.
We would love to see your beautiful summer wreaths! Please share with us over at the How To Make Wreaths Facebook Group.


Halloween Centerpiece Bow
Materials
- 2 Tin Buckets
- Floral Foam Filler
- 2 2.5" wired ribbon Halloween Themed
- 2 1.5 wired ribbon Spring Green, Candy Corn
- 2 picks and sprays Candy Corn
- Fall Filler Leaf Bush
- 2 Hallowen Leaf Bush Black
- Halloween Twirl Ball Whimiscal Spray
- Deco mesh tubing
- floral picks
- Pick machine
- Hot Wire Styrofoam Cutter
- pipe cleaners
- hot glue gun
- EZ Bow Maker
Instructions
- This first layer of bow will have 3 loops. We’re going to measure out a 12 inch tail pointing down out of our Halloween colored ribbon. Pinch and twist it in the center. Slide it into the EZ Bow Maker. We want our pretty side up, ugly side down. We’re going to measure our loop out to 6.5 inches. Bringing it back through, twist it. We want a tail and a loop facing the same direction. That way we have our tail and our loop both pointing towards us. So we’re just making an X every time. Our first layer of loops will have two loops on one side and 1 loop on the other.
- For this next layer of 2.5” wired ribbon, we will have the exact opposite set up, with an ending product of 2 loops on the other side and 1 loop on the other. You will use another ribbon entirely. I chose a fun bright green ribbon with eyeballs.
- For this layer of ribbon, we will have one loop on both sides, with your tails still facing downward. I am using a 2.5” wired black and white striped ribbon, using my same technique of slide, pinch, and twist in the center of my EZ Bow Maker.
- Repeat steps to make your next layer of your bow with a 1.5” wired spring green ribbon. In this layer there will just be 1 loop on each side, and long tails.
- To finish up, I will create a 2 loop per side layer of bow from a 1.5” candy corn wired ribbon. Cut from spool, leaving your tails nice and long.
- Get 2 pipe cleaners and twist it together to make a longer pipe cleaner, then fold in half. Wrap it around all the layers of ribbon with the center of the pipe cleaner at the top. Hold the layers tight and holding each side of the pipe cleaner as close to the bow, twist nice and tight, and you’ll see the loops and tail start to form the bow.
- Make a second bow, just exactly the same one as the first one we just completed.
- With both bows complete, grab your pick machine. Slide your pipe cleaner in the pick machine. Push down firmly to clamp it off. Repeats for both bows.
- Insert each bow into one of your metal tins, shoving the picks down in nice and deep towards the front. Your tails will flow down longer than your buckets.
- With wire cutters, trim your candy corn accessories from their picks. Hot glue directly on candy corns to add to the centers of your large bows. Hold in place.
- Grab your Fall Filler Leaf Bushes and trim stem to fit easily inside your tin bucket. Slide down into foam so they are a start to building up your Halloween centerpiece.
- To bring in some more dark colors, grab your black Halloween Leaf Bush Sprays with white pumpkins. Trim pieces from the main stem to give you lots of pieces to work with. Fill in here and there, by bringing the black leaves to the tops of the stem so they are noticeable. Fill in both bushes, looking from all different angles so there are no gaps.
- To add some fun, pop in your Halloween Twirl Ball Whimsical Spray and insert into foam where you see fit. Have fun with it.
- Grab some Deco Mesh Coil Tubing, bright green, and put in a bundle. Attach a pipe cleaner to the center, twisting nice and tight, to create a pick with your pick machine. This will allow for easy insertion into your Halloween Centerpiece. Slide in several pieces where you like. Be sure to do this step for both centerpieces.
- To make your coil tubing stand up taller in your design, simply insert a floral pick into your foam. Use your pipe cleaner to wrap it around the floral pick. Add as many as you like to fill in any gaps. This gives your centerpieces a bit of funky character.
Video
Just pin this Halloween Centerpiece tutorial to save the instructions for later!
If you love to craft, check out our Eat. Sleep. Craft. Repeat. t-shirts and click on the picture below!


