
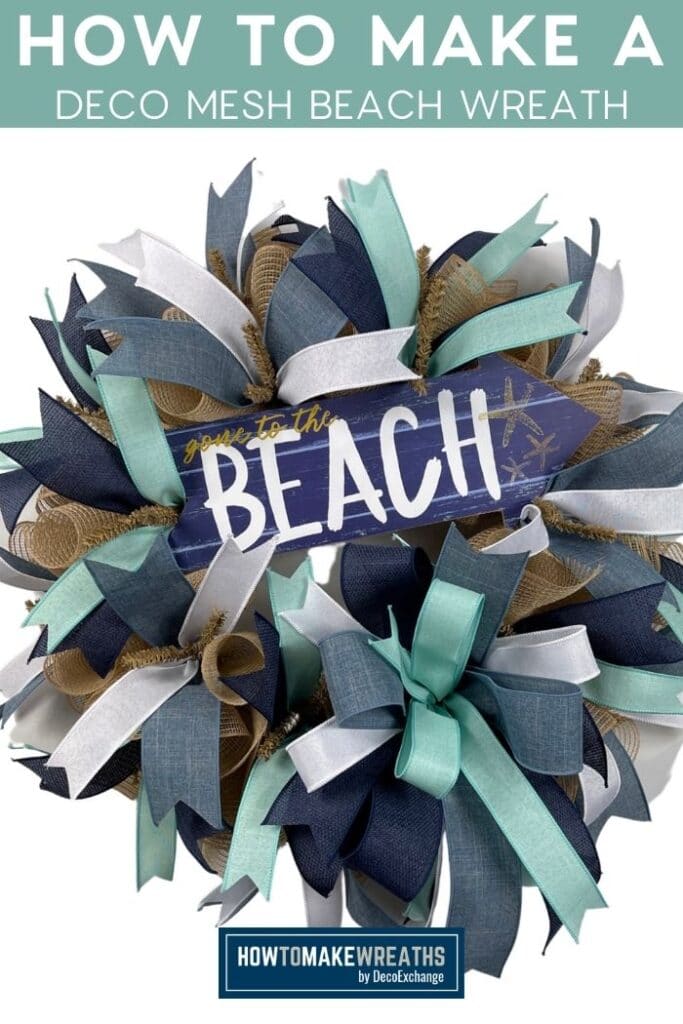
Hey y’all, I hope your summer is kicking off with a bang and you’re finding ample time to get your toes in the sand. Today I’m showing you how to make a Gone to the Beach deco mesh wreath that will remind you of the waves, even when you can’t be right in front of them!
One of the most popular wreath designs for summer are beach or nautical wreaths. And with good reason too! All those cool blues and calming green colors are pleasing to the eye and make us feel more relaxed. This Gone to the Beach deco mesh wreath is a great example of this. Parker did an amazing job picking out the ribbon colors for this one. And, when you add in the burlap, the whole project comes together beautifully! Whether you keep this one for yourself or offer it for sale in your shop, this summer wreath is sure to be a big hit.
DIY Gone to the Beach Deco Mesh Wreath
I don’t know about you, but after all the time we spent at home last year, getting out and about again has made this year seem like it’s moving in fast forward. Believe me, I’m not complaining! I’m just readjusting. It’s been amazing to be able to spend time with people and make plans again. If you are finding yourself feeling a little overwhelmed right now, know that you are not alone! Give yourself some grace and ease on in, friend. One way to ease in is to make sure you are getting some quality relaxing time. Possibly at the beach! I know that for many creatives, including myself, spending time in our craft rooms can also be therapeutic. I admit it, the easy repetition of ribbon tails can be very meditative!
If you are using regular rolls of ribbon for this wreath, you will find that you have enough left over to make at least one more bow. If you are making this wreath for yourself, you could use that bow on your mailbox or a light post. It’s a fun way to tie your outdoor decor together! If you offer the wreath for sale in your shop, you could offer the bow to your customers as an add on purchase. Or, if you’re feeling froggy, throw it in as a thank you gift to help build a relationship with your customers. If you want more tips on How to Use All Your Extra Wreath Making Supplies, we have a post for that too!
Change it up!
When you watch the video below you will hear me mention that the supplies I use for this wreath came in a kit. That kit is most likely sold out by now but don’t worry, you can still make this wreath! The ribbons that I use (denim, navy, turquoise, and white) are all pretty easy to get your hands on. And, so is the burlap mesh. Any beach sign with these shades will also work. Or, you could totally change it up!
Start with a beach sign that you like and just match the ribbons to it. Then just use the same methods I did to make yourself a beautiful summer wreath! If you are looking for more great summer designs you can check out our post Fun Summer Decorating Ideas That’ll Brighten Your Doorway. There are so many awesome wreath ideas to choose from!

4 ribbon bow
Instructions
- Get out your EZ Bow Maker and your ribbons. Start with a 2.5” ribbon, measure a 12” tail, twist the ribbon and then add it to the bow maker. Then make a 7” loop, twist, and add it to the bow maker. Make another loop on the other side then trim after am 8”tail.
- Next, use a 1.5" ribbon to do the same things but make your loops a little smaller this time.
- Use the other 2.5" ribbon to repeat the same process, again making your loops slightly smaller.
- For the last layer, repeat the same process with the other 1.5" ribbon.
- Take two pipe cleaners and twist the ends together to make one long pipe cleaner. Remove your bow from the bow maker and use the long pipe cleaner to secure the center of the bow twisting it off at the back.
Gone to the Beach Deco Mesh Wreath
Materials
Instructions
- Start by cutting 20 10" strips of your 10" mesh and 8 20" strips.
- Next, take 2 of your 10" strips and roll them into loose curls. Make and X with the curls and add the center of it to one of the ties on the bottom of wreath frame. Continue this process until all the ties on the bottom rung are full.
- Now take a 20" strip, curl up the ends just a bit, then scrunch it up the center to make a ruffle. Add the center or your ruffle to one of the ties on the top rung of the frame. Repeat this process until the whole top rung is full.
- Use the super glue to attach 4 mounting squares to the back of your sign. Then thread a pipe cleaner through the mounting squares and twist them to secure them in place.
- When your glue is dry, use the pipe cleaners to poke through the mesh and attach the sign to the top of your wreath.
- Next, add the bow in the same way to the bottom of the wreath.
- Now use the ribbon tail board to measure 8 14" tails of each of your ribbons. Dovetail the ends.
- Take one 1.5" ribbon and one 2.5" ribbon tail and place one on top of the other. Fold the tails in half and pinch the center together. Attach the center pinch to a twist tie on the wreath frame. Repeat with the remaining ribbon tails and twist ties, alternating your colors as you go.
- Finally, trim the tails of your bow to different lengths.
Video
I hope y’all love this “gone to the beach” deco mesh wreath. It’s one of my classic deco mesh designs but with a little twist. If you are looking for more ways to add some spice to this wreath you could always whip out your glue gun. Add some pretty flowers or cute shells and sand dollars to it. Any kind of beach themed embellishment could be fun. I’d just stay away from the sand. It could get a little messy and we already have glitter all over the place. Happy crafting, friends!
Just pin this Gone to the Beach deco mesh wreath tutorial below to find the instructions later!

CHECK OUT MORE GRAPEVINE WREATHS
If you need any help with centerpiece-making, bow-making, wreath-making, or crafting in general, be sure to check out more of our tutorials on How to Make Wreaths.
We would love to see your beautiful summer wreaths! Please share with us over at the How To Make Wreaths Facebook Group.

If you love to craft, check out our Eat. Sleep. Craft. Repeat. t-shirts and click on the picture below!


