
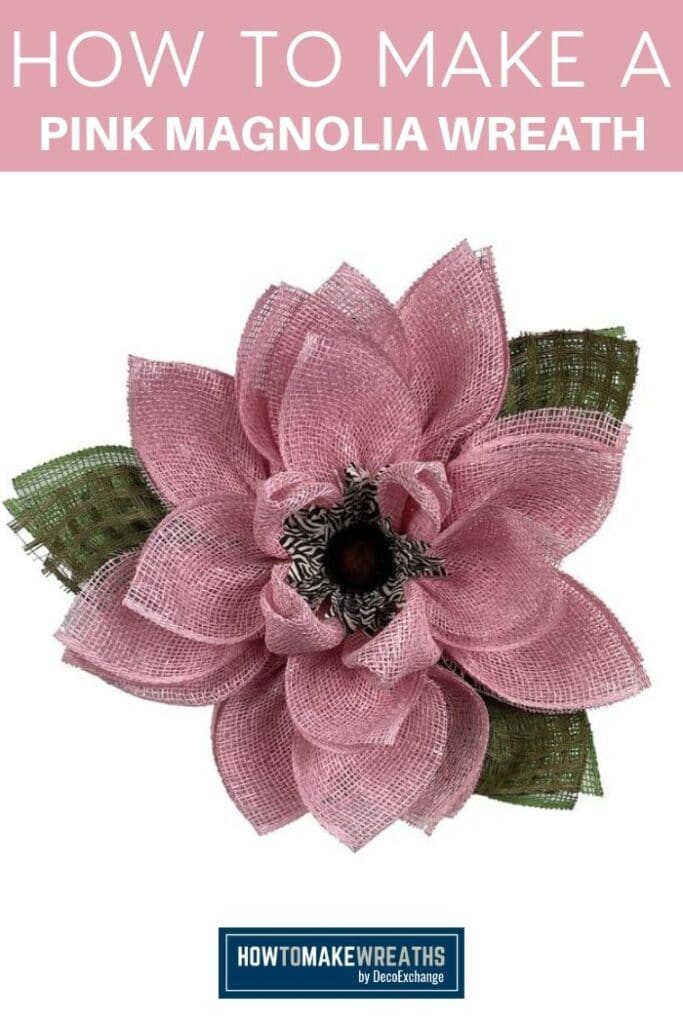
This Pink Magnolia Wreath is so simple, fun, and oh so beautiful you are going to want to create one of these for yourself. I am quite glad you are here to see exactly why I love it so much!
Here as you know we create lots of beautiful things. This Pink Magnolia Wreath falls right under that category, beautiful! We create wreaths of all sorts here with you live on our Facebook page, many with greenery, florals, ribbons, and bows. Some are fun and whimsical swags with bright and neutral colors. Let’s not forget about the magnificent centerpieces for all occasions. You too can create such beautiful things with just your hands and supplies of course!
Pink Magnolia Wreath Kit
Are you like me? Do you have a flower that you love more than others? One that just makes your heart happy? I love a good sunflower at the start of summer. Those bright yellows scream of sunshine and warmth. A pretty poinsettia in December just makes the holiday season so merry. But y’all. The beauty of magnolia has my heart in the spring. In fact, I sometimes wish they would stay in bloom longer because it is just so pretty. That could be why I love this wreath kit so much. It is almost as pretty as the real thing but doesn’t come with seasonal allergies.
In this step-by-step tutorial, I will walk you through how to create this beauty. You will learn how to work with mesh, a flower board, and why zip ties of all sizes were created! This craft is so simple, you will not believe how quickly you can create it. So stick around, and let’s have some fun with flowers. The kind of flowers that don’t require Zyrtec or Claritin to really enjoy!
Supplies You Need To Make Your Pink Magnolia Wreath
- UITC Flower Board
- Deco Mesh 30″ Light Pink
- Deco Mesh Light and Dark Green
- zip ties
- Wood burner and tempered glass cutting board
- cutting mat
- pipe cleaners
How to Create Your Own Pink Magnolia Wreath Kit
Step #1: With your Poly Deco mesh, lay it out on your measuring mat. Cut 8 pieces at 20” with your wood-burning tool. These will be used to create your flower pedals.
Step #2: Repeat to cut 8 more pieces of your mesh, measuring 10” this time. Set aside.
Step #3: Grab your 2 different colors of green poly deco mesh and cut 3 pieces about 10” in length for your leaves. You will have a total of 6 pieces of green mesh.
Step #4: Grab your Flower Board, and let’s prep it first visually. We will completely skip row 1 (The row on the outer ring of the circle). On the next row of your board, you will only use 3 sections, leaving 2 spots (4 holes) in between. I circled them with a dry erase marker just so I could stay organized. These will be where we add our leaves. In row 3, you will use every single set of holes. Again, I circled them with my marker. I am a visual learner, can you tell? This is where we will add our thicker petals.
Step #5: In the center of my board, we will focus first on the 4 alternating spots. Then we will connect the 4 holes in between with another zip tie. The formula should look like this on your flower board:
Row:
- 1 – empty
- 2 – 3 used 2 blank spots in between
- 3 – All of them used
- 4 – All of them used
Step #6: Now that you are visually prepared, let’s add in our zip ties to those specific spots on your flower board. I began on row 2 and then worked my way in. Leave about 1-1.5 inches of space in your sealed zip tie to insert our deco mesh with ease. We will tighten it as we work through this project.
Step #7: Grab your 1st 3 bright green pieces of deco mesh. Take your first piece, laying out flat and folding tip to tip to form a triangle. Pinch it out in the middle of that fold, and carefully gather the sides walking hands towards the middle.
Step #8: Hold tight in your hand, as you have formed the leaf shape. Secure together with a mini zip tie. Repeat for all 3 leaves of that color green.
Step #9: Grab your next color of light green pieces of deco mesh. Repeat to create your leaf, but before securing it with a zip tie, place it on top of the bright green leaf. This gives our leaves dimension and pops of colors.
Step #10: Holding 2 leaves together in one hand, place them into one of your 3 sections on row 2 of your flower board. Pull zip-tie tight and secure in place. Repeat for all 3 of your leaves on your flower board. Trim excess zip tie.
Step #11: Grab your 20” deco mesh pieces. These will be big and full to help cover all of that excess gray space on the flower board. We are only adding 1 extra fold from the steps of making your leaf. Lay it out flat horizontally. Fold it in half to create a square. Make sure you make a nice crease. Next fold it from tip to tip, again creating a triangular shape with your mesh. See, we are doing the same steps as you did when creating your leaf. Pull out from the middle on the crease, pinch, and ruffle the edges in by walking hands together. A cuplike shape should form to create your petal.
Step #12: Keeping tight in your hand, add your 20” petals all the way around row 3 of your flower board. Repeat until that whole row is complete. If you have a petal that is not looking so great, try flipping it over to the other side of the mesh. You can easily reform the cuplike shape to go the opposite direction.
Step #13: Don’t forget to trim the excess zip ties.
Step #14: Make the next row of petals with the 10” deco mesh pieces. Layout flat as a square, pull from the middle, pinch, ruffle edges, and add to the inside section. Remember we will be adding them to every other spot, so they will lay between the 20” pieces. Repeat all the way around, using only 4 pieces of your deco mesh.
Step #15: We will create a new type of pedal with the remaining pieces. Lay 1 of your 10” mesh out flat and fold tip to tip to create a triangle. On the corners of the triangle, fold in half so the corners meet. You will see the 2 tips of the newly formed triangle. Slide those 2 tips together across the table until they meet. You will see a little bit of an open gap with that, so I cheat and hot glue that gap shut with a tiny little line on the lip. Quickly squeeze it together, pinching the gap shut. You should see a petal form.
Step #16: Insert that pointy end of the petal into your flower board in those openings in the center. Pull tight with your zip tie. You will see that it starts to lift, creating dimension on your pink magnolia. Repeat with the remaining pieces of deco mesh.
Step #17: Grab your Zebra Print sunflower and add a whole lot of hot glue on the base and stem of the flower. Insert it right into the center of your magnolia flower.
Step #18: Step back and observe your flower. If you have some spots that are lacking or looking less than ideal, let’s fix that. I know I did.
Step #19: Looking at your bottom layer of flowers, we will pull them up a bit from the base. Then spread every other petal on the back and begin to hide the flower board. You will separate those flower petals, every other one on your board.
Step #20: To create our wreath hanger, flip your flower board over to the back. Identify where the Plus 1 marking is on your board. This will be where we place our pipe cleaner. Cut your pipe cleaner in half, run it through the holes, and twist it off tight. Don’t forget to leave an inch or so of space so you can actually hang your work.
Step #21: Adjust, fluff, and decide where you will be hanging this beauty.
Final Thoughts
Deco mesh is so much fun to work with! I love that it comes in a variety of colors and textures. And honestly, I really have a hard time deciding what I love more, the colors or textures. Ok, I decided. The texture is just plain dreamy. But… think of the beautiful garden wall you could create just by changing your colors of mesh. I am getting excited just visualizing its beauty. Ahhhh! I love this pink magnolia wreath! See why it is my favorite flower?
Conclusion
If you need any help with centerpiece-making, bow-making, wreath-making, or crafting in general, be sure to check out more of our tutorials on How to Make Wreaths.
We would love to see your beautiful summer wreaths! Please share with us over at the How To Make Wreaths Facebook Group.

Pink Magnolia Wreath
Materials
- UITC Flower Board
- Deco Mesh 30" Light Pink
- Deco Mesh Light and Dark Green
- zip ties
- Wood burner and tempered glass cutting board
- cutting mat
- pipe cleaners
Instructions
- With your Poly Deco mesh, lay it out on your measuring mat. Cut 8 pieces at 20” with your wood burning tool. These will be used to create your flower pedals.
- Repeat to cut 8 more pieces of your mesh, measuring 10” this time. Set aside.
- Grab your 2 different colors of green poly deco mesh and cut 3 pieces about 10” in length for your leaves. You will have a total of 6 pieces of green mesh.
- Grab your Flower Board, and let’s prep it first visually. We will completely skip row 1 (The row on the outer ring of the circle). On the next row of your board, you will only use 3 sections, leaving 2 spots (4 holes) in between. I circled them with a dry erase marker just so I could stay organized. These will be where we add our leaves. On row 3, you will use every single set of holes. Again, I circled them with my marker. I am a visual learner, can you tell? This is where we will add our thicker petals.
- In the center of my board, we will focus first on the 4 alternating spots. Then we will connect the 4 holes in between with another zip tie.The formula should look like this on your flower board:Row 1 – emptyRow 2 – 3 used, 2 blanks spots in betweenRow 3 – All of them usedRow 4 – All of them used
- Now that you are visually prepared, let's add in our zip ties to those specific spots on your flower board. I began on row 2 and then worked my way in. Leave about 1-1.5 inches of space in your sealed zip tie to insert our deco mesh with ease. We will tighten as we work through this project.
- Grab your 1st 3 bright green pieces of deco mesh. Take your first piece, laying out flat and folding tip to tip to form a triangle. Pinch it out in the middle of that fold, and carefully gather the sides walking hands towards the middle.
- Hold tight in your hand, as you have formed the leaf shape. Secure together with a mini zip tie. Repeat for all 3 leaves of that color green.
- Grab your next color of light green pieces of deco mesh. Repeat to create your leaf, but before securing it with a zip tie, place it on top of the bright green leaf. This gives our leaves dimension and pops of colors.
- Holding 2 leaves together in one hand, place into one of your 3 sections on row 2 of your flower board. Pull zip tie tight and secure in place. Repeat for all 3 of your leaves on your flower board. Trim excess zip tie.
- Grab your 20” deco mesh pieces. These will be big and full to help cover all of that excess gray space on the flower board. We are only adding 1 extra fold from the steps of making your leaf. Lay it out flat horizontally. Fold it in half to create a square. Make sure you make a nice crease. Next fold it from tip to tip, again creating a triangular shape with your mesh. See, we are doing the same steps as you did when creating your leaf. Pull out from the middle on crease, pinch, and ruffle the edges in by walking hands together. A cuplike shape should form to create your petal.
- Keeping tight in your hand, add your 20” petals all the way around row 3 of your flower board. Repeat until that whole row is complete. If you have a petal that is not looking so great, try flipping it over to the other side of the mesh. You can easily reform the cuplike shape to go the opposite direction.
- Make the next row of petals with the 10” deco mesh pieces. Lay out flat as a square, pull from the middle, pinch, ruffle edges, and add to the inside section. Remember we will be adding them to every other spot, so they will lay between the 20” pieces. Repeat all the way around, using only 4 pieces of your deco mesh.
- We will create a new type of pedal with the remaining pieces. Lay 1 of your 10” mesh out flat and fold tip to tip to create a triangle. On the corners of the triangle, fold in half so the corners meet. You will see the 2 tips of the newly formed triangle. Slide those 2 tips together across the table until they meet. You will see a little bit of an open gap with that, so I cheat and hot glue that gap shut with a tiny little line on the lip. Quickly squeeze it together, pinching the gap shut. You should see a petal form.
- Insert that pointy end of the petal into your flower board in those openings in the center. Pull tight with your zip tie. You will see that it starts to lift, creating dimension on your pink magnolia. Repeat with the remaining pieces of deco mesh.
- Grab your Zebra Print sunflower and add a whole lot of hot glue on the base and stem of the flower. Insert it right into the center of your magnolia flower.
- Step back and observe your flower. If you have some spots that are lacking or looking less than ideal, let’s fix that. I know I did.
- Looking at your bottom layer of flowers, we will pull them up a bit from the base. Then spread every other petal on the back and begin to hide the flower board. You will separate those flower petals, every other one on your board.
- To create our wreath hanger, flip your flower board over to the back. Identify where the Plus 1 marking is on your board. This will be where we place our pipe cleaner. Cut your pipe cleaner in half, run it through the holes, and twist it off tight. Don’t forget to leave an inch or so of space so you can actually hang your work.
- Adjust, fluff, and decide where you will be hanging this beauty.
Video
Just pin this pink magnolia wreath kit tutorial to save the instructions for later!

If you love to craft, check out our Eat. Sleep. Craft. Repeat. t-shirts and click on the picture below!


I’ve never seen 30″ mesh. Only 21″. Where do you buy it?