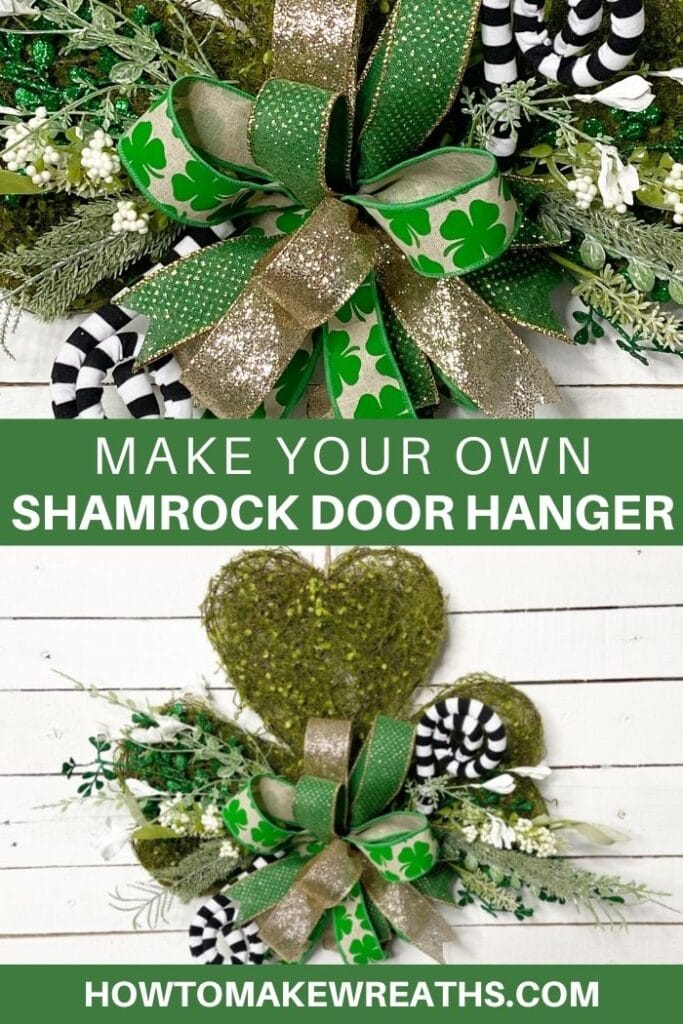
Learn how to make your own St. Patrick’s Day door hanger using this shamrock wreath form making the cutest Shamrock door hanger for your front door.
Are you one of those who believe in superstition? Good fortunes? And of course, the luck can only be found from a 4-leaf clover? Well, you better believe I am. I am always on the hunt for one of those little guys. A little good luck never hurt anybody. And y’all, when I found these super cute shamrocks, I felt just as lucky as if I had found the elusive 4-leaf clover itself! I mean, come on…. Look at it!
This shamrock is just too cute! All we will need is just a little bit of added florals here and there, a funky bow, and some fancy embellishments for this simple DIY spring craft. Do you believe me when I say we can create an adorable Shamrock Door Hanger in little to no time at all? Like less than 15 minutes. Feeling lucky? I know I am. Let’s get started!
SHAMROCK DOOR HANGER
This spring DIY craft is not over-the-top at all! Because you know those cute, little leprechauns are pretty mild-mannered little people. With this craft, I will show you how to keep it simple. I love the natural look of it, letting the beautiful elements speak for themselves. Adding a funky bow, which I will teach how to make, will be a fun added a focal point to this base. A little green pop of glitter helps keep the lucky little leprechaun vibe too, which I want y’all!
If you want to be a little extra, I will show you how to reach that goal, by adding a few extra pieces that will instantly create a more whimsical feel. You will love the simplicity of this craft. Following along with me all the way will help you feel like you have stumbled upon a crafting pot of gold! Let me teach you all my tips and tricks.
Supplies
- Shamrock Door Hanger
- floral picks White Floral stems
- greenery stems Green Glittery Leafy Stem
- 3 2.5″ wired ribbon Emerald Green Ribbon, Gold Polka Dot Ribbon, Shamrock Ribbon
- picks and sprays Black & White Curly Q stems
- Floral Wire
- Hot Glue gun
- Zip Tie
- wire cutters
- Pick machine
HOW TO MAKE A/ MAKE YOUR OWN SHAMROCK DOOR HANGER
Step #1: Grab your Shamrock door hanger and remove the tags. Do not remove the door hanging string. We will use that bad boy for sure.
Step #2: Next grab your White Floral Stems from DecoExchange. Maneuver the flowers extra carefully to naturally divide them out into 3 sections from your main bundle. Simply rip them from the main bundle and trim excess. Save the excess bundle for another project.
Step #3 Grab 2 pieces of your florals and connect the stems together and wrap tightly with your 26 gauge Paddle Wire. This will help secure those wispy sections before adding to your shamrock. Set aside.
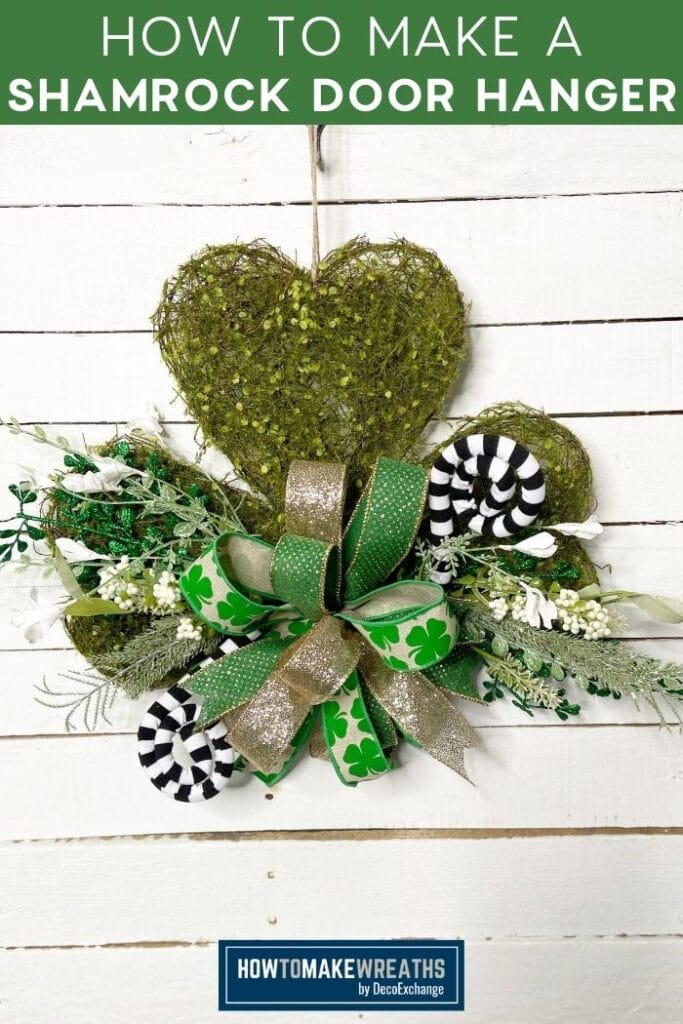
Step #4 Grab your Glittery Green Leafy Stem and cut off 2 pieces from the main bundle. Place those down on your shamrock, resting out to the left and right, just above the stem of your shamrock. Layer your white floral bundle sections on top. Hold in place and with a zip tie, going directly through your base, push it through. Go right back up to the top side, and secure it tightly. Trim excess zip tie. Fluff and fancy your florals to make the shamrock embellishments all 3d. Set aside.
Step #5 Next will be the Miniature Funky Bow. Grab your 3 different ribbons and cut your 6 tails all measuring 24”. You should have 2 of each color.
Step #6 With your Shamrock ribbon first, fold in half, and “wring its neck.” That just means determining how long you want your loop to be, then twisting it to form a secure loop. I personally like a loop of about 5-6”. Then twist your back ribbon tail so both sides of the pretty printed design are showing. Repeat as you alternate each of your ribbon colors to form your bow. Have fun with your loops sizing, as I mixed them up as I created. I prefer a graduated look for my bows, but you do. Twist, fluff, and adjust.
Step #7 To secure, grab your zip tie and pull tight. Trim excess. Before connecting your funky bow, move your loops to the placement you are happy with. Twist, fluff, and adjust. Place your funky bow on your shamrock base, working another zip tie down through the guts. Pull it back through the top and secure, pulling tight. Clip it at the base.
Step #8 With your ribbon tails, create some short fly-away tails by making a few a little smaller than others. Then dovetails the extra. This creates a firecracker allusion for your cute little funky bow. If you wanted to leave some long tails, you could do that too! Curl those up as an added touch!
Step #9 Stop here if you want to keep a natural look for your door! Because it is just so cute!
Step #10 If you wanted to create a funky, whimsical look, think of adding in some cute Black & White Curly Q’s. Hot glue those stems in under your bow poking in and out all over. Use a pick machine if necessary. Be careful not to work your picks through your shamrock base, so they don’t poke through. You do not want to scratch up anyone’s door.
Step #11 Determine where to hang this adorable door hanger, be it in a dorm room, small door, or wherever! I just love how much cuteness is packed into this little craft!
So what do you think? Are you feeling extra lucky that you stumbled upon this blog post? Perhaps maybe even feeling extra lucky and want to craft something else, because you had so much fun? Are you feeling extra lucky, like you’re looking into a Vegas trip? Well, whatever level of luck you are feeling, you deserve it! Nice work on making an adorable Shamrock Door Hanger in less than 15 minutes with me today. And truly, I am the lucky one. Thanks for crafting with me. See you next time!
If you need any help with centerpiece-making, bow-making, wreath-making, or crafting in general, be sure to check out more of our tutorials on How to Make Wreaths.
We would love to see your beautiful summer wreaths! Please share with us over at the How To Make Wreaths Facebook Group.

Shamrock Door Hanger
Materials
- Shamrock Door Hanger
- floral picks White Floral stems
- greenery stems Green Glittery Leafy Stem
- 3 2.5" wired ribbon Emerald Green Ribbon, Gold Polka Dot Ribbon, Shamrock Ribbon
- picks and sprays Black & White Curly Q stems
- Floral Wire
- Hot Glue gun
- Zip Tie
- wire cutters
- Pick machine
Instructions
- Grab your Shamrock door hanger and remove the tags. Do not remove the door hanging string
- Next grab your White Floral Stems from Deco exchange. Maneuver the flowers extra carefully to naturally divide out into 3 sections from your main bundle. Simply rip them from the main bundle and trim excess. Save the excess bundle for another project.
- Grab 2 pieces of your florals and connect the stems together and wrap tight with your 26 gauge Paddle Wire. This will help secure those wispy sections before adding to your shamrock. Set aside
- Grab your Glittery Green Leafy Stem and cut off 2 pieces from the main bundle. Place those down on your shamrock, resting out to the left and right, just above the stem of your shamrock. Layer your white floral bundle sections on top. Hold in place and with a zip tie, going directly through your base, push it through. Go right back up to the top side, and secure it tight. Trim excess zip tie. Fluff and fancy your florals to make the shamrock embellishments all 3d. Set aside.
- Next will be the Miniature Funky Bow. Grab your 3 different ribbons and cut your 6 tails all measuring 24”. You should have 2 of each color
- With your Shamrock ribbon first, fold in half, and “Wring its neck.” That just means determine how long you want your loop to be, then twist it to form a secure loop. I personally like a loop of about 5-6”. Then twist your back ribbon tail so both sides of the pretty printed design are showing. Repeat as you alternate each of your ribbon colors to form your bow. Have fun with your loops sizing, as I mixed them up as I created. I prefer a graduated look for my bows, but you do do. Twist, fluff, and adjust.
- To secure, grab your zip tie and pull tight. Trim excess. Before connecting your funky bow, move your loops to the placement you are happy with. Twist, fluff, and adjust. Place your funky bow on your shamrock base, working another zip tie down through the guts. Pull it back though the top and secure, pulling tight. Clip it at the base.
- With your ribbon tails, create some short fly away tails by making a few a little smaller than others. Then dovetails the extra. This creates a firecracker allusion for your cute little funky bow. If you wanted to leave some long tails, you could do that too! Curl those up as an added touch!
- Stop here if you want to keep a natural look for your door! Because it is just so cute!
- If you wanted to create a funky, whimsical look, think of adding in some cute Black & White Curly Q’s. Hot glue those stems in under your bow poking in and out all over. Use a pick machine if necessary. Be careful not to work your picks through your shamrock base, so they don’t poke through. You do not want to scratch up anyone’s door.
- Determine where to hang this adorable door hanger, be it in a dorm room, small door, or wherever! I just love how much cuteness is packed into this little craft!
Video
Just pin this shamrock door hanger tutorial to save the instructions for later!