
We’re having fun with some succulents with this easy DIY succulent grapevine wreath. We’re using faux succulents in this design, but you could absolutely get brave and use live succulents as well.
Meghan Fugate from Gals vs Glue Gun recorded this exclusively on the blog!
In this tutorial, you’re going to use lots of greens, with different texture and color combinations.

How to Make a Succulent Grapevine Wreath
Here’s a list of all the things you’ll need to make this wreath.
Tools
- Scissors
- Wire cutters
- Hot glue gun
Supplies
- Various small succulents
- Mossy greenery
- White filler flower bush (60919)
- Boxwood Bush PF1648
- 4″ black and white stripe wired ribbon
- 1.5″ polka dot wired ribbon
- 1.5″ faux burlap wired ribbon
- 7/8″ solid black ribbon
- Pipe cleaners
- Zip ties
How to Add Greenery Stems
Bend the individual stems in the mossy green stem outward in opposite directions, so that it creates a center for your bow placement.
Repeat the same process with the white filler flower bush. Trim any excess stem and layer under the mossy green pick.
Secure stems together with a zip tie. Trim extra zip tie tail.
Incorporate some of the white stems forward to make it look like one large stem versus two stacked pieces.
Add the stacked greenery slightly more towards the center vines on the left side. This gives your bow loops a little space to breathe without it looking like it’s just flopping over the side. Secure into place with a zip tie.
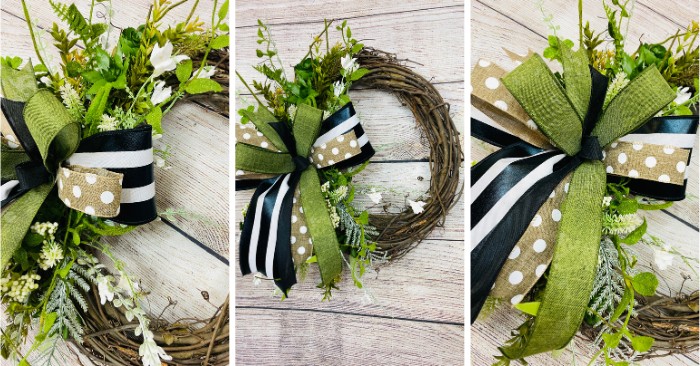
How to Create a Funky Bow for Succulent Wreath
Using the 4″ ribbon, create a 6″ tail, twist and create one 5.5″ loop. Leave a 6″ tail.
Next add in the 1.5″ ribbon creating a loop on the opposite side of that first loop. Twist and create another loop on the same side of that 4″ ribbon loop. Trim ribbon leaving a 6″ tail.
Next incorporate your 1.5″ faux burlap ribbon creating 1 slightly smaller loop on each side. Leave 6″ tails.
Finally, grab that 7/8″ ribbon for the final single center loop.
Take an extra long pipe cleaner and double wrap the bow twist tight.
Fluff out your bow and position the loops and tails.
Attach the bow at the center of the stem bunch you added earlier.
Cut the 7/8″ tail at an angle and dovetail the rest of the tails.
Finishing Touches
Let’s fill in some of the thin areas to extend the design outward with the boxwood bush.
Hot glue into place in between the grapevines.
Last but not least, let’s add the succulents. Hot glue to secure into place.
Succulent Grapevine Wreath FAQs
Which side of the grapevine do you cover up with your design?
Give that grapevine a quick peek and pick the smoother side to face the back towards the door. We don’t need our grapevines scratching up the paint on someone’s front door.
Next, looking at the front facing side, determine if the left or right side has a nicer natural look. We can keep that side exposed while designing on the opposite side.
How do you create longer zip ties out of shorter ones?
Add the tail of one zip tie to the clasp of another zip tie. Make sure it’s the “locking” side so that extended zip ties falls out of place.
Can you use real succulents?
Yes, hot glue will NOT harm your succulents. It actually gets tackier faster than cold glue, which make securing them into place a lot easier.
You can also attach real succulents to driftwood, gravel, pottery, and more!

Faux Succulent Grapevine Wreath
Equipment
Materials
- Various small succulents
- Mossy greenery
- White filler flower bush 60919
- Boxwood Bush PF1648
- 4 ″ black and white stripe wired ribbon
- 1.5 ″ polka dot wired ribbon
- 1.5 ″ faux burlap wired ribbon
- 7/8 ″ solid black ribbon
- Pipe cleaners
- Zip ties
Instructions
How to Add Greenery Stems
- Bend the individual stems in the mossy green stem outward in opposite directions, so that it creates a center for your bow placement.
- Repeat the same process with the white filler flower bush. Trim any excess stem and layer under the mossy green pick.
- Secure stems together with a zip tie. Trim extra zip tie tail.
- Incorporate some of the white stems forward to make it look like one large stem versus two stacked pieces.
- Add the stacked greenery slightly more towards the center vines on the left side. This gives your bow loops a little space to breathe without it looking like it’s just flopping over the side. Secure into place with a zip tie.
How to Create a Funky Bow for Succulent Wreath
- Using the 4″ ribbon, create a 6″ tail, twist and create one 5.5″ loop. Leave a 6″ tail.
- Next add in the 1.5″ ribbon creating a loop on the opposite side of that first loop. Twist and create another loop on the same side of that 4″ ribbon loop. Trim ribbon leaving a 6″ tail.
- Next incorporate your 1.5″ faux burlap ribbon creating 1 slightly smaller loop on each side. Leave 6″ tails.
- Finally, grab that 7/8″ ribbon for the final single center loop.
- Take an extra long pipe cleaner and double wrap the bow twist tight.
- Fluff out your bow and position the loops and tails.
- Attach the bow at the center of the stem bunch you added earlier.
- Cut the 7/8″ tail at an angle and dovetail the rest of the tails.
Finishing Touches
- Let’s fill in some of the thin areas to extend the design outward with the boxwood bush.
- Hot glue into place in between the grapevines.
- Last but not least, let’s add the succulents. Hot glue to secure into place.

