
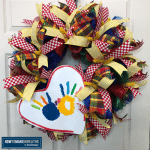
April is Autism Awareness Month, and what better way to help spread the word than creating an autism awareness wreath? Make and hang this one on your front door—it’s for a great cause!
This is one of my favorite wreaths, y’all, because it’s for a cause that we are very proud to support: autism awareness. We all know someone who is affected by autism, and this DIY wreath is a great way to pay tribute. Whether you choose to display this on your front door to start conversations with neighbors or make several of these to sell and donate to a charity, your contribution matters and is needed!

Video: Autism Awareness Wreath
This design is made with 10″ curls of mesh attached to a basic wreath form. Watch and craft alongside me and learn all my tricks for making this autism awareness wreath!
DIY Autism Wreath
Materials
Instructions
- Fluff out wreath form
- Take your 21" deco mesh and make 10" poofs between each wreath tie on the top and 12" poofs around the bottom.
- Using the bottom twist ties, use the deco mesh and fill in the middle to give a fuller look.
- Take wreath sign, add craft foam pieces to each corner of your sign.
- Get 4 pipe cleaners and staple each pipe cleaner to the craft foam pieces. Twist and tighten each of the pipe cleaners.
- Now we'll be making a bow. Get out your Pro Bow and ribbons.
- Put pegs on row D, and cutting (6) 24" floral wire.
- Let's start with our first ribbon (1.5" ribbon). Measure out about 7-inches for the tail. Take a wire and fold it in half, give it a pinch around the ribbon, and we're going to tie it off. Wrap the ribbon around your center peg. Pinch on the bottom peg, twist, and tie it off on the top.
- Now that you have your center loop, you'll need to add your second wire. Fold the wire in half and work it through.
- Take your 1.5" ribbon, trim into a dovetail, Measure out about 7-inches for the tail. Take a wire and fold it in half, give it a pinch around the ribbon, and we're going to tie if off. Wrap the ribbon around the next peg. Pinch on the bottom peg, twist, and loop on the other side. Cut the dovetail. Tie off with the wire.
- Repeat the step above until all the pegs are used working your way outwards from the center peg.
- Take your coordinating ribbon with your center loop and another 2.5" ribbon together around the last peg, cut the dovetail, and tie of with the wire.
- Once you're done, tie off, unwrap the first wire from the top and bottom from when you first started. Take off your bow from the Pro Bow.
- Repeat steps 8-13 to make more 2 bows.
- Get out your ribbon tail board, 2.5" ribbon, and (2) 1.5" ribbon.
- Cut 2.5" ribbon into (18) 14" strips.
- Cut ends into dovetails.
- Cut 1.5" ribbon into (18) 14" strips.
- Cut ends into dovetails.
- Cut 1.5" ribbon into (18) 14" strips.
- Cut ends into dovetails.
- Layer (2) 1.5" ribbon strips on top of (1) 2.5" ribbon strip, fold in half, scrunch in middle, and add to the wreath ties.
- Fan out the ribbon tails. and Make sure it all points out to make the wreath look bigger.
- Repeat previous 2 steps until you add ribbon tails to each wreath tie on the bottom and then the top ties.
- Take your fluff box, place the bow in the center and wrap the wires on the side hooks to keep it in place. Fluff out your bow, start with the outside and work your way to the center.
- Repeat previous step when fluffing out the other 2 bows.
- Attach sign to wreath frame using the pipe cleaners. Wrap pipe cleaners around metal frame nice and tight.
- Add your bows to your wreath.
- Take some of your ribbon and measure out 26" and 28" about 2-3 pieces each. Make them in to single loops and add to the wreath twist ties. Make all tails dovetails. Be sure to fluff all the ribbons out. Use the ribbons to fill in open spots.
If you are looking for the sign we used, be sure to check our shop. We tend to get these in stock in March so you can craft ahead of time. Thank you for your support!

If you need any help with centerpiece-making, bow-making, wreath-making, or crafting in general, be sure to check out more of our tutorials on How to Make Wreaths.
We would love to see your beautiful wreaths! Please share with us over at the How To Make Wreaths Facebook Group.
We Think You’ll Enjoy These Related Posts:


