
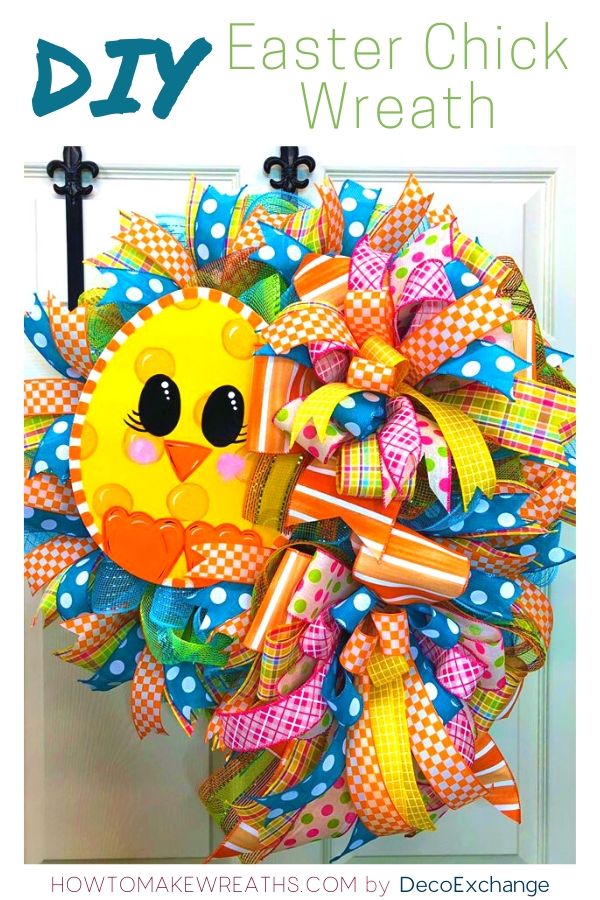
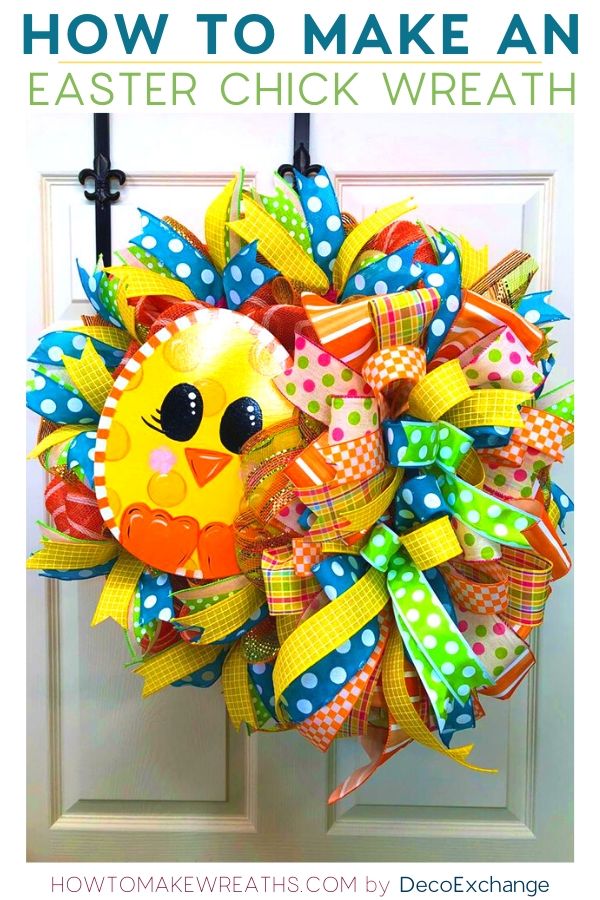
Easter is the perfect reason to grab your patterned pastel ribbons and have fun! Make this DIY Easter wreath featuring a cute chick and add some color to your Easter decor.
Okay, y’all – this is one of the cutest Easter wreath projects we’ve done! I made this one extra fancy with plenty of ribbons and bows. Plus, as you’ll notice, I didn’t exactly keep neutral with the colors either.
Easter is one of the few holidays that encourage plenty of colors and pastels, so I definitely took advantage. I had a lot of fun choosing the best ribbons for this DIY Easter wreath!
How to Make a DIY Easter Wreath with a Chick
The first thing you’re probably wondering is how to make that adorable chick for the wreath. Good news, y’all…it’s already made! We get to just focus on playing with the ribbons and crafting the wreath before adding the chick to it. You can also add a sign to this one too if you prefer.
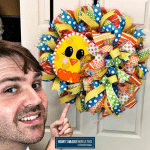
Watch along as I create this DIY Easter wreath—and make one of your own, too!

DIY Easter Chick Wreath
Materials
Instructions
- Take your wreath base and your deco mesh. Add 10" poof with ruffles in between.
- With deco mesh, roll the ends just a little and scrunch in the center. Add ruffles all the way around the base. You'll need 6 more pieces on top.
- Take your wreath sign/attachment. Add craft foam in the back of your sign. You'll need 4 pipe cleaners, hot glue gun, and a staple gun. This will keep the staples from showing in the front of the sign.
- So glue pipe cleaner in the to the back of the sign, put two piece of foam in the hot glue and then staple so that it keeps the pipe cleaner in place. We don't want the staple going into the wood or through the wood. Repeat this with the remaining pipe cleaners with two on top and two on the bottom.
- Take your EZ Bow Maker, start with your mesh ribbon. Measure a 12-inch tail with two 7-inch loops, one on each side and end with another tail.
- With your 4" ribbon, measure out 12-inch tail, then measure out 7-inch loops. You want to do 4 loops, 2 on each side then cut your tail.
- With your 2.5" ribbon, measure out a 12-inch tail with two 7-inch loops, one on each side and end with another tail.
- With your other 2.5" ribbon, measure out 12-inch tail, then measure out 7-inch loops. You want to do 4 loops, 2 on each side then cut your tail.
- With your 5/8" ribbon, measure out a 12-inch tail with two 7-inch loops, one on each side and end with another tail.
- With your 1.5" ribbon, measure out 12-inch tail, then measure out loops slightly smaller than the previous ribbon. You want to do 4 loops, 2 on each side then cut your tail.
- With your 1.5" ribbon, measure out a 12-inch tail with two loops slightly smaller than the previous ribbon, one on each side and end with another tail.
- With your last ribbon, do a tail and a single loop for the center of your bow. Take your pipe cleaner and wrap around the center of the bow. Tie and twist off nice and tight.
- Take your sign with the pipe cleaners. Tie off the pipe cleaners and get it closed.
- We're going to attach the sign to the side of your wreath with the 4 pipe cleaners. Push pipe cleaner through the mesh and securing and wrapping around the frame.
- Take your bow and add it to your wreath at the bottom right of your sign. Same thing…secure the bow through the mesh and wrap pipe cleaner around the frame. Fluff out your bow and trim the tails into dovetails.
- Take your EZ Bow Maker, start with your mesh ribbon. Now we're going to make a Terri bow. So basically it's one loop on each side and one tail on each side. You're going to basically make an X every time, rotating your loops and tails as you go.
- Start with an 8-inch tail on the bottom right, with a 7-inch loop on the bottom left, a loop on the top right and a tail on the top left.
- Take your next ribbon, and alternate with the tail on the top right, loop on the top left, loop on the bottom right, and a tail on the bottom left.
- Start with an 8-inch tail on the bottom right, with a 7-inch loop on the bottom left, a loop on the top right and a tail on the top left.
- Take your next ribbon, and alternate with the tail on the top right, loop on the top left, loop on the bottom right, and a tail on the bottom left.
- With you next ribbon, 8-inch tail on the bottom right, with a loop slightly smaller than the previous ribbon on the bottom left, a loop on the top right and a tail on the top left.
- Take your next ribbon, and alternate with the tail on the top right, loop on the top left, loop on the bottom right, and a tail on the bottom left.
- With your last ribbon, do a tail and a single loop for the center of your bow. Take your pipe cleaner and wrap around the center of the bow. Tie and twist off nice and tight.
- Take your bow and add it to your wreath at the top right of your sign. Same thing…secure the bow through the mesh and wrap pipe cleaner around the frame. Fluff out your bow, rearrange your tails, and trim the tails into dovetails.
- Now we'll make a tails only bow. Take a 2.5" ribbon and with the 14-inch side of the ribbon board. Just wrap it around 10 times, cut, slide it off, and trim on each end. All that's left is to dovetail the ends.
- Take a 1.5" ribbon and with the 14-inch side of the ribbon board. Just wrap it around 10 times, cut, slide it off, and trim on each end. All that's left is to dovetail the ends.
- Take another 1.5" ribbon and with the 14-inch side of the ribbon board. Just wrap it around 10 times, cut, slide it off, and trim on each end. All that's left is to dovetail the ends.
- Take the 3 ribbons, fold in half, pinch in the middle and adding them around the frame. Use the pink twists that are part of the frame. Spread out the tails and have it facing outward. Continue this until you make it all the way around the frame. Make sure all gaps are filled.
There you have it! An adorable DIY Easter wreath with a cute little chick. Make one of your own and have fun this Spring!
If you need any help with centerpiece-making, bow-making, wreath-making, or crafting in general, be sure to check out more of our tutorials on How to Make Wreaths.

Learn how to start, operate, and scale your creative business!
Get more info about business and creative coaching at The Makers University.
We would love to see your beautiful wreaths! Please share with us over at the How To Make Wreaths Facebook Group.
We Think You’ll Enjoy These Related Posts:


I love the Easter Chick wreath. I going to try to make one. Thank you for sharing. Do you sell the Chick face that you used? I would like to buy one. Of you don’t sell it could you please tell me where I can get one. I watched the video it is wonderful. I will continue to watch them. 5 stars all the way.