If you have ever struggled to get a bow to stay exactly where you want it on a door hanger, this tutorial is worth watching closely.
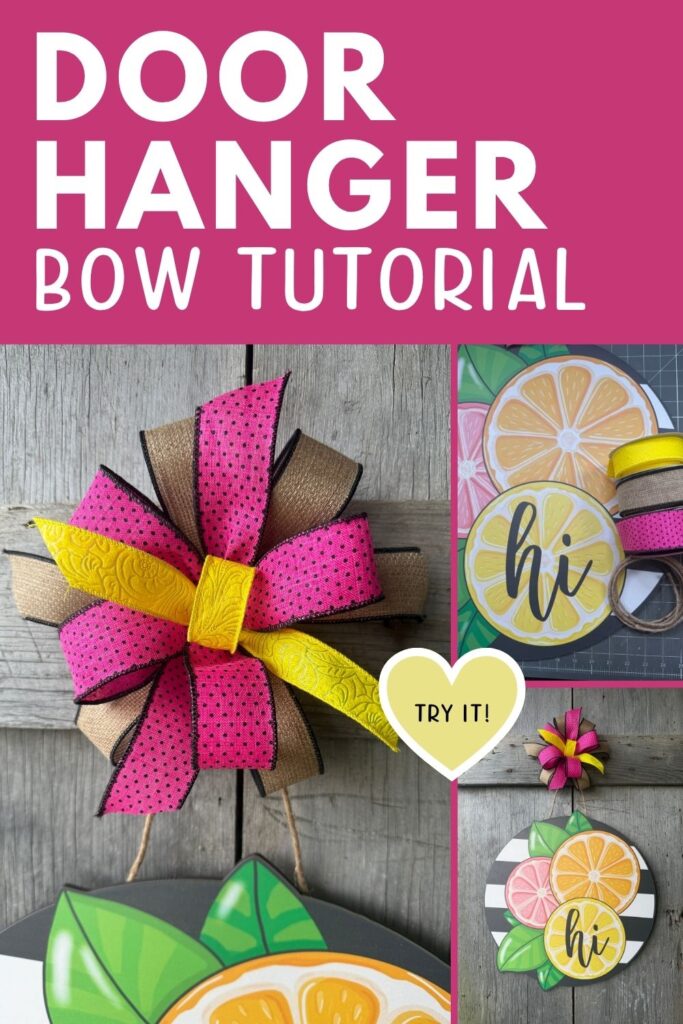
In this tutorial, Stacy shows how to build a layered bow for a door hanger using three ribbons, wired jute rope from Dollar Tree, and staples to secure everything neatly in place. The combination of pink swiss dot, burlap, and yellow ribbon gives the bow a warm, summery feel that works well with lemon-themed or garden-style door decor. The wired jute rope adds rustic texture and structure that keeps the bow looking full and intentional without a lot of fuss.

Why This Bow Method Works
Stapling a bow to a door hanger is one of the most underused techniques in wreath and door hanger making. When a bow is wired and then glued or tied to a hanger, it can shift, slide, or sag over time, especially in outdoor heat. Stapling the bow directly to the hanger keeps it locked in place so it stays centered and full-looking all season long.
The wired jute rope from Dollar Tree is a standout supply here. Wired rope holds a loop shape without springing back, which makes it easy to build consistent, full loops without fighting the material. At Dollar Tree pricing, it is also one of the most affordable ways to add a natural, textured element to a bow.
How to Make a Door Hanger Bow
Supply List
- 1 door hanger
- 1/4-inch staples
- Wired jute rope (Dollar Tree)
- 1 roll 1.5-inch pink swiss dot ribbon (RGH131983)
- 1 roll 1.5-inch burlap ribbon (RG1275T8)
- 1 roll 1-inch yellow ribbon (NR100029)
Step-by-step and Video Tutorial
Step 1: Prepare Your Door Hanger
Lay your door hanger flat on your work surface. Decide where you want the bow to sit before you start building it. Most door hangers look best with the bow at the top, just below the hook, or at the base of the sign. Pick your spot and keep it in mind as you build so the bow is the right size and shape for the placement.
Step 2: Cut Your Ribbon Lengths
Cut working lengths from each of your three ribbons. For a full, layered bow on a door hanger, you will want enough length to build at least three to four loops per ribbon style. Cut generously rather than sparingly. It is easier to trim extra length at the end than to add more ribbon once the bow is partially built.
Cut several lengths of the wired jute rope as well. Jute rope does not need to be long since it is used for accent loops and texture rather than as a full bow ribbon.
Step 3: Build Your Bow Loops
Start with the widest ribbons first. The 1.5-inch burlap ribbon builds the outer structure of the bow since it is the most neutral and gives the bow its base shape. Form a loop with the burlap, pinching it at the center, and continue building loops, alternating directions slightly so the loops fan out rather than stacking on top of each other.
Add loops of the 1.5-inch pink swiss dot ribbon next, working them in between the burlap loops. The pink swiss dot is your most decorative ribbon, so make sure the loops are positioned where the print will be visible from the front.
Add accent loops of the 1-inch yellow ribbon to fill in gaps and add a bright pop of solid color. Yellow is the narrowest ribbon in this bow, so use it to add detail and contrast rather than structure.
Finish by adding looped sections of the wired jute rope throughout the bow. The jute adds rustic texture that balances the softness of the swiss dot and the structure of the burlap. Because the jute rope is wired, you can shape each loop exactly where you want it and it will hold that position.
Pinch all loops together firmly at the center as you build.
Step 4: Secure the Bow with Staples
Once your bow is built and pinched at the center, position it on the door hanger exactly where you want it. Press the center of the bow flat against the hanger surface and use 1/4-inch staples to staple through the center of the bow and into the hanger. Depending on how thick your bow center is, you may need two or three staples to hold it completely flat and secure.
Stapling gives you a much more stable attachment than glue or wire on a door hanger surface. The bow will not slide, shift, or sag even in summer heat.
Step 5: Fluff and Shape the Bow
Once the bow is stapled in place, use your fingers to pull each loop up and shape it. Fan the loops out so they fill in a full, round shape around the stapled center. Adjust the jute rope loops so they sit at natural angles between the ribbon loops. Pull any streamer tails or ribbon ends down to the length you want and trim cleanly with scissors.
Step back and check the bow from a distance. It should look full and centered with the pink swiss dot visible and the yellow adding a clean accent throughout.
Tips for This Project
Use wired jute rope, not plain jute twine. Plain jute twine is soft and floppy and will not hold a loop shape in a bow. The wired version from Dollar Tree has a thin wire core that lets you shape each loop and have it stay put. It is worth picking up a few rolls when you find it since it works in a wide range of seasonal bows.
Staple before you fluff. It can be tempting to shape the bow perfectly and then try to staple it without disturbing the loops. Staple the center down first while the bow is still flat, then fluff the loops after. The loops are flexible enough to reshape after stapling, and you get a much cleaner attachment when the bow center is flat against the hanger.
Cut ribbon tails after stapling. Waiting to cut your ribbon streamer tails until the bow is stapled lets you see the exact length and angle that looks best with the finished placement. Cutting before you staple means guessing at lengths that may not suit the final position.
Mix loop sizes. Building all your loops at the same size makes a bow look flat and uniform. Make some loops slightly larger and some slightly smaller as you build, and position the smaller loops closer to the center. The variation in size is what gives a handmade bow its full, layered look.

Learn how to start, operate, and scale your creative business!
Get more info about business and creative coaching at The Makers University.
Where to Use This Bow Technique
This stapled bow method works well for:
- Door hangers of any shape or size
- Wooden signs used as front door or porch decor
- Wreaths where you want a bow to stay firmly in place without wire
- Craft show inventory where the bow needs to stay put during display and transport
The combination of pink swiss dot, burlap, and yellow ribbon suits a wide range of summer and lemon-themed designs, and all three ribbons are versatile enough to use in other projects as well.