
There really are so many different methods on how to tie a wreath bow by hand. Some crafters like to start from the smallest layer and work towards the wider ribbon layer. The 3 ways we’re featuring today will be working in the opposite direction – from bottom to top.
These bows are going to be perfect for your wreaths, swags, deco mesh wreaths or whatever you choose.
You can use these wreath bow tutorials as a starting point, don’t feel married to the measurements. You can decide how large you want your loops and ribbon tails based on your overall design.
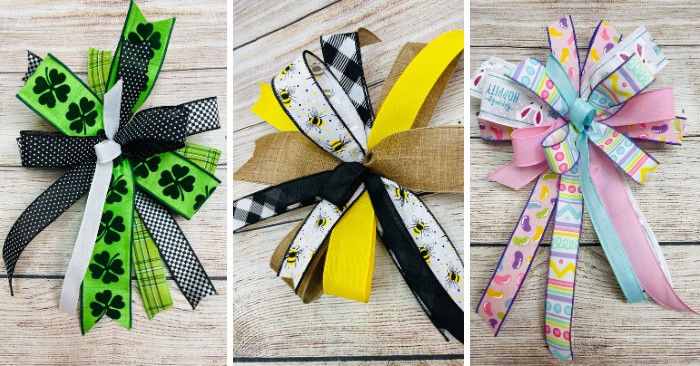
Ribbon Patterns and Color Combinations
Although the themes we’ve picked for these examples are for specific holidays, remember you can switch them out to recreate for another season.
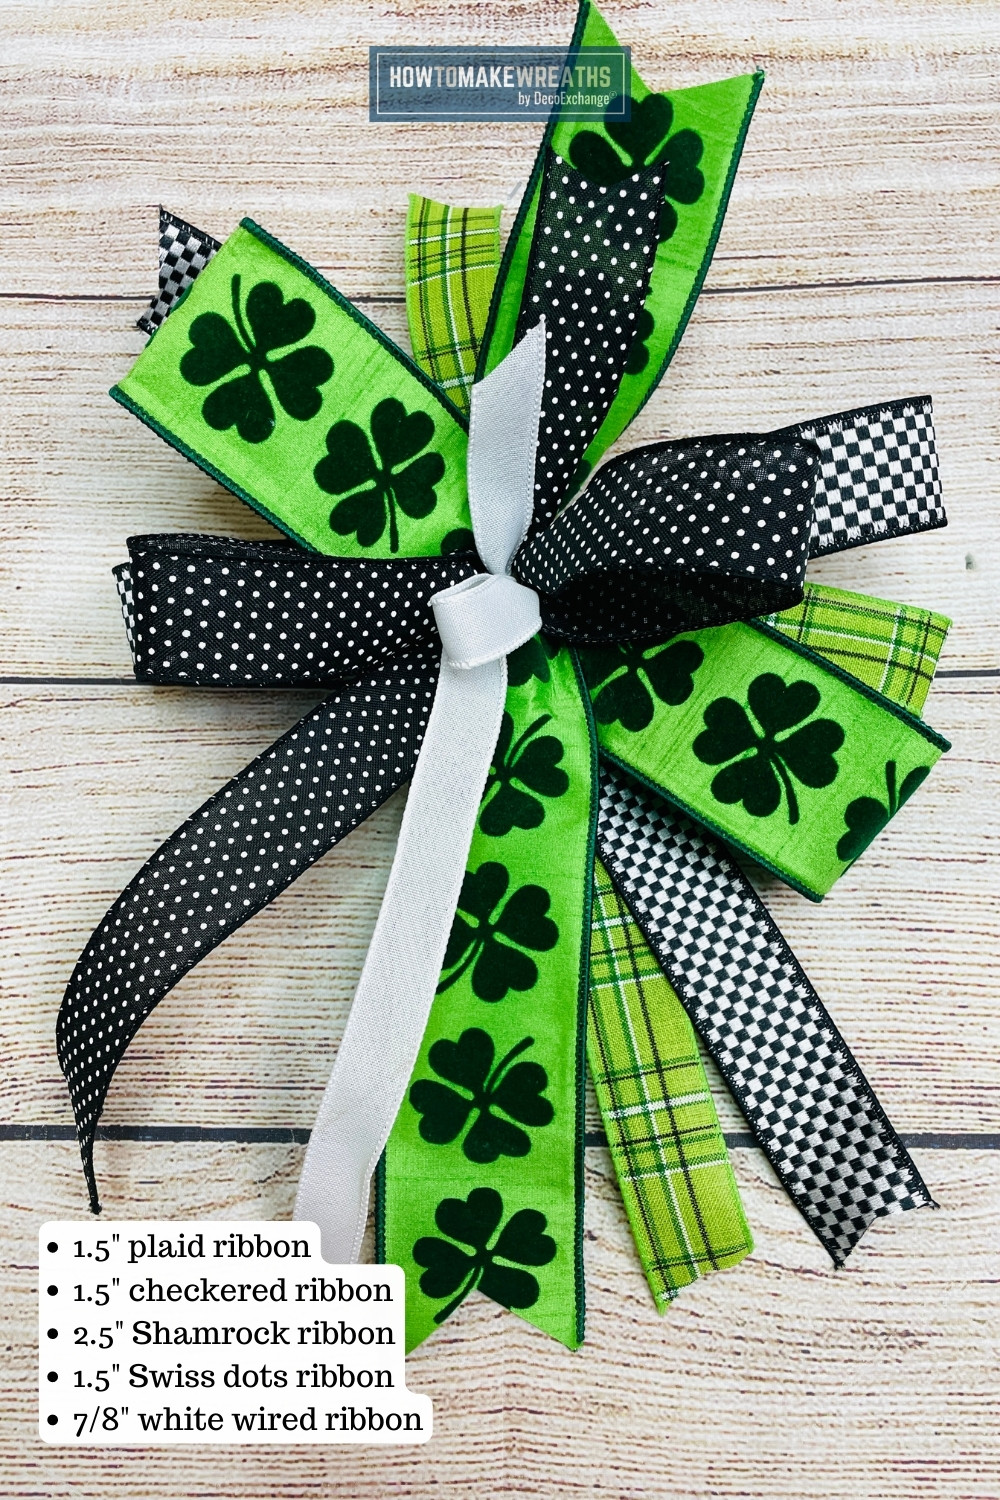
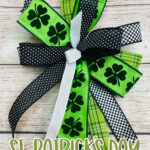
St. Patrick’s Day Color and Pattern Combo
For this St. Patrick’s Day wreath bow, we’re using 5 different styles of ribbon:
- 1.5″ green plaid wired ribbon
- 1.5″ checkered black and white wired ribbon
- 2.5″ green with Shamrocks wired ribbon
- 1.5″ black with white Swiss dots wired ribbon
- 7/8″ white wired ribbon
Summer Bee Color and Pattern Combo
This combo is perfect for Summer designs with a pop of yellow pairing the some bumblebees.
- 2.5″ burlap wired ribbon
- 1.5″ buffalo check wired ribbon
- 1.5″ yellow wired ribbon
- 1.5″ bumblebee wire ribbon
- 7/8″ black wired ribbon
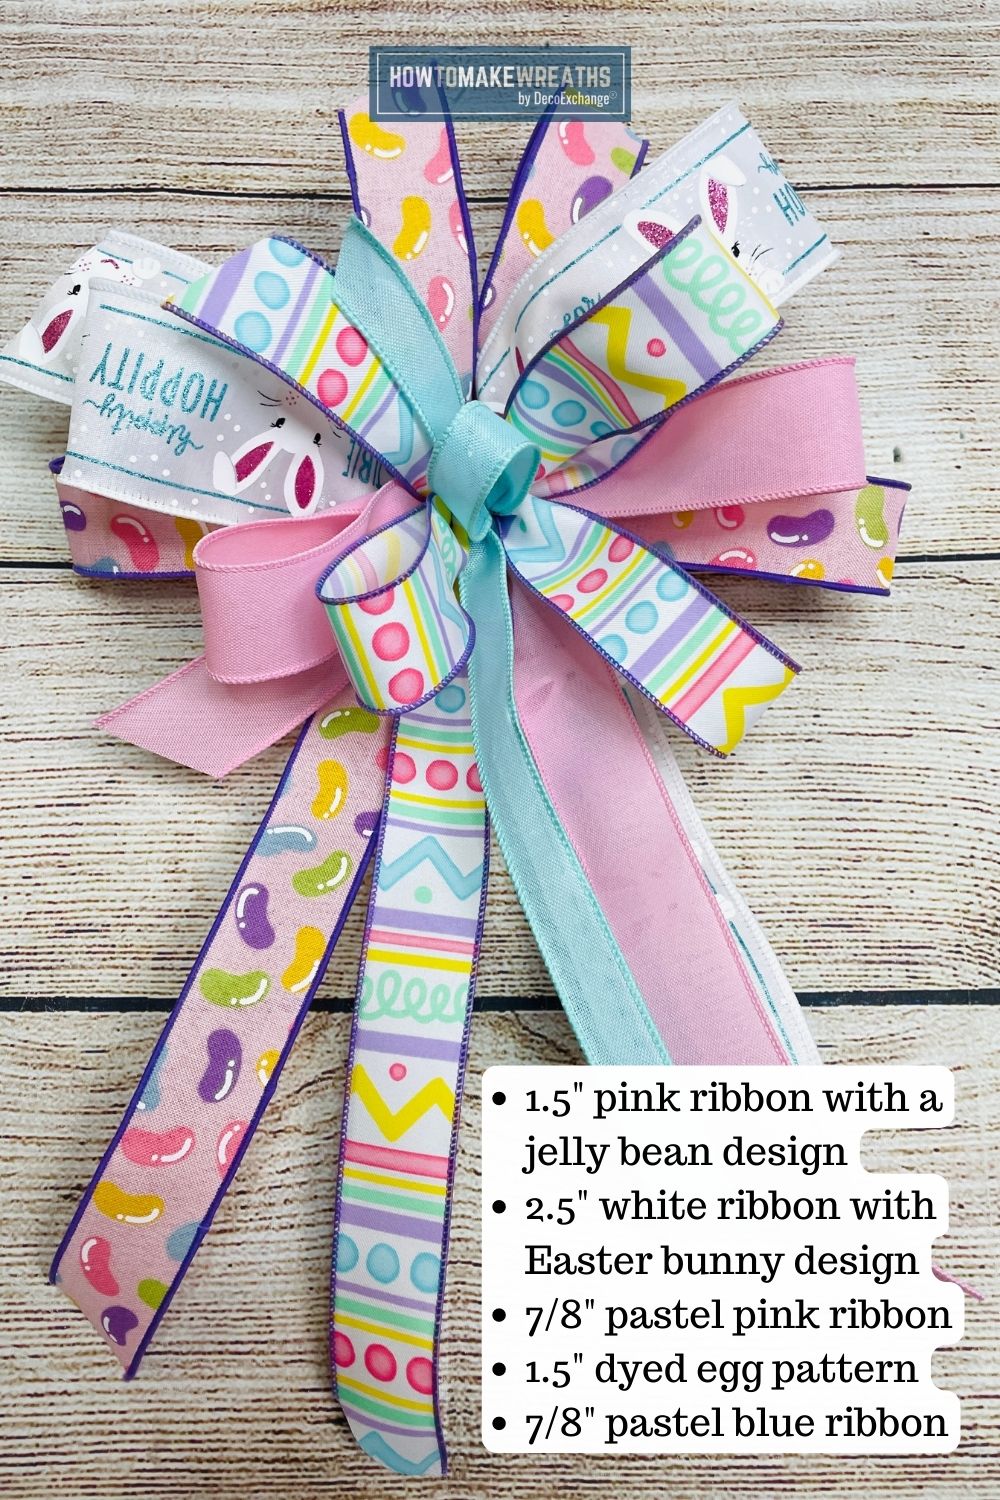
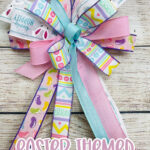
Easter Color and Pattern Combo
We’re using traditional pastels and white in this design, with a mix of patterns, solids, and designs.
- 1.5″ pink ribbon with a jelly bean design
- 2.5″ white ribbon with Easter bunny design
- 7/8″ pastel pink ribbon
- 1.5″ dyed egg pattern
- 7/8″ pastel blue ribbon
You’ll notice with each design there’s solid ribbon mixed in. Anytime you add a solid it just works as a nice filler. It helps elevate all the rest of the designs pulling out colors from the other patterns.
How to Tie a Wreath Bow – 3 Methods to Try!
Method #1: How to Make a 5-Layer Wreath Bow
You could start with the wider ribbon for the bottom layer, but today we’re doing it a little different. The reason is we want this 2.5″ green with Shamrocks wired ribbon right in the middle because we want this to be very up close and center. We don’t want it to disappear.
Let’s go ahead and start with this beautiful 1/2″ plaid pattern. The plaid is not too heavy, it’s not competing with the black and white checkered ribbon.
We’re going to go ahead and give it a nice accordion pinch, where we’ve measured off a nice tail. We’re going to have a nice 6″ tail right here. With a hand bow, you’re going to use your fingers as your pegs that we would normally use on an EZ Bowmaker.
Next, give it a nice firm twist right up against your fingers. The twist is because we want the pattern of the beautiful ribbon to show. As you twist it the pattern is always going to stay on the outside so you’re always going to see the pretty part.
Next, you’re going to use the top of your fingers to give it another nice firm twist. Y’all are just holding the layers of ribbon firmly. You’re not choking the ribbon, you’re just letting it work as the pegs just to kind of hold everything in place.
Go ahead and give it a nice accordion pinch to complete another loop. Keep your loops kind of fluffed out so you can see the bow being built right in your hands.
Make sure the loops are about even. Leave about a 12″ inch” tail and trim from the ribbon spool. In this bow style, we like the longer tail to be down towards the bottom and the shorter one to be up towards the top.
The next thing you’re gonna do is build the next layer right on top with this beautiful double sided checkered ribbon. You’ll repeat the same process as earlier, but create slightly smaller loops each time.
The heart of this bow is the 2.5″ Shamrock ribbon. Now, remember we’re gonna create smaller loops every time. Make sure that the ribbon is nice and flat and the wires are not tucked in. To do that, give the ribbon a nice flat curl and twist.
Pro tip: Keep your fingers right up against that ribbon to make sure it stays nice and fluffy.
Next, you’re going to come in with the 1.5″ Swiss dot ribbon repeating the same process with 1 loop on each side.
And last but not least, add one little loop with your 7/8″ ribbon to create a center. This loop will be about half the size of your previous loop.
Use a pipe cleaner to secure all those luscious layers together. Flip it upside down and give that pipe cleaner a nice twist, twist, twist. Wrap that pipe cleaner around the bow one more time for extra security and twist again. Trim any excess pipe cleaner tails.
This last step is very important. It’s all about finding your windows in between the loops. It’s all about building that X pattern so we can see everything.
Cut your tails by folding the ribbon in half and cutting at a little angle. These are called dovetails.
The higher level tails you can cut a little shorter and then as we go in and trim each one of these tails, make them a smidge bit longer. So, just a little bit longer each layer.

Method #2: 5-Layers with Single Loops Wreath Bow
Starting with your 2.5″ burlap wired ribbon create a 10″ tail and give a nice accordion pinch, leaving your tail pointing upward.
Next create a 7″ loop right almost like you’re going to make an awareness ribbon.
Leave yourself a nice long tail about 12″ inches”.
Next, incorporate the 1.5″ buffalo check ribbon. We’re going to repeat the same process, but facing the opposite direction.
Your loops will get a little smaller as you add more ribbon.
The 1.5″ bumblebee wired ribbon is next.
Now, here’s where we break pattern a little bit. Add a strip of the 2.5″ burlap ribbon to create tails on each side.
The last ribbon, the 7/8″ black ribbon will be used to create a center loop.
Use a pipe cleaner to secure, give it a couple good twists and wrap around again.
Fluff out your bow more like a Y pattern this time, since we have 2 tails on one side and a loop on the other.
Dovetail the ends by folding the ribbon in half and cutting at a little angle.
Method #3: 5-Layers with Single Loops Wreath Bow
Let’s start with the 1.5″ jelly bean ribbon. Give it a nice little tail about five or six inches, and accordion pinch.
You can do as many loops as you want with the jelly bean ribbon. We do want this to stick out, so let’s start with three loops this time.
Pinch and twist to ensure that the side with the design is always sticking outward.
Don’t fret if both your tails end up on the same side, it’s wire. So you can manipulate it and pull downwards.
So you’re going to have two really cute loops on one side and one cute loop up top along with your tails.
Let’s continue on with the 2.5″ white ribbon with Easter bunny design. Repeat the same process, this time creating 2 loops, one on each side.
We’re gonna layer it nice on top, put it between our fingers, we’re gonna give it a nice twist. And each loop gets a little bit smaller.
Make sure that your twist are very nice and clean. Work that ribbon at the core, making sure that it is nice and flat. And the twists are nice and dominant. Fluff that ribbon out.
The next ribbon we’ll layer on is the 1.5″ pink ribbon with a loop on each side, getting smaller every time.
Now, add the tribal Easter art ribbon. This layer we’ll add 3 loops, 2 on one side and 1 on the other.
Why not? Anytime it’s a ribbon your really love and you just want a little extra of it to be seen, add more loops!
Last but definitely not least, let’s do a little loop of the beautiful 7/8″ pastel blue that goes perfect with all our pretty pastels. This will be our center loop.
Secure with a pipe cleaner.
Again, let’s find the windows and pull the bows and loops up at attention.
Full Video Tutorial on How to Tie a Wreath Bow Tutorials
St. Patrick’s Day Wreath Bow
Materials
- 1 1.5″ green plaid wired ribbon
- 1 1.5″ checkered black and white wired ribbon
- 1 2.5″ green with Shamrocks wired ribbon
- 1 1.5″ black with white Swiss dots wired ribbon
- 1 7/8″ white wired ribbon
Instructions
- You could start with the wider ribbon for the bottom layer, but today we’re doing it a little different. The reason is we want this 2.5″ green with Shamrocks wired ribbon right in the middle because we want this to be very up close and center. We don’t want it to disappear.
- Let’s go ahead and start with this beautiful 1/2″ plaid pattern. The plaid is not too heavy, it’s not competing with the black and white checkered ribbon.
- We’re going to go ahead and give it a nice accordion pinch, where we’ve measured off a nice tail. We’re going to have a nice 6″ tail right here. With a hand bow, you’re going to use your fingers as your pegs that we would normally use on an EZ Bowmaker.
- Next, give it a nice firm twist right up against your fingers. The twist is because we want the pattern of the beautiful ribbon to show. As you twist it the pattern is always going to stay on the outside so you’re always going to see the pretty part.
- Next, you’re going to use the top of your fingers to give it another nice firm twist. Y’all are just holding the layers of ribbon firmly. You’re not choking the ribbon, you’re just letting it work as the pegs just to kind of hold everything in place.
- Go ahead and give it a nice accordion pinch to complete another loop. Keep your loops kind of fluffed out so you can see the bow being built right in your hands.
- Make sure the loops are about even. Leave about a 12″ inch” tail and trim from the ribbon spool. In this bow style, we like the longer tail to be down towards the bottom and the shorter one to be up towards the top.
- The next thing you’re gonna do is build the next layer right on top with this beautiful double sided checkered ribbon. You’ll repeat the same process as earlier, but create slightly smaller loops each time.
- The heart of this bow is the 2.5″ Shamrock ribbon. Now, remember we’re gonna create smaller loops every time. Make sure that the ribbon is nice and flat and the wires are not tucked in. To do that, give the ribbon a nice flat curl and twist.
- Next, you’re going to come in with the 1.5″ Swiss dot ribbon repeating the same process with 1 loop on each side.
- And last but not least, add one little loop with your 7/8″ ribbon to create a center. This loop will be about half the size of your previous loop.
- Use a pipe cleaner to secure all those luscious layers together. Flip it upside down and give that pipe cleaner a nice twist, twist, twist. Wrap that pipe cleaner around the bow one more time for extra security and twist again. Trim any excess pipe cleaner tails.
- This last step is very important. It’s all about finding your windows in between the loops. It’s all about building that X pattern so we can see everything.
- Cut your tails by folding the ribbon in half and cutting at a little angle. These are called dovetails.
- The higher level tails you can cut a little shorter and then as we go in and trim each one of these tails, make them a smidge bit longer. So, just a little bit longer each layer.
Notes

Summer Themed Wreath Bow
Materials
- 1 2.5″ burlap wired ribbon
- 1 1.5″ buffalo check wired ribbon
- 1 1.5″ yellow wired ribbon
- 1 1.5″ bumblebee wire ribbon
- 1 7/8″ black wired ribbon
Instructions
- Starting with your 2.5″ burlap wired ribbon create a 10″ tail and give a nice accordion pinch, leaving your tail pointing upward.
- Next create a 7″ loop right almost like you’re going to make an awareness ribbon.
- Leave yourself a nice long tail about 12″ inches”.
- Next, incorporate the 1.5″ buffalo check ribbon. We’re going to repeat the same process, but facing the opposite direction.
- Your loops will get a little smaller as you add more ribbon.
- The 1.5″ bumblebee wired ribbon is next.
- Now, here’s where we break pattern a little bit. Add a strip of the 2.5″ burlap ribbon to create tails on each side.
- The last ribbon, the 7/8″ black ribbon will be used to create a center loop.
- Use a pipe cleaner to secure, give it a couple good twists and wrap around again.
Notes
Easter Themed Wreath Bow
Materials
- 1 1.5″ pink ribbon with a jelly bean design
- 1 2.5″ white ribbon with Easter bunny design
- 1 1.5″ dyed egg pattern
- 1 1.5″ bumblebee wire ribbon
- 1 7/8″ pastel blue ribbon
Instructions
- Let’s start with the 1.5″ jelly bean ribbon. Give it a nice little tail about five or six inches, and accordion pinch.
- You can do as many loops as you want with the jelly bean ribbon. We do want this to stick out, so let’s start with three loops this time.
- Pinch and twist to ensure that the side with the design is always sticking outward.
- Don’t fret if both your tails end up on the same side, it’s wire. So you can manipulate it and pull downwards.
- So you’re going to have two really cute loops on one side and one cute loop up top along with your tails.
- Let’s continue on with the 2.5″ white ribbon with Easter bunny design. Repeat the same process, this time creating 2 loops, one on each side.
- We’re gonna layer it nice on top, put it between our fingers, we’re gonna give it a nice twist. And each loop gets a little bit smaller.
- Make sure that your twist are very nice and clean. Work that ribbon at the core, making sure that it is nice and flat. And the twists are nice and dominant. Fluff that ribbon out.
- The next ribbon we’ll layer on is the 1.5″ pink ribbon with a loop on each side, getting smaller every time.
- Now, add the tribal Easter art ribbon. This layer we’ll add 3 loops, 2 on one side and 1 on the other.
- Why not? Anytime it’s a ribbon your really love and you just want a little extra of it to be seen, add more loops!
- Last but definitely not least, let’s do a little loop of the beautiful 7/8″ pastel blue that goes perfect with all our pretty pastels. This will be our center loop.
- Secure with a pipe cleaner.
- Again, let’s find the windows and pull the bows and loops up at attention.
Notes
FAQs on Making a Wreath Bow
What type of ribbon works best?
Wired ribbon is your best bet. If I need a little bit of extra body, just take your fingers and rub them on the outside of the wires and it’s gonna pop right up.
Why do you use extra long pipe cleaners?
These extra long pipe cleaners are amazing! You can get them at DecoExchange. It allows you to really secure your bow and give it a little body. The double wrap gives you a little more confidence that the bow is nice and tight.

