
A grapevine wreath is one of the most versatile bases you can use for spring decor. In this tutorial, Tammy shows how to create a soft, layered spring grapevine wreath using mixed greenery, a simple floral accent, and coordinated ribbon.
This design works beautifully for front doors, covered porches, and craft shows. It is lightweight, easy to customize, and perfect for makers who want a polished look without overcomplicating the build.

Why Grapevine Wreaths Are Ideal for Spring Designs
Grapevine wreaths already bring texture and movement, which means you do not need to completely cover the base to make it feel full. Leaving some of the grapevine visible keeps the design airy and natural, which is especially fitting for spring.
They are also easy to work with since florals and greenery can be tucked directly into the base with minimal wiring.
Supplies Used for This Spring Grapevine Wreath
Here is everything Tammy used for this project.
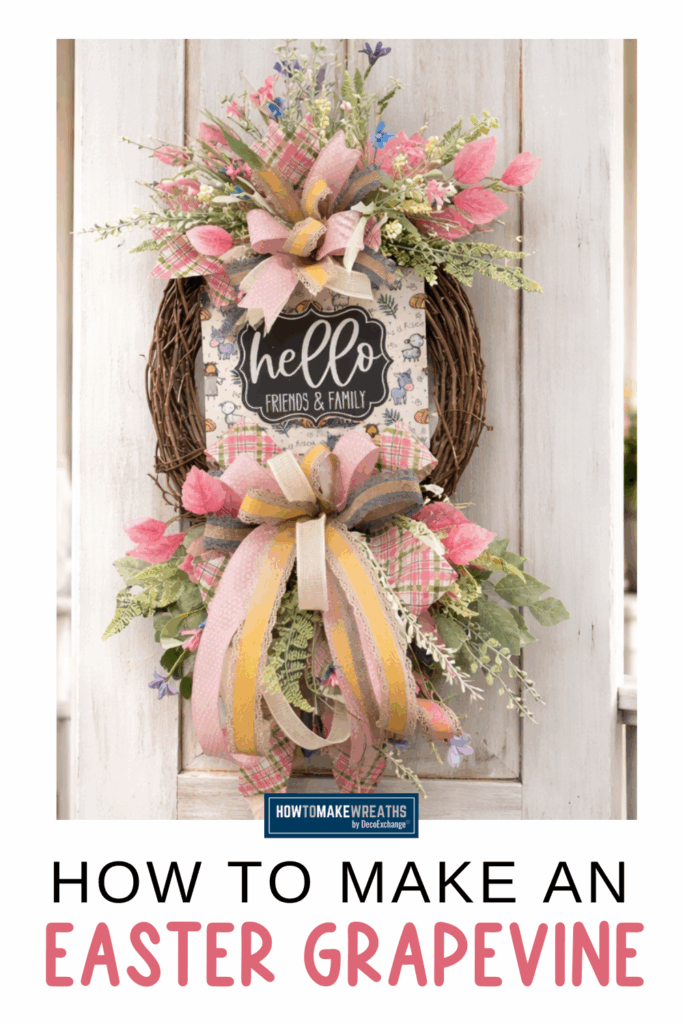
- Grapevine wreath
- 60919 look alike floral
- Spring green fern
- Leather leaf fern
- Rose leaves
- Metal sign
Ribbon
- 2.5 inch argyle ribbon
- 1.5 inch scalloped smokey blue ribbon
- 1.5 inch mustard scalloped ribbon
- 1.5 inch pink swiss dot ribbon
- ⅞ inch cream linen ribbon
Step by Step + Video Tutorial
Step 1: Prep the Greenery
Begin by separating all greenery into smaller sections. Cutting stems apart allows you to control placement and prevents the wreath from looking bulky.
Step 2: Build the Greenery Base
Start with the spring green fern and leather leaf fern. Tuck them into the grapevine on one side of the wreath to create a crescent shape. Add the rose leaves next to soften the edges and add variation in texture.
Keep the greenery concentrated in one area so the wreath feels intentional and balanced.
Step 3: Add the Floral Accent
Place the 60919 look alike floral into the greenery cluster. Use just enough to add color without overpowering the greens. Let a few stems extend outward for depth.
Step 4: Attach the Sign
Secure the metal sign near the center of the greenery cluster. Position it slightly off center for a more natural look. Make sure it is attached firmly so it stays in place when the wreath is hung.
Step 5: Create and Attach the Bow
Using all ribbon styles, create a layered bow that pulls the color palette together. The argyle ribbon anchors the look while the softer scalloped and linen ribbons add contrast.
Attach the bow near the sign to visually connect the elements.
Step 6: Final Adjustments
Step back and fluff the greenery, adjust ribbon tails, and fill in any gaps. Make sure the grapevine base is still visible so the design does not feel too heavy.
Design Tips for Customizing This Wreath
- Stick with a soft color palette for spring and early summer
- Swap the sign and ribbon to reuse the same greenery base
- Keep florals minimal to maintain a fresh, natural look
Craft Show Friendly Features
This wreath is an excellent option for craft shows because it appeals to a wide audience and works for multiple seasons. The neutral greens make it easy for customers to imagine it on their own doors, while the ribbon and sign add personality.
It is also lightweight and easy to transport, which is always a bonus for vendors.
Simple Spring Elements
This spring grapevine wreath is a great example of how simple elements can come together to create a clean, professional design. By focusing on layered greenery and thoughtful ribbon choices, you can build a wreath that feels fresh and timeless.
Want to level up your design skills? Join us at The Makers University Design School!

