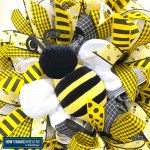
This bumblebee wreath is extra sweet thanks to layers of yellow and black patterned bows topped with an adorable stuffed bee. Learn how to make one of your own with this video and supply list.
Okay y’all, I’m pretty excited about today’s project. It’s a stuffed bumblebee wreath! We’ll use a base of mesh and ribbon to create a base, then add this guy on top of it all.

Watch: Cutest Stuffed Bumblebee Wreath EVER!
This project comes from one of our monthly wreath kits. I get asked ALL the time how people can get a kit when it’s listed for sale. It’s simple, y’all – you just gotta download our app.
Yup, in case you didn’t know, we have an app. Just go to the app store and type in Deco Exchange App and it should pop right up. As soon as a kit like this bumble bee wreath one is listed, you’ll get a notification on the app. Then you can click it and head write to the online store to purchase!
They definitely tend to sell out so if you want the best chance of grabbing one, then the app is the way to go. It’s nice because it has the supplies you need all bundled together. But you can watch the video below and check out the supply list underneath to make something very similar to our bumblebee wreath.

Terri Bow using the EZ Bow Maker
Materials
Instructions
- We're going to take our first two and a half inch ribbon. We're going to measure it out eight inches. Pinch it in the center. We're going to give it a twist, slide it in. We want our pretty side up, ugly side down.
- We're going to measure it out to seven inches. Bringing it back through, twist it. Y'all, whenever you're twisting your ribbons, make sure you twist them this way one time and then come back the other way when you come back across. All right?
- So the first one, we want a tail and a loop facing the same direction. So we have our tail and our loop both pointing towards us.
- When we come back across, we're going to measure our seven inches. Go straight down. Y'all, it's the tail so we want both pretty sides up. On the outside, we're going to dovetail it. So we're just making an X every time.
- For the next two and a half inch, we're going to have our tail pointing out the first time. Give it a twist. Tail pointing up. So if our tail's pointing up, we want our first loop going up. Y'all, and guess what? We're not going to measure anymore. We're just going to make each one a little bit smaller going in.
- Now our other two and a half inch ribbon is next. Since our last one, the loop was down, so now our first tail is going to be down. Y'all, any time you kill a role, well, then you get to buy three more. It's a rule.
- All right. So our last one, the first thing that we had down was a tail. So we will bring our tail up to the top this time. Bring a loop down. And you just keep following this same pattern all the way up until we get to the center.
- So the previous ribbon, we have a loop down, so now we're going to start with our tail. Repeat same steps: Tail to the top. Loop on the top. Give it a little twist in the middle.
- Then I like to finish mine with the center loop. So to get your center loop, you have your tails coming out on one side, a smaller loop right down the middle, and tail is coming back out.
- Get a pipe cleaner and fold in half. Get it ready, then just hold your pipe cleaner tight in your hand and give your bow a twist.
- Now, add it to your wreath.
- You can add it to the base. That way it makes it easier to fluff. If you add it to your base, get it attached, then it'll sit there while you pull your ribbons and your tails all in different directions.
- Trim these tails up nice and pretty. Y'all, you can dovetail them or you can just cut them at an angle. Whatever you like to do. Y'all, I also like to leave all the tails longer while I'm making the bow. That way when I come back in and trim them, I can cut them all at different lengths. That way you get a really cool, fun textured look.
How to Make the Cutest Stuffed Bumble Bee Wreath
Materials
- 1 wreath form
- 2 10" deco mesh 30" long; 18 pieces
- mesh cutter
- 6 1.5 wired ribbon
- 1 sign/attachment
- staple gun
- super glue
- pipe cleaners
- scissors
- EZ Bow Maker
- ribbon tail board
- Terri bow
Instructions
- Fluff out wreath form
- Take your 10" mesh and cut (18) 30" pieces.
- Take each of the 18 pieces of mesh, curl the ends then scrunch down the center, and add to every wreath tie. This is the ruffle method. Do start at the bottom of the wreath frame and work your way to the top to avoid getting tangled up.
- Scrunch the wreath form so that it looks more oval.
- Get your attachment, wrap wires around the frame.
- Pull out your EZ Bow Maker and ribbons.
- Take your 1.5" ribbon and measure (12") for your tail, and make (2) 7" loops on each side.
- Next, take your 1.5" ribbon and measure the same length in tail and make a loop on each side slightly smaller than the previous on each side.
- Then take your next 1.5" ribbon and make same length tail, and make 2 loops on each side slightly smaller.
- Add a ribbon tail with one of your 1.5" ribbon.
- Add another ribbon tail with one of your 1.5" ribbon, opposite the previous, making an X.
- Get your next 1.5" ribbon and measure same length tail and make 2 loops on each side slightly smaller.
- Take your other 1.5" ribbon and measure same length tail and a single loop on each side slightly smaller.
- Take your other 1.5" ribbon and measure same length tail and a single loop slightly smaller.
- Take pipe cleaner and wrap around the center of the bow. Twist nice and tight. Fluff out bow.
- Add bow below the attachment on the wreath. Wrap the pipe cleaner around the frame and tie nice and tight. Curl tails.
- Add the Terri bow you made on your EZ Bow Maker.
- Get out your ribbon tail board and your 1.5" ribbons.
- Wrap 1.5" ribbon around the ribbon tail board and cut into (13) 14" strips.
- Cut tails at an angle.
- Wrap your other 1.5" ribbon around the ribbon tail board and cut into (13) 14" strips.
- Cut tails at an angle.
- Wrap your last 1.5" ribbon around the ribbon tail board and cut into (13) 14" strips. Cut tails at an angle.
- Layer (3) 1.5" ribbon strips, fold in half, scrunch in middle, and add to the wreath ties.
- Fan out the ribbon tails. and Make sure it all points out to make the wreath look bigger.
- Repeat previous 2 steps until you add ribbon tails to each wreath tie on the bottom and then the top ties.
That’s it y’all! Don’t forget to download the app and grab a wreath making kit next time they are available.

If you need any help with centerpiece-making, bow-making, wreath-making, or crafting in general, be sure to check out more of our tutorials on How to Make Wreaths.
We would love to see your beautiful wreaths! Please share with us over at the How To Make Wreaths Facebook Group.

We Think You’ll Enjoy These Related Posts: