
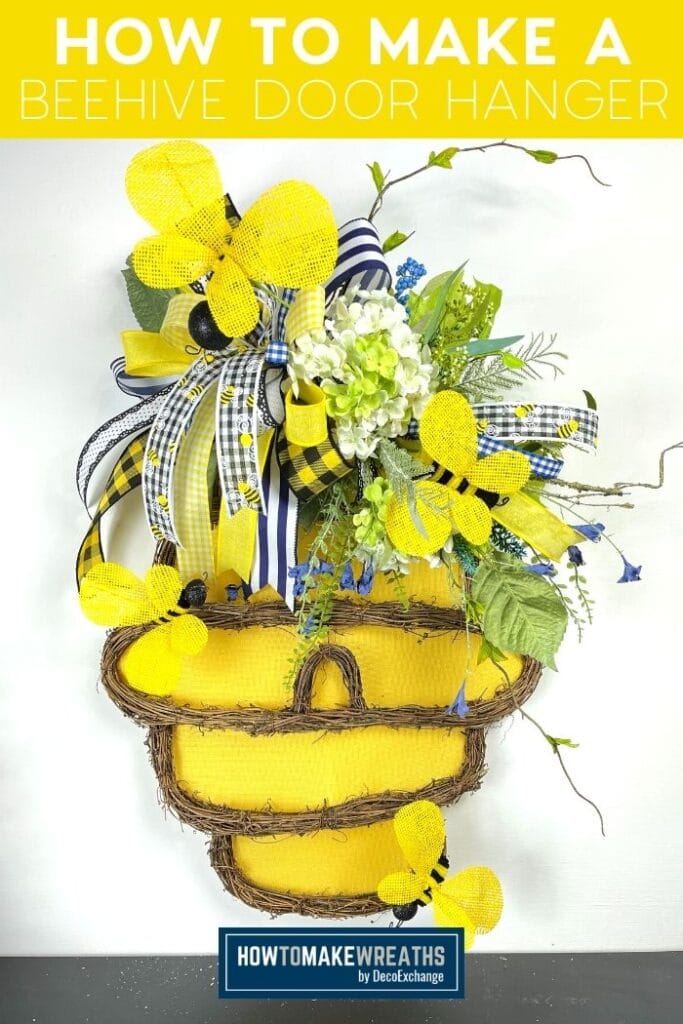
Learn how to make a fun beehive door hanger all on your own! This bright and colorful beehive will look beautiful on any front door during the warm seasons.
Hey, y’all! Are you just as obsessed with bees as we are? I just love the color combinations that bees have, and they work perfectly in a wreath as well. Today, I’m showing you how to make a fun and vibrant front door hanger in the shape of a beehive. It has everything you need to spring into summer with style!
Beehive Decor Supplies Needed
Here’s everything you need to make this fun and bright black, yellow, blue, and white door hanger with a beehive base.
- Grapevine beehive base
- White flower floral stems
- Blue flower floral stems
- Zip ties
- (2) 2.5” ribbon
- (4) 1.5” ribbon
- ½” ribbon
- Hot glue gun and hot glue
- Larger bee pick
- Smaller bee picks
- Pipe cleaners
- EZ Bow Maker
How To Make A Beehive Decoration For Your Door
Use these step-by-step instructions to put this piece together. Just follow along to these directions, and you’ll have this project completed in under 15 minutes!
Step 1
Trim the stem of your white flower floral. Then, zip tie the floral stem to the top of your beehive base frame.
Step 2
Spread out the floral stem to add some texture and secure the different parts to the beehive base with zip ties to hold them in place.
Step 3
Take your blue flower floral stem and spread apart the flowers and small stems. Add the pick to the top of the white flowers to add some lovely contrast to the yellow beehive base. Secure it with zip ties.
Step 4
Take your EZ Bow Maker and your first 2.5” ribbon. Make a 7” loop with 14” tails in an “X” shape.
Step 5
Repeat that process with your second 2.5” ribbon. Make sure that the second layer of your bow offsets the first layer in a similar “X” shape.
Step 6
Take your first 1.5” ribbon and repeat the same process, but make your loops slightly smaller (about 6.5”). Offset the previous layer with your “X”.
Step 7
Repeat the process again with your second 1.5” ribbon.
Step 8
Take your third 1.5” ribbon and make two loops about 6” with 14” tails in that same offset “X” pattern.
Step 9
Use your ½” ribbon and make 5.5” loops with 8” tails.
Step 10
Finally, take your last 1.5” ribbon and make a 5” center loop with 14” tails.
Step 11
Take 2 pipe cleaners and attach them at their ends so that you have one extra long pipe cleaner. Carefully pull your bow off the EZ Bow Maker and wrap the pipe cleaner around the middle of the bow to hold it together. Give a tight twist to secure it.
Step 12
Use the same extra long pipe cleaner to attach the bow to your beehive frame just to the left of the floral stems. Dovetail the ribbon tails.
Step 13
Take 3 ribbons (I used 2 of the 1.5” ribbons and the ½” ribbon) and cut 12” tails of each ribbon. Stack them on top of each other, pinch in the middle and fold. Use a pipe cleaner to attach the ribbon tail to the beehive decor base in between the florals. Dovetail the ends.
Step 14
Add the larger bee pick to your beehive decor project at the top right of the bow. Secure it with a dab of hot glue.
Step 15
Take your smaller bee pick and cut the bees off of the larger stem. Insert one into the beehive frame on the left side, at about the midway point. Secure it in place with a dab of hot glue. Add another bee to the other side of the base (in the florals) and secure with hot glue.
Step 16
Insert one more bee pick into the bottom right side of your beehive decor. Use a dab of hot glue to secure it.
Isn’t it cute? I love how cheerful and summery this beehive decor project looks!
Make This Beehive Decor Project For Your Door
Now your summer beehive decor is complete! Wasn’t that easy to create?
If you love this project, you won’t want to miss our Fun Bee Wreath with Sunflowers, DIY Bumble Bee Wreath, or Cutest Bumblebee Wreath EVER!
If you need any help with centerpiece-making, bow-making, wreath-making, or crafting in general, be sure to check out more of our tutorials on How to Make Wreaths.
We would love to see your beautiful wreaths! Please share with us over at the How To Make Wreaths Facebook Group.
If you’re interested in more info on learning how to make wreaths or being in a community of like-minded crafters, check out our Creative Coaching Subscription Group.


Beehive Door Hanger
Materials
- Grapevine beehive base
- floral stems white flowers
- floral stems blue flowers
- zip ties
- 2 2.5" wired ribbon
- 4 1.5" wired ribbon
- ½" ribbon
- hot glue gun
- hot glue
- bee pick 1 large, 1 small
- pipe cleaners
- EZ Bow Maker
Instructions
- Cit the stem of your white flower floral and use a zip tie to attach it to the top of your beehive base frame.
- Spread out the florals to add texture and use zip ties to secure the different parts to the beehive base.
- Repeat the process with your blue flower floral stem and add the pick to the top of the white flowers to add some contrast to the yellow beehive base. Secure it in place with zip ties.
- Take your EZ Bow Maker and your first 2.5” ribbon. Make a 7” loop with 14” tails in an “X” shape.
- Take your second 2.5” ribbon and repeat the process, making sure that the second layer of your bow offsets the first layer.
- Take your first 1.5” ribbon and make 6.5" loops with tails the same length. Offset the previous layer with your “X”.
- Do the same thing with your next 1.5" ribbon.
- Use your third 1.5" ribbon and make 6" loops with 14" tails.
- Grab your ½" ribbon and make 5.5" loops with 8" tails.
- For the final layer, use your fourth 1.5" ribbon to make a 5" center loop with 14" tails.
- Attach 2 pipe cleaners together so that you have one extra-long pipe cleaner. Carefully remove your bow from the EZ Bow Maker and wrap the pipe cleaner around the middle of the bow to hold it together. Secure it with a twist.
- Attach the bow to the beehive frame. Cut the tails in a dovetail shape.
- Let's make ribbon tails with 3 of our ribbons. Take 2 of the 1.5” ribbons and the ½” ribbon and cut 12” tails out of each. Stack them on top of each other, pinch in the middle and fold. Use a pipe cleaner to attach the ribbon tail to the beehive decor base and dovetail the ends.
- Add the larger bee pick to your beehive decor project at the top of the grapevine frame. Use hot glue to secure it.
- Cut your smaller bees off the main pick stem and insert one into the beehive frame on the left side. Use hot glue to secure it in place. Add another bee in the florals on the other side of the base and secure with hot glue.
- Add one more bee pick to the bottom right of your design. Use hot glue and secure it in place.


