Want to make a great impression on all those who walk up to your front door? Make this bumble bee wreath and welcome everyone to your home in a bright, cheery style. Watch the video to learn every detail about this project.
Hey, y’all! Sometimes you just need something bright and cheery to adorn your front porch, right? What color is more cheery than sunshine yellow?
If you doubt the need for sunshine and happiness, maybe you won’t be after you learn that bright, happy wreaths like this one consistently sell extremely well.
That’s why I have a few different bee designs. If you love bee decor, check out our Bumble Bee Mesh Wreath For Summer, DIY Beehive Door Hanger, and Cutest Bumblebee Wreath Ever.
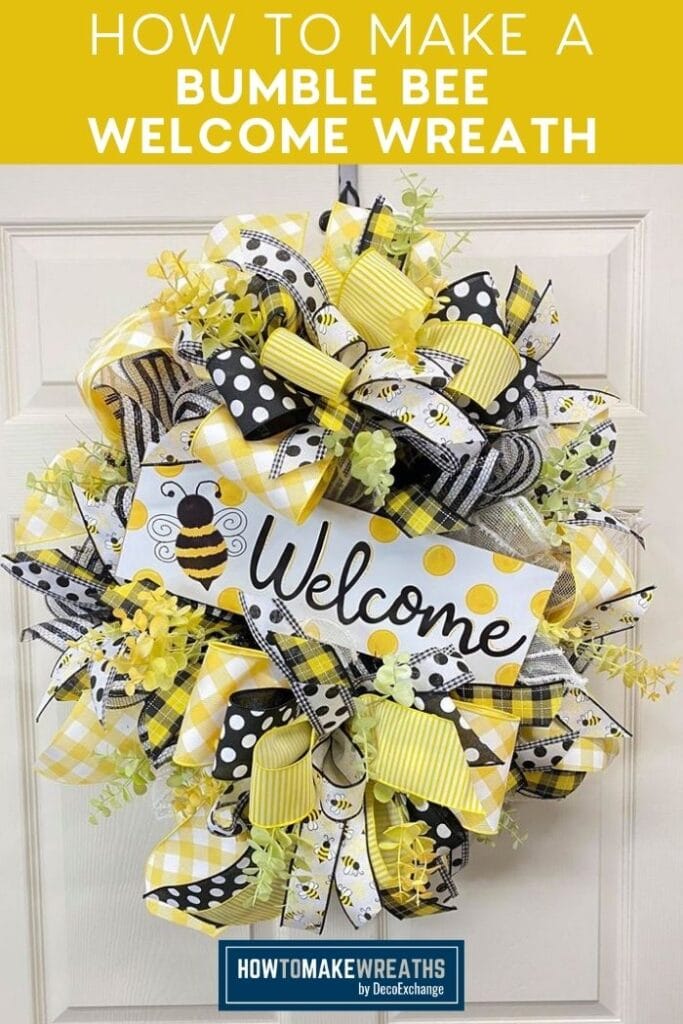
Now, on to today’s design. This bumble bee wreath is just plain fun, y’all. I mean, what better way to welcome your guests than with a pop of yellow and this cute little guy on the sign?
How To Make A DIY Bumble Bee Wreath
I love the graphic white and black ruffle on the 12″ wreath base with this design. I opted to do that instead of solid yellow so that the pops of yellow would be pops instead of making your eyes sore.
Video Tutorial
Outside of the wreath tutorial, there’s a lot of great content in this video. I share the answer to one of the most commonly asked questions I receive: how the heck do you space out pipe cleaners on a wreath frame?
Well, I’m showing you my super easy method and your mind will be blown.
Plus, if you are a Craftpreneur, you need to stick around and watch the last half of the video where I bust out my whiteboard and take y’all to (business) school. Trust me…if you want to make a profit with your products, you need to see this.
In this video tutorial, y’all will see us making a DIY wreath frame – grab the full tutorial here. But, I highly recommend buying one already made because it’ll save a lot of time.
Supplies Needed
- 1 wreath form
- 2 10″ deco mesh
- Floral picks
- (1) 4″ wired ribbon
- 2 1.5 wired ribbon
- 3 5/8″ wired ribbon
- Mesh cutter
- Scissors
- Pipe cleaners
- EZ Bow Maker
- Sign/attachment
- Rapid fuse glue
- Zip tie
- Zip tie mounts
- Hot glue gun
- Ribbon tail board
- Greenery sprays
- Wire cutters
Instructions To Make A Bumble Bee Wreath
The process for making this wreath may LOOK long, but it’s very simple to follow. In case you missed bits and pieces in the video, here are the step-by-step instructions.
Step 1
Cut (9) 30″ strips of each mesh using your mesh cutter.
Step 2
Prepare your sign by gluing a zip tie into each corner of the back of your sign. Once the glue dries, stick on zip tie mounts. To reinforce, you can use your hot glue gun around the edges of the mounts. Set aside to dry.
Step 3
Prepare your wreath frame and have all ties face outwards. Crunch frame to make it oval.
Take a strip of mesh then curl the tips on each end and ruffle it into the center. Add it to a wreath tie. Repeat the process all the way around frame-filling each wreath tie.
Step 4
With your sign, take a pipe cleaner and tie it to each corner of the zip tie mount. Add a sign to the center of the wreath by attaching the pipe cleaners tightly to the frame (one corner at a time) so the sign doesn’t move.
Step 5
Get your EZ Bow Maker and ribbons and let’s make a bow. Take 4″ ribbons and make a 12″ tail and 6″ loop on each side.
Next, with your 5/8″ ribbon, make 12″ tails with 6″ loops in an “X” shape.
Then, take your 1.5″ ribbon and make 12″ tails with slightly smaller loops. Offset this layer on top of the layer below it.
Now, with your other 5/8″ ribbon, make 12″ tails with 5″ loops. Offset this layer on top of the layer below.
Next, with your second 1.5″ ribbon, make 12″ tails and slightly smaller loops, offsetting this layer.
Take your first 5/8″ ribbon and cut a ribbon tail facing top left, bottom right.
Finally, take your second 5/8″ ribbon and make a single loop for the center of your bow.
Twist the ends of two pipe cleaners together to make a longer piece. Wrap this long pipe cleaner around the center of the bow. Twist it off and tie it nice and tight.
Step 6
Attach the bow to the wreath on the bottom of the wreath sign. Use the pipe cleaner to tie the bow to the wreath frame. Fluff your bow and arrange to your preference. Dovetail the tails.
Step 7
Make another similar bow. This next bow is a Terri Bow, so the tails will be shorter.
With your 4″ ribbon, make an 8-inch tail on the bottom right, a 6″ loop on the bottom left, a loop on the top right, and an end with a tail on the top left.
Repeat the rest of the steps for the bow then tie it off with an extra-long pipe cleaner.
Step 8
Add the bow to the wreath at the top of the wreath sign. Use the pipe cleaner to tie the bow to the wreath frame. Fluff your bow and arrange to your preference. Dovetail the tails.
Step 9
Take your 4″ ribbon, make a 7″ tail, scrunch and add to wreath tie on the outer part of the frame. Make a loop, scrunch and connect to the next wreath tie. Then, make a 7″ tail and dovetail it. Make this ribbon poof big enough to cover over the mesh.
Repeat this step until you make it all the way around the wreath.
Step 10
Next, take your (3) 5/8″ ribbons and cut (5) 14″ strips of each ribbon. You can use your ribbon tail board. Dovetail the ends.
Step 11
Stack 1 of each ribbon tail (3 total) on top of each other. Fold it down the middle, scrunch, and add to the outer edges of the wreath. Add this first set is to the right of the bottom bow. Spread tails apart and face outwards.
Add your next set of ribbon tails to the right of your top bow. For your 3rd set of ribbon tails, insert them to the left of the bottom bow.
Finally, add the rest of the ribbon tails individually around the wreath to give a fuller look.
Step 12
Next, add the greenery. Take each piece of greenery, use hot glue and apply it to the end of the stem, and insert it randomly throughout the wreath. You can use wire cutters to trim the stems.
Your wreath is now complete!
FAQs
If you have any questions about how to make this wreath, you’ve come to the right place! Here are some answers to common questions I see from readers.
Can I use different colors for the ribbons?
Yes, of course. In fact, if you can’t find these same ribbon colors (or prints), feel free to use similar options or something totally different to make your own unique design!
Do I need to add the ribbon tails?
They are optional, but I include them in this design to fill it out and give it more depth. Feel free to add fewer ribbon tails or more if you prefer that!
Make This Wreath For Your Door!
This wreath design will add that perfect sunny touch to any front door. Give it a try and see for yourself!
If you love this cheery design, check out these other colorful wreaths:
- How To Make A Spring Chick Wreath
- DIY Spring-Themed Bike Wheel Wreath
- DIY Summer Road Trip Inspired Wreath
- How to Make a Flip Flop Wreath
By the way, the supplies for this bumble bee wreath were from one of our monthly kits. They are sold out now, but you can check out our other kits here.
If you need any help with centerpiece-making, bow-making, wreath-making, or crafting in general, be sure to check out more of our tutorials on How to Make Wreaths.
We would love to see your beautiful summer wreaths! Please share with us over at the How To Make Wreaths Facebook Group.

DIY Bumble Bee Welcome Wreath
Materials
Instructions
- Get (2) 10" deco mesh and cut them in to 30" strips using your mesh cutter. You'll need 9 of each mesh.
- Take your sign. With a zip tie, take your rapid fuse glue and apply to each corner of your sign.Stick on zip tie mounts. To reinforce, you can use your hot glue gun. Set aside to dry.
- Get your wreath frame prepared and have all ties face outwards. Squish it in the middle to make it oval-shaped.Take your mesh strips, one at a time, curl the tips on each end and ruffle it to the center. Add to a wreath tie. Continue process all the way around frame filling each wreath tie.
- With your sign, take a pipe cleaner and tie to each corner of zip tie mount.Add sign to the center of the wreath. Start with the bottom right of the sign and attach the pipe cleaner to the metal frame and wrap nice and tight.Next, tie the pipe cleaner on the top left to the metal frame nice and tight. This is so the sign doesn't move around. Tie the remaining corners.
- Get your EZ Bow Maker and ribbons. Start with 4" ribbon and make a 12" tail and 6" loop on each side.Next, with your 5/8" ribbon and make a 12" tail on the bottom right, 6" loop on bottom left, loop on top right, and end with 12" tail on top left.Now, with your first 1.5" ribbon, make a 12" tail on the top right, loop on the top left, loop on the bottom right, and tail on the bottom left.Next, with your other 5/8" ribbon and make a 12" tail on the bottom right, loop on bottom left, loop on top right, and end with tail on top left.Next, with your other 1.5" ribbon, make a 12" tail on the top right, loop on the top left, loop on the bottom right, and tail on the bottom left.Lastly, take your 5/8" ribbon and cut a ribbon tail facing top left, bottom right.Take your last 5/8" ribbon and make a single loop for the center of your bow.With a pipe cleaner, take 2 and twist together to make a longer piece. Wrap around center of the bow and twist off and tie nice and tight.
- Add the bow to the wreath on the bottom of the wreath sign. Use the pipe cleaner to tie bow to wreath frame. Fluff your bow and arrange to your preference. Cut tails at an angle.
- Make another similar bow. This next bow is a Terri Bow. The tails will be shorter.With your 4" ribbon and make an 8" tail on the bottom right, 6" loop on bottom left, loop on top right, and end with tail on top left.Repeat the other steps of making the bow from above.
- Add the bow to wreath on the top of the wreath sign. Use the pipe cleaner to tie bow to wreath frame. Fluff your bow and arrange to your preference. Dovetail the ends.
- Take your 4" ribbon, make a 7" tail, scrunch and add to wreath tie on the outer of the frame, make a loop, scrunch and connect to the next wreath tie, and make a 7" tail and cut at an angle. Make loop/poof big enough to cover over the mesh. Repeat this step until you make it all the way around the wreath.
- Next, take your (3) 5/8" ribbon and cut in to 14" strips. You'll need 5 strips of each ribbon. You can use your ribbon tail board. Cut all tails at an angle.
- Get 1 of each ribbon tail (3 total), fold down the middle, scrunch, and add to outer edges of wreath. First set is to the right of the bottom bow. Spread tails apart and facing outwards.For your next set of ribbon tails, repeat the previous step, and add to the right of your top bow.Add next set of ribbon tails to the left of the bottom bow.Start adding the rest of the ribbon tails individually around the wreath to give a fuller look.
- Next, we're going to add greenery. Take each piece of greenery, use hot glue and apply to end of stem, and add randomly throughout the wreath. You can use wire cutters to trim the stems.
Just pin this DIY bumble bee “welcome” wreath tutorial below to find the instructions later!