
Today we’re showing you how to make a Christmas wreath using the UITC triangle board. You’ll be amazed at how easy it is to create this beautiful design yourself.
Hey y’all! It’s the season for all things red, green, gold, and…tree-shaped. Triangle-shaped wreaths used to be unusual, but thanks to the UITC triangle board, they’re exploding in popularity.
These wreaths are becoming so popular that we just had to do a tutorial for you!
Well, truth be told, we asked our friend over at Unique in the Creek to show us how she makes her famous Christmas tree wreath. Its simple design combined with those amazing UITC boards of hers will give you a beautiful wreath in almost no time!
How to Make a Christmas Wreath Using the UITC Triangle Board
Who’s ready to learn how to make a Christmas wreath in the shape of a tree?
Use this step-by-step tutorial to learn how to create this beautiful Christmas tree wreath. You won’t believe how simple and fun this design is to make and decorate! Laurie, from Unique in the Creek, is going to demonstrate her tutorial for us in a video.
Fun Facts About Laurie
If you don’t know Laurie, here are some fun facts about her.
She:
- is the proud mother of 3 children and 2 fur babies.
- started inventing these boards over 5 years ago which was introduced in the US in April of 2018.
- has a favorite saying: “Creativity is contagious…pass it on.”
Watch Her Video Tutorial Below:
Supplies Needed to Make a Christmas Tree Wreath
- UITC Triangle board

- (66) 18 lb zip ties 6-8 inch in length
- 1.5 rolls of 10”x 10 yard Decomesh (I am using a foiled red and green stripe)
- Wire cutter and/or zip tie gun
- Scissors
- Embellishments to decorate tree (optional)

 6-8 inch in length
 and/or

Embellishments for Your DIY Christmas Tree Wreath
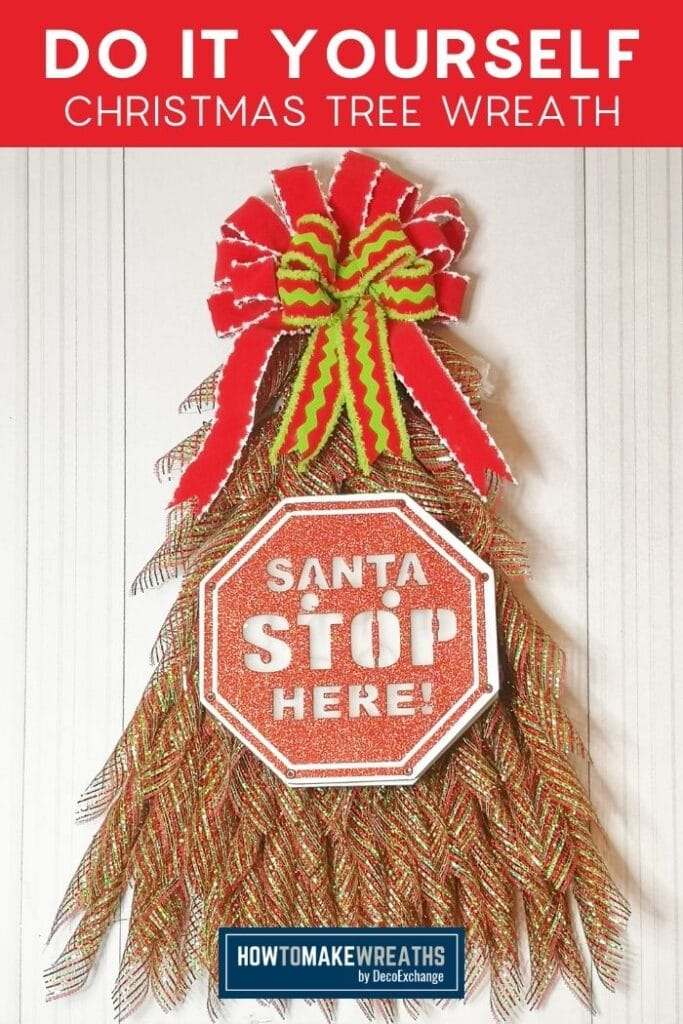
Wondering what embellishments to use on your wreath? Add whatever you like! I’ll be using a light-up sign and a tree bow.
You can decorate with ornaments , ribbons, greenery picks…whatever you want.
Use a fun bow for the top of your tree; however, you can also use a star, angel, ornament… whatever suits your needs.
Christmas Tree Wreath Instructions
Use this detailed step-by-step guide to create your own Christmas tree wreath!
Step 1
Pre-load all sets of holes closed on the board. There is 65 sets of holes.
Step 2
After your board is pre-loaded, you will need to cut deco mesh, poly jute, poly burlap, or whatever you like. Cut 65 pieces to 9×10”. That will be about 1.5 10 yard rolls.
Step 3
Once completed, you will take your mesh, place it in front of you, and turn it into a diamond shape with the curl side up. Take the corner and roll from one corner to the opposite corner.
When you’re rolling you don’t need to roll them too tight…but try for the same thickness throughout.
Step 4
After your piece of mesh is rolled, you’re going to fold that piece of mesh in half with both ends pointing in the same direction. Make sure each side of the folded pieces are the same length.
Step 5
Take that folded end of the mesh and place it into the zip tie on the bottom row.
It doesn’t matter if you start on the right or left side of the board. Just put that folded end into the zip tie about a half an inch in and zip it up nice and tight. Do this for the whole row.
Step 6
Once you have all your pieces placed and secured in that row, cut off all the zip tie tails.
For the edge/side pieces you want to make sure your Deco mesh is slightly turned, laying along the contour of the side of the board.
Step 7
Continue on each row doing the exact same instructions as above. Keep doing this all the way to row number 1.
You don’t have to use all the same mesh you can intermingle different meshes and/or different colors. A really nice example would be to use alternating lighter and darker greens.
Step 8
When you’ve completed adding the deco mesh, adding the hanger is your last step.
Your hanging holes are the chamfered or beveled holes in row one. Place a zip tie, a piece of twine, or ribbon, or anything else you want to use as a hanger.
Now the fun part begins with decorating your Christmas tree. I kept this one very simple by just adding a light-up sign that I had in stock as well as a fun ribbon bow tree topper I made and called it done!

Christmas Wreath-Making Final Thoughts
If you’re interested, you can buy UITC boards at Unique In The Creek, on Amazon , or in select Michael’s stores within the USA and Canada. You can also find them at CraftOutlet.com, Trendy Tree, Waterman’s loft , and quite a few other smaller new stores on Etsy.
We hope you enjoyed this Christmas tree wreath tutorial! If you liked it, please share this with your friends so they can enjoy it too!
If you need extra help with bow-making, wreath making, or crafting in general, be sure to check out our other tutorials on How to Make Wreaths.
Also, please share your holiday wreaths with us over at the How To Make Wreaths Facebook Group. We love seeing all your creations!
If you’re interested in more info on learning how to make wreaths or being in a community of like-minded crafters, check out our Creative Coaching Subscription Group.

How to Make a Christmas Wreath with UITC Triangle Board
Equipment
- UITC Triangle board
- Wire cutter and/or zip tie gun
Materials
- 66 18 lb zip ties 6-8 inch in length
- 1.5 rolls of 10”x 10 yard Decomesh (I am using a foiled red and green stripe)
- Embellishments to decorate tree (optional)
Instructions
- Pre-load all sets of holes closed on the board. There are 65 sets of holes.
- After your board is pre-loaded, cut the deco mesh or other materials you're using. Cut 65 pieces to size 9×10”, which is about 1.5 10 yard rolls.
- Once completed take your mesh and turn it into a diamond shape with the curl side up by taking the corner and roll from one corner to the opposite corner.
- Once rolled, fold that piece of mesh in half with both ends pointing in the same direction. Make sure each side of the folded pieces are the same length.
- Take the folded end of the mesh and place it into the zip tie on the bottom row.Next, put the folded end into the zip tie about a half an inch in and zip it up nice and tight. Do this for the whole row.
- Once you have all your pieces placed and secured in that row, cut off all the zip tie tails.For the edge/side pieces you want to make sure your Deco mesh is slightly turned, laying along the contour of the side of the board.
- Keep doing this process all the way to row number 1.
- Once you have completed adding the deco mesh, add your hanger.


These boards are THE BEST way to DIY! If you’re not using a Unique in the Creek board–jump over there and grab one or 50 because you’re going to be absolutely AMAZED at what you can create with these boards. You can, LITERALLY, use ANY materials to DIY absolutely gorgeous decor–whether it’s for the holidays, birthdays, weddings, baby showers–these DIY wreath boards are genius. Join Laurie and the ENTIRE community of Creekers–it’s an amazing family over there!
Very Beautiful wreath. Looks harder to make but I will try this in the coming christmas.
Hi Fiona! It may look hard, but it’s so worth trying! Share your pics with us on our How to Make Wreaths Facebook group! We’d love to see your creations!