
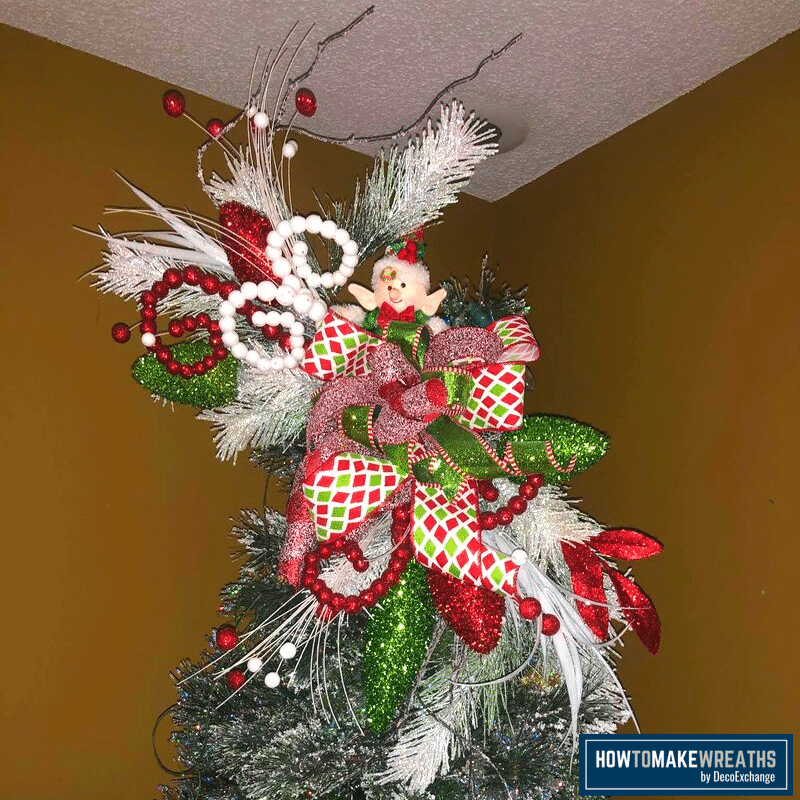
Have you ever added a bow tree topper to your decorated Christmas tree? Learn how to create a lovely Christmas tree bow topper to complete your tree decorations this year!
Hey, y’all! The hustle and bustle of the holidays are upon us, and it’s time to drag those Christmas decorations out of the dusty attic!
I love decorating for the holidays…the lights, the wreaths, the garlands, and the tree!
Decorating the Christmas tree is one of my favorite parts of the holidays. I just love how festive it looks – and how amazing it smells! But even with all the ornaments on top, it still looks empty to me without a bow tree topper.
That’s why today I’m going to share a tutorial with you on how to make a Christmas classic—a big, beautiful Christmas tree bow topper!
Related Post: How to Decorate a Christmas Tree Like A Pro
How to Make A Christmas Tree Topper Bow
I’m going to show you how to create a professional bow tree topper in no time at all. Prepare to be amazed…(I’ve always wanted to say that)!
With a bow maker (if you need to, check out our tutorial for using a Pro Bow Maker) and a few rolls of ribbon, we’re going to create a designer Christmas tree topper bow in less than 10 minutes!
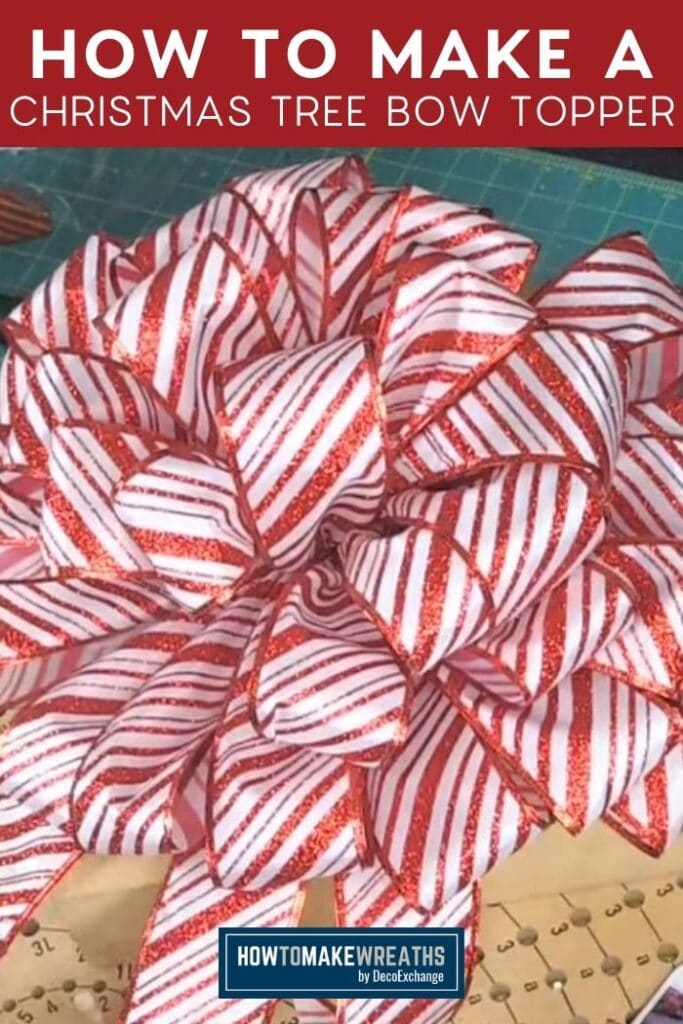
I’m going to use a classic red and white striped ribbon for my bow, but you use any colors that fit your theme.
That’s one of the very best things about using ribbon; it’s so versatile which provides so many opportunities for customization!
Christmas Tree Bow Topper Bow Supply & Tool List:
- Pro Bow the Hand Bow Maker & Fluff Box
- Floral wire
- (3) 25 yard rolls of 2.5 inch wired ribbon
- Scissors


DIY Christmas Tree Bow Topper Instructions
Follow these step-by-step instructions to create your own Christmas tree topper bow, and you’ll be done in no time!
Step 1
Set up your Pro Bow the Hand with 6 pegs on each side in Row E and your three rolls of ribbon in the accompanying spool holder.
Step 2
Cut two lengths of floral wire at 30 inches and fold in half.
Step 3
Next, while holding all three ends of the ribbon together, pull ribbons simultaneously, and fold the ribbon over one inch (thumb length) creating a crease.
Pinch ribbon at the fold and wrap the wire around the ribbon, approximately three times.
Step 4
Take your three ribbons and loop around the first peg on the left of your Pro Bow (design facing out), then:
- Wrap the end of the ribbon around the bottom peg.
- Wrap the top wire around the bottom peg.
- Then, wrap the bottom wire around the nail of the Pro Bow several times.
- Finally, tuck your extra wire under the Pro Bow.
Step 5
At this point, I added my second length of floral wire around the ribbon to create extra stability.
Step 6
Bring the ribbon down to the bottom peg, pinch and twist so that the design faces out, then loop around the first peg on the right side.
Step 7
Bring ribbon down to the bottom peg, pinch and twist the ribbon, and loop it around the second peg on the left.
Step 8
Repeat steps until you have made six loops on each side.
Step 9
Unwrap the wires and tie off the bow. Then, dovetail the ends of the ribbon and attach your bow to the Fluff Box.
Step 10
Starting in the center, fluff the bow from the top down by pulling your three loops with one in the center and one on each side. Repeat until the whole bow is fluffed. Adjust ribbon tails.
Tip: To create the look of a Christmas tree topper bow with long flowing tails, cut extra lengths of ribbon according to the height of your tree.

Christmas Tree Bow Topper
Equipment
- Pro Bow the Hand Bow Maker & Fluff Box
Materials
- Floral wire
- 1 25 yard rolls 2.5 inch wired ribbon any colors you want
Instructions
- Set up your Pro Bow the Hand with 6 pegs on each side in Row E. Your three rolls of ribbon should be in the accompanying spool holder.
- Cut two lengths of floral wire at 30 inches and fold in half.
- Holding all three ends of the ribbon together, pull them simultaneously and then create a crease by folding the ribbon over one inch (thumb length). Pinch ribbon at the fold and wrap the wire around the ribbon, about three times.
- Take your three ribbons and loop around the first peg on the left of your Pro Bow (design facing out). Wrap the end of the ribbon around the bottom peg and the top wire around the bottom peg, then wrap the bottom wire around the nail of the Pro Bow several times. Tuck your extra wire under the Pro Bow.
- Add the second length of floral wire around the ribbon to create extra stability.
- Bring the ribbon down to the bottom peg, then pinch and twist it so that the design faces out.vLoop around the first peg on the right side.
- Bring the ribbon down to the bottom peg, pinch and twist the ribbon, then loop it around the second peg on the left.
- Repeat steps until you have made six loops on each side.
- Unwrap the wires and tie off the bow. Dovetail the ends of the ribbon and attach your bow to the Fluff Box.
- Starting in the center, fluff the bow from the top down by pulling your three loops with one in the center and one on each side. Repeat until the entire bow is fluffed. Adjust ribbon tails.
Video
Notes
Christmas Tree Bow Topper – Final Thoughts
That’s it, y’all! I know at first glance the process for making a Christmas tree bow topper seems complicated, but it’s really not.
With just a little practice, you’ll be cranking out professional-looking bows for Christmas trees in no time!
Now, go gaze upon the twinkling lights and enjoy the satisfaction of creating something beautiful.

More Christmas Inspiration
Check out these other Christmas tutorials for some inspiration as you prepare for the holidays this year.
More Bow Making Resources
If you need extra help with bow-making, be sure to check out our other tutorials on How to Make Wreaths.
Don’t forget to share your Handmade bows with us over at the How To Make Wreaths Facebook Group. We love seeing all of your creations!
If you are interested in more info on learning how to make wreaths, where to buy supplies, or being a part of a community of like-minded crafters, check out our Creative Coaching Subscription Group.


Great tips & instructions once again…. thanks
bow
Thank you!
Awesome tutorial, as always!
Bow
Bow
Thank you
Bow
Bow
Bow
Bow
Bow
Send info please,.
bow
Bow
Bow
Bow