
Get ready to watch as I show you exactly how to make an amazing Mistletoe Christmas Wreath in this Christmas Wreath tutorial.
This is the time of year when people start to get into the Christmas spirit. Decorations are going up, and everyone is ready for a winter wonderland! If you’re looking for a great fun wreath to make this holiday to add to your decorating collection, then you will want to follow along as I teach you how to make a Christmas wreath with an attached sign that says Meet me Under the Mistletoe.
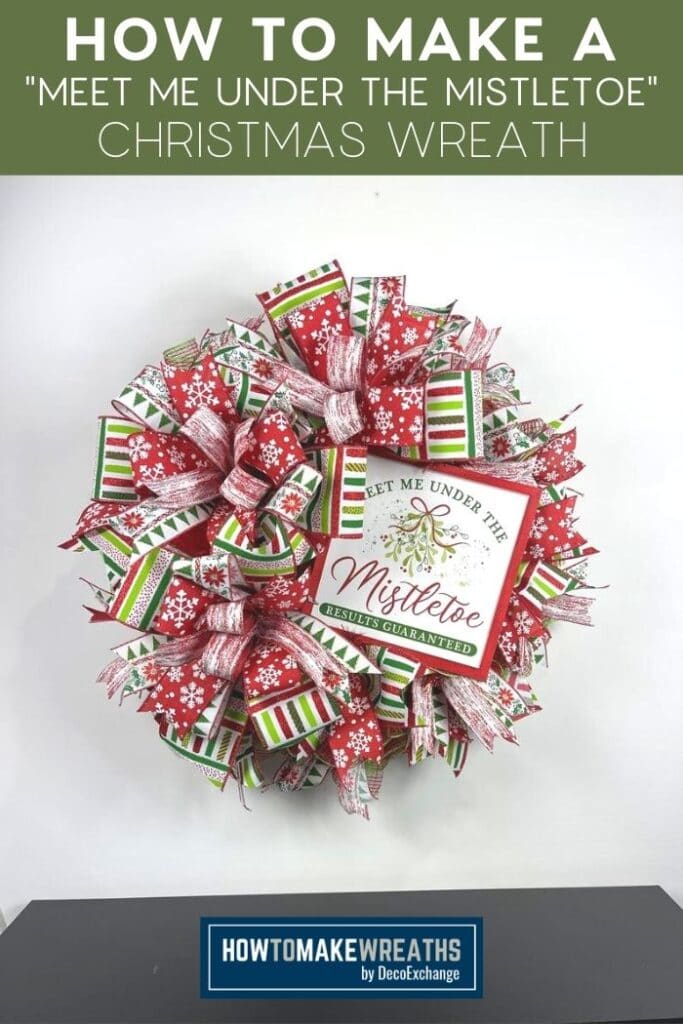
Meet Me Under the Mistletoe Christmas Wreath
I love Christmas! All the red, all the green, and all the sparkly things! Making adorable wreaths just makes the holiday even more fun! With this project, I will show you step by step how to mount a sign, build a deco mesh wreath, create a bow, and of course beautify it with all the Christmas ribbons! Let’s get started.
Supplies for Meet Me Under the Mistletoe Christmas Wreath
- 1 wreath form
- 2 10″ deco mesh Christmas themed checked, red
- 1 4″ wired ribbon Christmas Themed
- 2 2.5″ wired ribbon Poinsettia/Tree ribbon, White and Red Snowflake
- 1 1.5″ Ribbon Velvet
- 1 sign/attachment Meet Me Under the Mistletoe
- 1″ mounting square
- Rotary Cutter
- ribbon tail board
- pipe cleaners
- hot glue gun
- EZ Bow Maker
How to Make a Meet Me Under the Mistltoe Christmas Wreath
Step #1: Add 4 mounting squares on all 4 corners of your Christmas sign and some super glue. Place a little dab at the bottom and top, because a little goes a long way. Adhere your mounting squares to the super glue. While the super glue dries, add a thin layer of hot glue around your metal allowing the super glue to cure. Set aside.
Step #2: Grab your red value deco mesh and drop it to the floor. Fold over the front edge and walk our hands together to curl it up, so we have no frayed ends. Tie it into your work form wreath in the inner top circle with your twist ties. We will create 12” poofs in between each twist tie on the inner section, fluffing as you go.
Step #3 Continue with your 12” poofs around the bottom outer circle of your work form all the way around. Cut when done. This is a nice filler base for our wreath. Set aside.
Step #4: Grab your Red and Green Check Fabric Deco mesh, laying it out on your measuring mat. Cut 18 pieces at 20” with your rotary cutter. These will be our inside and outside ruffles.
Step #5: Once cut, grab one 20” mesh ruffle. Roll it up from both ends, scrunch together and add 1 of these all the way around your outer edge first. Use your twist tines to secure in place. There is no wrong way to add a ruffle.
Step #6: Repeat adding your ruffles into the inner circle. Fluff as you go. Set aside.
Step #7: Our sign should be ready to continue. Grab your pipe cleaners, sliding 1 tip into the mounting square, and twist it off. Repeat for all 4 mounting squares on the back of your sign.
Step #8: Grab your Meet Me Under The Mistletoe sign, as the glue should be nice and dry now. I am adding my sign on the right section of my wreath. It is good to begin with a plan to help your vision come to life. Place your sign at a slight angle and be sure you like the placement before securing in place.
Step #8: Work your pipe cleaners down through the frame in the position you like. When tying down my pipe cleaners, I like to go corner to corner at an angle first, and then complete the other two. Be sure to tie them securely to your frame so it will stay in place. Do not smash your mesh. Set aside.
Step #9: Now for the bow! Trim off any weird ends you might have on your bow. Grab your EZ Bow Maker and your 4” Christmas ribbon. Measure out about 8” to create your first tail. Give it a pinch and twist before sliding into your EZ Bow Maker. Pull tail down. We’re going to measure our loop out to 6 ½ to 7”. Bringing it back through, twist it. Now measure again, 6 ½ to 7” on your loop on the other side. Pulling ribbon back through, you will measure out your second tail pointing out toward the top of your bow, about 8”. Trim ribbon to make the next layer.
Step #10: For the next layer of ribbon, grab your 2nd ribbon, 2.5” Christmas theme. With this layer we’re going to have our tail pointing out and up the first time, opposite from our first layer. Give it a twist. So if our tail’s pointing up, we want our first loop going up. We’re not going to measure anymore. We’re just going to make each one a little bit smaller going in. 2nd loop in this layer will match the length of that loop, but instead, point downward on your bow. Our loops will be about 6” for those of you who must have measurements. Cut ribbon, having your tail pointing downward – about 8”, opposite in position from your loop.
Step #11: Third layer of ribbons with your red and white snowflake 2.5” ribbon, repeat steps to have 2 long tails and 2 matching loops. Pay attention to your loop and tail placement, as they should accent the first 2 layers of ribbon in your bow. That just means, make sure it is eye-appealing.
Step #12: 4th layer of bow, made with 1.5” red velvet ribbon will be created repeating the same steps.
Step #13: To finish the bow, get 1 pipe cleaner, give it a good pinch in the center to fold in half. Wrap it around all the layers of ribbon with the center of the pipe cleaner at the top. Hold the layers tight and holding each side of the pipe cleaner as close to the bow, twist nice and tight, and you’ll see the loops and tail start to form the bow. Fluff and adjust.
Step #14: Repeat the bow making steps to make 3 total bows in all for this wreath. Make bows 2 and 3 smaller than your first bow a bit by shrinking the tails and loops an inch less than the bow we just completed.
Step #15. Add your biggest bow to the bottom of your wreath with pipe cleaner by sliding through the frame up on the bottom left section of your wreath. Twist nice and tight to secure your bow. Fluff and fancy your loops, reposition your tails if needed, remembering not to smash your beautiful mesh underneath.
Step #16: I always follow the order of bottom, top, and middle when adding my bows to keep an even look. I have found that it prevents weird gaps in my wreath. Add our second bow, all the way at the top, above the left corner of our sign.
Step #17: Add your third and final bow in the center, accenting the outer edge of your wreath, complimenting the first 2 bows added and supporting the placement of your sign. We will address the ribbon tails on these bows a little later in the project, so don’t worry. Your wreath should be so full. Fluff and beautify!
Step #18: Let’s create multiple ribbon tails. With our ribbon tail board, measure out tails about 13” in length, making 5 total sections of each ribbon. Dovetails the ends and pinch in the center.
Step #19: I will use my 4” Christmas ribbon paired with my 2.5” multicolored ribbon for one set of tails. And the 2.5” red and white snowflake with the 1.5” red velvet ribbon for the other set. Attach on the outer edge of work form all around the wreath, alternating tails as we add.
Step #20: Grab one set of ribbons, layer on top of each other, pinch in half forming a good-looking bow tie, and then pinch it backwards until your two inner edges of wire touch. Keeping that form, add them into the twist ties that are already on your work form. Attach on the outer edge all around the wreath, alternating ribbon pairings as we add. Complete all around your wreath.
Step #21: To fill in any gaps, add your ribbon pairing with 4” set, creating a set of tails measuring 13” in length in the bottom gap. Add your other ribbon pairing with the 2.5” ribbon tail in the top gap. Don’t forget to dovetail those ends. Use twist ties on the wreath to secure in place.
Step #22: Go back to your bows and dovetail the ends of your tails, measuring at all different lengths to add some fun.
Step #23: Take a look at your wreath, making any adjustments as needed. Arrange the bows, so your sign is not covered. Be sure your loops look fabulous!
Make your own Christmas Wreath with sign today!
No matter what sign you attach to your wreath this is a great wreath recipe to follow to make a full and bright wreath to hang on your door this Christmas season.
If you need any help with centerpiece-making, bow-making, wreath-making, or crafting in general, be sure to check out more of our tutorials on How to Make Wreaths.
We would love to see your beautiful summer wreaths! Please share with us over at the How To Make Wreaths Facebook Group.


Meet Me Under the Mistletoe Christmas Wreath
Materials
- 1 wreath form
- 2 10" deco mesh Christmas themed checked, red
- 1 4" wired ribbon Christmas Themed
- 2 2.5" wired ribbon Poinsettia/Tree ribbon, White and Red Snowflake
- 1 1.5 wired ribbon Velvet
- 1 sign/attachment Meet Me Under the Mistletoe
- 1″ mounting square
- Rotary Cutter
- ribbon tail board
- pipe cleaners
- hot glue gun
- EZ Bow Maker
Instructions
- Add 4 mounting squares on all 4 corners of your Christmas sign and some super glue. Place a little dab at the bottom and top, because a little goes a long way. Adhere your mounting squares to the super glue. While the super glue dries, add a thin layer of hot glue around your metal allowing the super glue to cure. Set aside.
- Grab your red value deco mesh and drop it to the floor. Fold over the front edge and walk our hands together to curl it up, so we have no frayed ends. Tie it into your work form wreath in the inner top circle with your twist ties. We will create 12” poofs in between each twist tie on the inner section, fluffing as you go.
- Continue with your 12” poofs around the bottom outer circle of your work form all the way around. Cut when done. This is a nice filler base for our wreath. Set aside.
- Grab your Red and Green Check Fabric Deco mesh, laying it out on your measuring mat. Cut 18 pieces at 20” with your rotary cutter. These will be our inside and outside ruffles.
- Once cut, grab one 20” mesh ruffle. Roll it up from both ends, scrunch together and add 1 of these all the way around your outer edge first. Use your twist tines to secure in place. There is no wrong way to add a ruffle.
- Repeat adding your ruffles into the inner circle. Fluff as you go. Set aside.
- Our sign should be ready to continue. Grab your pipe cleaners, sliding 1 tip into the mounting square and twist it off. Repeat for all 4 mounting squares on the back of your sign.
- Grab your Meet Me Under The Mistletoe sign, as the glue should be nice and dry now. I am adding my sign on the right section of my wreath. It is good to begin with a plan to help your vision come to life. Place your sign at a slight angle and be sure you like the placement before securing in place.
- Work your pipe cleaners down through the frame in the position you like. When tying down my pipe cleaners, I like to go corner to corner at an angle first, and then complete the other two. Be sure to tie them securely to your frame so it will stay in place. Do not smash your mesh. Set aside.
- Now for the bow! Trim off any weird ends you might have on your bow. Grab your EZ Bow Maker and your 4” Chrismtas ribbon. Measure out about 8” to create your first tail. Give it a pinch and twist before sliding into your EZ Bow Maker. Pull tail down. We’re going to measure our loop out to 6 ½ to 7”. Bringing it back through, twist it. Now measure again, 6 ½ to 7” on your loop on the other side. Pulling ribbon back through, you will measure out your second tail pointing out toward the top of your bow, about 8”. Trim ribbon to make the next layer.
- For the next layer of ribbon, grab your 2nd ribbon, 2.5” Christmas theme. With this layer we’re going to have our tail pointing out and up the first time, opposite from our first layer. Give it a twist. So if our tail’s pointing up, we want our first loop going up. We’re not going to measure anymore. We’re just going to make each one a little bit smaller going in. 2nd loop in this layer will match the length of that loop, but instead point downward on your bow. Our loops will be about 6” for those of you who must have measurements. Cut ribbon, having your tail pointing downward – about 8”, opposite in position from your loop.
- Third layer of ribbons with your red and white snowflake 2.5” ribbon, repeat steps to have 2 long tails and 2 matching loops. Pay attention to your loop and tail placement, as they should accent the first 2 layers of ribbon in your bow. That just means, make sure it is eye-appealing.
- 4th layer of bow, made with 1.5” red velvet ribbon will be created repeating the same steps
- To finish the bow, get 1 pipe cleaner, give it a good pinch in the center to fold in half. Wrap it around all the layers of ribbon with the center of the pipe cleaner at the top. Hold the layers tight and holding each side of the pipe cleaner as close to the bow, twist nice and tight, and you’ll see the loops and tail start to form the bow. Fluff and adjust.
- Repeat the bow making steps to make 3 total bows in all for this wreath. Make bows 2 and 3 smaller than your first bow a bit by shrinking the tails and loops and inch less than the bow we just completed.
- Add your biggest bow to the bottom of your wreath with pipe cleaner by sliding through the frame up on the bottom left section of your wreath. Twist nice and tight to secure your bow. Fluff and fancy your loops, reposition your tails if needed, remembering not to smash your beautiful mesh underneath.
- I always follow the order of bottom, top, and middle when adding my bows to keep an even look. I have found that it prevents weird gaps in my wreath. Add our second bow, all the way at the top, above the left corner of our sign.
- Add your third and final bow in the center, accenting the outer edge of your wreath, complimenting the first 2 bows added and supporting the placement of your sign. We will address the ribbon tails on these bows a little later in the project, so don’t worry. Your wreath should be so full. Fluff and beautify!
- Let’s create multiple ribbon tails. With our ribbon tail board, measure out tails about 13” in length, making 5 total sections of each ribbon. Dovetails the ends and pinch in center.
- I will use my 4” Christmas ribbon paired with my 2.5” multicolored ribbon for one set of tails. And the 2.5” red and white snowflake with the 1.5” red velvet ribbon for the other set. Attach on the outer edge of work form all around the wreath, alternating tails as we add.
- Grab one set of ribbons, layer on top of each other, pinch in half forming a good-looking bow tie, and then pinch it backwards until your two inner edges of wire touch. Keeping that form, add them into the twist ties that are already on your work form. Attach on the outer edge all around the wreath, alternating ribbon pairings as we add. Complete all around your wreath.
- To fill in any gaps, add your ribbon pairing with 4” set, creating a set of tails measuring 13” in length in the bottom gap. Add your other ribbon pairing with the 2.5” ribbon tail in the top gap. Don’t forget to dovetail those ends. Use twist ties on the wreath to secure in place.
- Go back to your bows and dovetail the ends of your tails, measuring at all different lengths to add some fun.
- Take a look at your wreath, making any adjustments as needed. Arrange the bows, so your sign is not covered. Be sure your loops look fabulous!
Video
Just pin this Meet Me Under the Mistletoe Christmas Wreath tutorial to save the instructions for later!

If you love to craft, check out our Eat. Sleep. Craft. Repeat. t-shirts and click on the picture below!


