
If y’all haven’t already started it is time to get your summer stock ready to go. This quick and adorable ladybug grapevine wreath will help get you going!
All right y’all, this sweet ladybug grapevine wreath is super quick and super simple which means that you can easily decorate your front door or beef up your summer line in no time! You can find all the supplies you need to make it on DecoExchange then watch the video, and we can make it together. We can be wreath making buddies, y’all!

Quick and Simple Ladybug Grapevine Wreath Tutorial
Ladybugs are going to be really popular this year (and why not, they are so cute!) so it is a good idea to offer your customers more than one option in the spotted bug department. I’m here to tell y’all that not everything we sell has to be super complicated; having some simple products on offer is a great way to add lower priced options to your shop.
The video below will walk you through how to make an adorable ladybug wreath and I also give you some advice on pricing and why it’s important to offer different price points to your customers. If you are looking for more help in this area you can check out my post on how to price your items to make money.
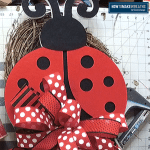
Quick Ladybug Grapevine Wreath
Materials
Instructions
- Take skewer and make whole in wreath sign. Thread floral wire where skewer was inserted and tie off. Secure with hot glue over the wires. Do this to the left, right side, and top of the sign.
- Attach sign to the grapevine base. Add hot glue under the sign to secure to grapevine base. Let dry.
- Get your EZ Bow Maker and ribbon.
- With your 2.5" ribbon, measure a 12" tail and a 6" loop on each side. Cut tail.
- Take your 1.5" ribbon, measure a 12" tail and (2) 5.5" loops on each side. Cut tail.
- With your last 1.5" ribbon, measure a 12" tail and a 5" loop on each side. Cut tail.
- Take a 1.5" ribbon and measure a tail and make a center loop.
- Wrap a pipe cleaner around the center of the bow and tie nice and tight.
- With your skewer, poke a hole on the bottom of your sign. Thread the pipe cleaner partially through the sign and the grapevine. Tie off nice and tight.
- Fluff out bow and trim ends into dovetails. Curl tails.
- Secure bow by adding a little bit of glue behind the bow.
Y’all know I love me some big and beautiful wreaths! They are great for gifts, perfect to sell, and go great on my front door. But, there are also benefits to these simpler projects too! Some people prefer a more modest décor. Others want to spend less on one item so they can buy more. It is impossible to be everything for everyone but when it comes to our products, the more people we can appeal to, the more our business will grow!
Y’all, this ladybug wreath is a simple and fun way to add to your summer product lineup! And, since it won’t take up much of your time and resources, you’ll be able to focus on other projects and ways to boost your business! Right now could be a great time to work on product photos and if you need help learning how to photograph your sale items we have a whole post with photo tips for selling.

If you need any help with centerpiece-making, bow-making, wreath-making, or crafting in general, be sure to check out more of our tutorials on How to Make Wreaths.
We would love to see your beautiful summer wreaths! Please share with us over at the How To Make Wreaths Facebook Group.

We Think You’ll Enjoy These Related Posts:


