
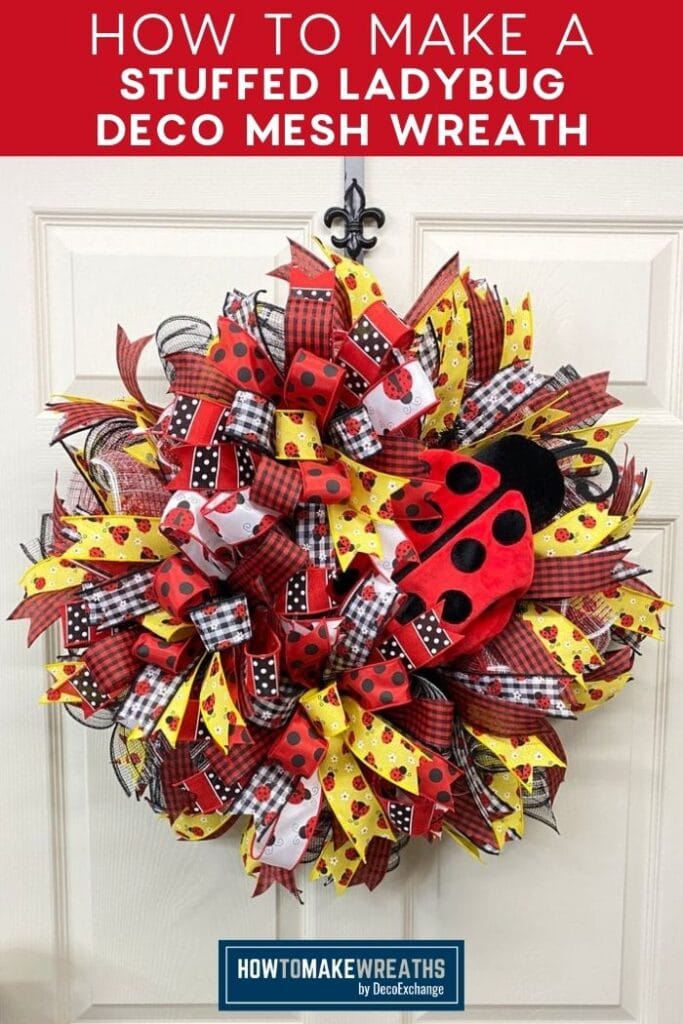
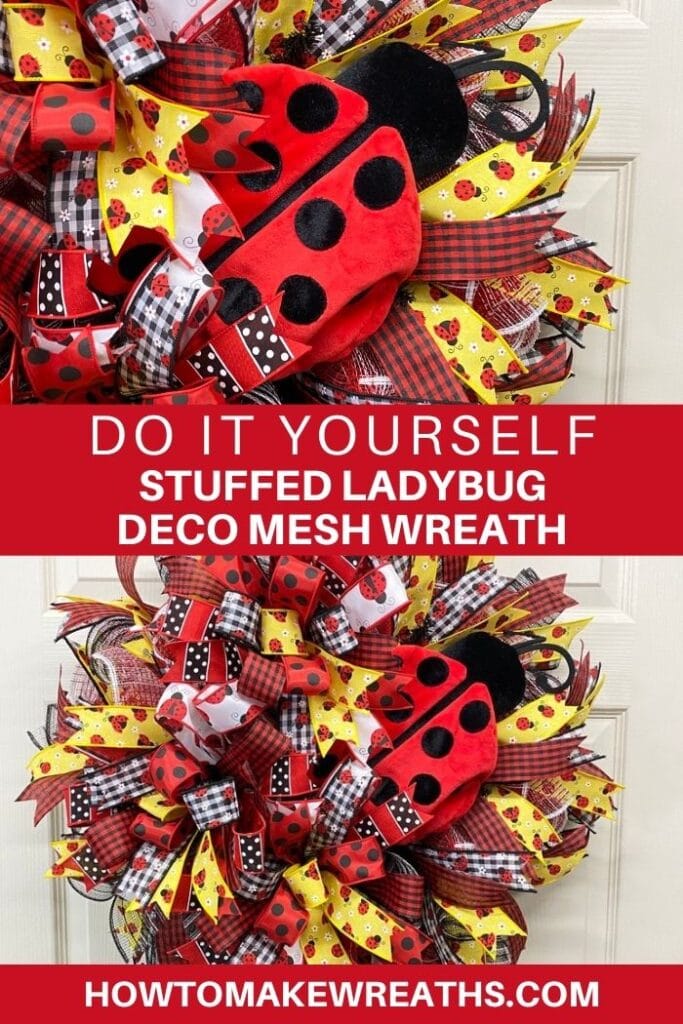
This ladybug deco mesh wreath is made with a combination of ribbons, ruffles, and bows in complementary red and black colors. This is the perfect way to jazz up any front door all summer long. Watch the video and learn how to make it yourself!
Hey, y’all! One of our wreath-making kits was this adorable ladybug wreath. Ironically, it wasn’t until I started putting this wreath together that I realized how many of our ribbons features ladybugs!
I’ve made other fun ladybug designs too over the years because everyone loves cute little ladybugs!
If you want more inspiration on fun wreath designs, check out our Patriotic Grapevine Wreath With Ladybug Decor and Quick Ladybug Grapevine Wreath tutorials!
DIY Ladybug Deco Mesh Wreath
I did something in this tutorial that I’ve never done before. I usually pick either curls OR ruffles and do the same thing all around the base.
However, I felt like changing it up for this ladybug wreath so I did curls around the outside and ruffles in the middle. I actually ended up really liking it because the difference lends a fun texture to the wreath! Check it out and tell me what you think!
Supplies Needed
- 1 Wreath form
- 2 10″ deco mesh (7) 30″ long and (18) 12″ long
- Mesh cutter
- (6) 1.5 wired ribbon
- 1 Sign/attachment
- Pipe cleaners
- Scissors
- EZ Bow Maker
- Ribbon tail board
- 3 Terri Bows
Ladybug Deco Mesh Wreath Video Tutorial
We know that many of our readers appreciate being able to see the process of making a wreath firsthand. Unfortunately, I can’t physically come to your home and personally show you this wreath process.
So, I did the next best thing: made a video! Watch this ladybug wreath come to life below:
Instructions
Follow these simple instructions and in just a few minutes you’ll have a beautiful ladybug deco mesh wreath to display all spring and summer!
Step 1
Fluff out the wreath form.
Step 2
Take your 10″ mesh and cut (7) 30″ pieces.
Step 3
Next, do (18) 12″ cuts from your mesh (separate from the previous pieces you cut).
Step 4
Take each 12″ deco mesh piece, curl it, and stack it in an “x” shape. Add 1 set (2 curls) to every wreath tie on the outside.
Step 5
Now, take the 30″ pieces, curl the ends, and then scrunch in toward the center. Add to the inside portion of the wreath using the wreath ties. Alternate deco mesh colors.
Step 6
Make 3 Terri Bows using the recipe card below (check out the Terri Bow tutorial).
Step 7
Grab 3 of your ribbons and your ribbon tailboard. Make (13) 14″ ribbon tails with each ribbon. Dovetail the ends.
Step 8
Layer (3) ribbon strips, fold in half, scrunch in middle, and add to the wreath ties along the outside of the wreath form.
Step 9
Fan out the ribbon tails and make sure they all point out to make the wreath look bigger.
Step 10
Add your attachment by wrapping the wires around the frame.
Step 11
Add the Terri Bows you made to your EZ Bow Maker. One below the attachment, one above, and one to the side.
Step 12
Dovetail the ribbon tails of your bows. Take your remaining ribbon tails and fill in any gaps.
Now your cute ladybug deco mesh wreath is done and ready to sell, give away, or hang!
I’m already brainstorming how I can use my new technique to make some different designs. One of the many reasons I love wreath making is that there’s never a dull moment, y’all!
FAQs
Here are a few answers to questions I frequently see readers ask about this ladybug wreath design!
Can I use different colors and patterns in this design?
Yes! Feel free to copy this deco mesh ladybug wreath design exactly as we made it or get creative and use different colors and textures to create your own unique design.
For example, you could change the ladybug elements into different versions or change out the ladybug for a different animal theme altogether.
Can I use a wider ribbon for the bows?
Yes! I think that the 1.5″ ribbon works best with the Terri Bow, but that’s just a personal opinion. If you want bigger, bolder bows, go for the 2.5″ ribbon!
If You Love This Ladybug Deco Mesh Wreath, Here’s More Wreath-Making Inspiration!
Check out these other popular design tutorials if you love making animal-themed wreaths.
- Orange Dog Lover Wreath
- Cheeky Sloth Sign Wreath
- Make a Butterfly Door Hanger
- Welcome To Our Honeycomb Floral Grapevine Wreath
- DIY Lemon-Themed Home Wreath
- DIY Pineapple Door Hanger
If you need any help with centerpiece-making, bow-making, wreath-making, or crafting in general, be sure to check out more of our tutorials on How to Make Wreaths.
We would love to see your beautiful summer wreaths! Please share with us over at the How To Make Wreaths Facebook Group.


Terri Bow using the EZ Bow Maker
Materials
Instructions
- We're going to take our first 1.5" ribbon. We're going to measure it out 8". Pinch it in the center. We're going to give it a twist, slide it in. We want our pretty side up, ugly side down.
- We're going to measure it out to 7". Bringing it back through, twist it. Y'all, whenever you're twisting your ribbons, make sure you twist them this way one time and then come back the other way when you come back across.
- So the first one, we want a tail and a loop facing the same direction. So we have our tail and our loop both pointing towards us.
- When we come back across, we're going to measure our 7". Go straight down. Y'all, it's the tail so we want both pretty sides up. On the outside, we're going to dovetail it. So we're just making an X every time.
- For the next 1.5 inch, we're going to have our tail pointing out the first time. Give it a twist. Tail pointing up. So if our tail's pointing up, we want our first loop going up. Y'all, and guess what? We're not going to measure anymore. We're just going to make each one a little bit smaller going in.
- Now our other 1.5 inch ribbon is next. Since our last one, the loop was down, so now our first tail is going to be down. Y'all, any time you kill a role, well, then you get to buy three more. It's a rule.
- All right. So our last one, the first thing that we had down was a tail. So we will bring our tail up to the top this time. Bring a loop down. And you just keep following this same pattern all the way up until we get to the center.
- So the previous ribbon, we have a loop down, so now we’re going to start with our tail. Repeat same steps: Tail to the top. Loop on the top. Give it a little twist in the middle.
- Then I like to finish mine with the center loop. So to get your center loop, you have your tails coming out on one side, a smaller loop right down the middle, and tail is coming back out.
- Get a pipe cleaner and fold in half. Get it ready, then just hold your pipe cleaner tight in your hand and give your bow a twist.
- Now, add it to your wreath.
- You can add it to the base. That way it makes it easier to fluff. If you add it to your base, get it attached, then it’ll sit there while you pull your ribbons and your tails all in different directions.
- Trim these tails up nice and pretty. Y’all, you can dovetail them or you can just cut them at an angle. Whatever you like to do. Y’all, I also like to leave all the tails longer while I’m making the bow. That way when I come back in and trim them, I can cut them all at different lengths. That way you get a really cool, fun textured look.
DIY Stuffed Ladybug Deco Mesh Wreath
Materials
- 1 wreath form
- 2 10" deco mesh (7) 30" long and (18) 12" long
- mesh cutter
- 6 1.5 wired ribbon
- 1 sign/attachment
- pipe cleaners
- scissors
- EZ Bow Maker
- ribbon tail board
- 3 Terri bow
Instructions
- Fluff out wreath form
- Take your 10" mesh and cut (7) 30" pieces.
- Take your deco mesh and do 12" cuts. Make 18 pieces.
- Take each of the 12" deco mesh pieces, curl it and add 2 curls to every wreath tie on the outside.
- Take the 30" pieces, curl the ends and then scrunch the center. Add to inside wreath ties. Alternate deco mesh colors. Fill the inside wreath ties.
- Make 3 Terri bows using the tutorial above.
- Take out 3 of your ribbons and your ribbon tail board. Make (13) 14" ribbon tails with each ribbon. Cut ends into dovetails.
- Layer (3) 1.5" ribbon strips, fold in half, scrunch in middle, and add to the wreath ties on the outside.
- Fan out the ribbon tails. and Make sure it all points out to make the wreath look bigger.
- Add your attachment. Wrap wires around frame.
- Add the Terri bows you made on your EZ Bow Maker. One below the attachment, one above, and one to the side.
- Trim your ribbon tails of your bows. Take your remaining ribbon tails and fill in the gaps.
Just pin this ladybug deco mesh wreath tutorial to save these instructions for later!
We Think You’ll Enjoy These Related Posts:
If you’re a dog lover or know someone who is, check out our Support Dog Rescue t-shirts and click on the picture below!


