
Turn your front door into something festive and fun this Easter with this moss covered bunny wreath. It’s easy, quick and cheap too! Plus it will be perfect to add to your shops if you sell!
Move over Winter and cold, it’s time for Spring and flowers! I’m so excited to show you all this super cute and fun door hanger for this Easter and Spring season. It is so simple and quick to make and will make a big impact on your own front door or that of your customers.
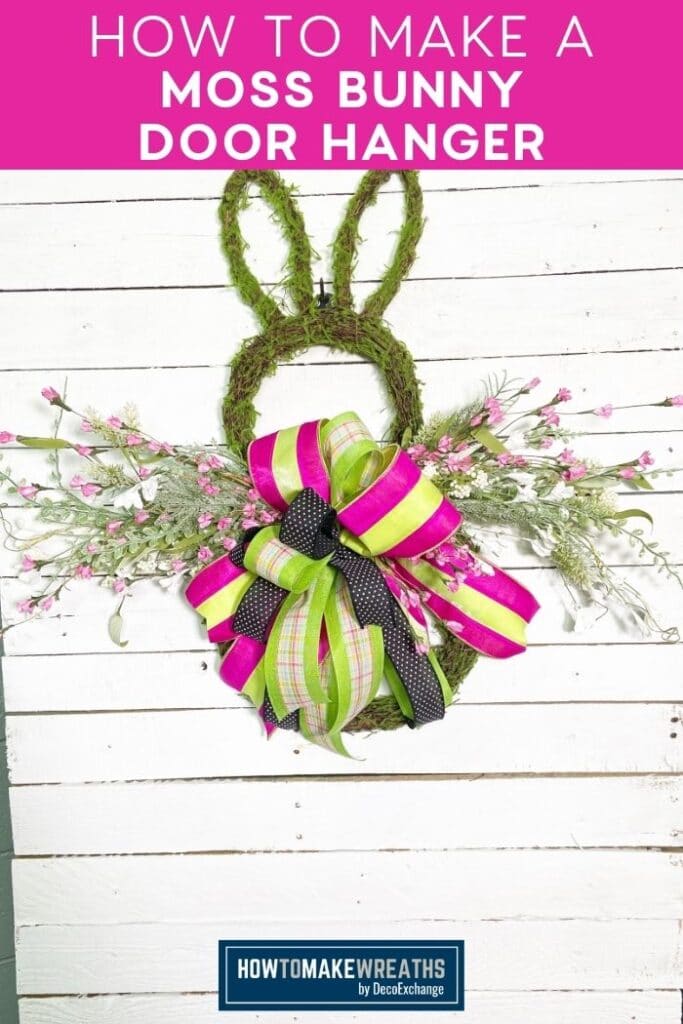
This moss covered bunny wreath is full of whimsy and beautiful greenery with a touch of pink and white flowers. The best part is we can be done from start to finish in about 15 minutes. You can’t beat that! Let me show you how to make your own super cute Moss Bunny wreath.
Moss Covered Bunny Wreath
There isn’t a lot to this quick and easy Moss Bunny wreath, so we need to make sure every component is spot on. That is why it is so important to take each bush of flowers or greenery and take the time to fluff the branches and adjust the stems. You want them to look like quality pieces and as realistic as you can. Even those tall whimsy branches can be curled around your finger to create more dimension. We first put together a small swag piece to attach to the Bunny wreath base. Modest addition of the small pink flowers will work perfectly on this piece!
I love making a bright funky bow for smaller projects that need a big punch. It’s also a great way to use smaller rolls or left-over ribbons from other projects. We use a beautiful and decadent pink and green striped ribbon that is going to steal the show. Funky bows are so versatile that you can add as many or as few loops and colors as you’d like. If you’d like to kick it up a notch, feel free to add some extra whimsical embellishments such as more florals or a coordinating Christmas ornament in the center of your bow. There are so many possibilities to be creative and inspired!
Supplies
- Moss Bunny Wreath Frame
- picks and sprays White Flower and Greenery Bush, Pink Flower Bushes
- 2 2.5″ wired ribbon Pink and Green Striped Ribbon, Pink and Yellow Plaid with Green Stripes Ribbon
- 1 1.5 wired ribbon Black and White Swiss Dot Ribbon
- Stem Cutter
- Zip Ties
- wire cutters
- scissors
- hot glue gun
How to Make A Moss Covered Bunny Wreath
Step 1: Take each of your floral and greenery bunches and spread and fluff the branches and stems. Cut off the raffia bow from the Bunny wreath frame. Use your stem cutter to cut the excess stem from each floral bush. Curl the whimsy stems from your bush around your fingers.
Step 2: Let’s make a quick swag by putting both white flower bushes stem to stem. Zip tie the center stems and clip the excess. Tear a smaller stem of pink flowers and intertwine within the white bushes on your swag.
Step 3: Add your floral swag onto your bunny where the raffia bow was. Zip tie around the grapevine to secure, making the zip tie buckle where the bow will go.
Step 4: Make a quick funky bow starting with your pink and green ribbon cutting a 32” length. Fold in half and make a single loop and gather at the center. Cut a 36” length of your pink and yellow plaid with green stripes ribbon and fold in half. Gather in the center for a single loop. Twist it so both tails are on the right side of the ribbon.
Step 5: Add the black and white swiss dot with a 36” length, making a single loop and adding to the other ribbons. Repeat the same with a 36” length of pink and yellow plaid with a slightly smaller loop. Add another 36” length of the black and white swiss dot with a slightly smaller loop.
Step 6: Finish off your bow with a 36” length of pink and green striped ribbon and one large loop. Use a zip tie to cinch the center of your funky bow together. Add another cable tie through the back to hang on your wreath base. Attach to your grapevine, making sure to get it secure into the guts of the base, not just around the grapevine, so it will not slip.
Step 7: Fluff the loops of your funky bow and trim the tails with a dovetail finish at varying lengths. Cut some left-over pink stems and hot glue down into the bow.
FAQs
When to hang Spring Wreaths?
Spring wreaths are the perfect addition to any front door that welcomes the arrival of warmer weather. This could vary where you live as some states are still dealing with snowstorms whereas others are seeing the start of spring! I would suggest if you are ready to feel a little bit warmer and bright then hang your spring wreath anytime after St. Patrick’s Day!
If you need any help with centerpiece-making, bow-making, wreath-making, or crafting in general, be sure to check out more of our tutorials on How to Make Wreaths.
We would love to see your beautiful summer wreaths! Please share with us over at the How To Make Wreaths Facebook Group.


Moss Covered Bunny Wreath
Materials
- Moss Bunny Wreath Frame
- picks and sprays White Flower and Greenery Bush, Pink Flower Bushes
- 2 2.5" wired ribbon Pink and Green Striped Ribbon, Pink and Yellow Plaid with Green Stripes Ribbon
- 1 1.5 wired ribbon Black and White Swiss Dot Ribbon
- Stem Cutter
- Zip Ties
- wire cutters
- scissors
- hot glue gun
Instructions
- Take each of your floral and greenery bunches and spread and fluff the branches and stems. Cut off the raffia bow from the Bunny wreath frame. Use your stem cutter to cut the excess stem from each floral bush. Curl the whimsy stems from your bush around your fingers
- Let’s make a quick swag by putting both white flower bushes stem to stem. Zip tie the center stems and clip the excess. Tear a smaller stem of pink flowers and intertwine within the white bushes on your swag.
- Add your floral swag onto your bunny where the raffia bow was. Zip tie around the grapevine to secure, making the zip tie buckle where the bow will go.
- Make a quick funky bow starting with your pink and green ribbon cutting a 32” length. Fold in half and make a single loop and gather at the center. Cut a 36” length of your pink and yellow plaid with green stripes ribbon and fold in half. Gather in the center for a single loop. Twist it so both tails are on the right side of the ribbon.
- Add the black and white swiss dot with a 36” length, making a single loop and adding to the other ribbons. Repeat the same with a 36” length of pink and yellow plaid with a slightly smaller loop. Add another 36” length of the black and white swiss dot with a slightly smaller loop.
- Finish off your bow with a 36” length of pink and green striped ribbon and one large loop. Use a zip tie to cinch the center of your funky bow together. Add another cable tie through the back to hang on your wreath base. Attach to your grapevine, making sure to get it secure into the guts of the base, not just around the grapevine, so it will not slip.
- Fluff the loops of your funky bow and trim the tails with a dovetail finish at varying lengths. Cut some left-over pink stems and hot glue down into the bow.
Video
Just pin this Moss Covered Bunny Wreath tutorial to save the instructions for later!

If you love to craft, check out our Eat. Sleep. Craft. Repeat. t-shirts and click on the picture below!


