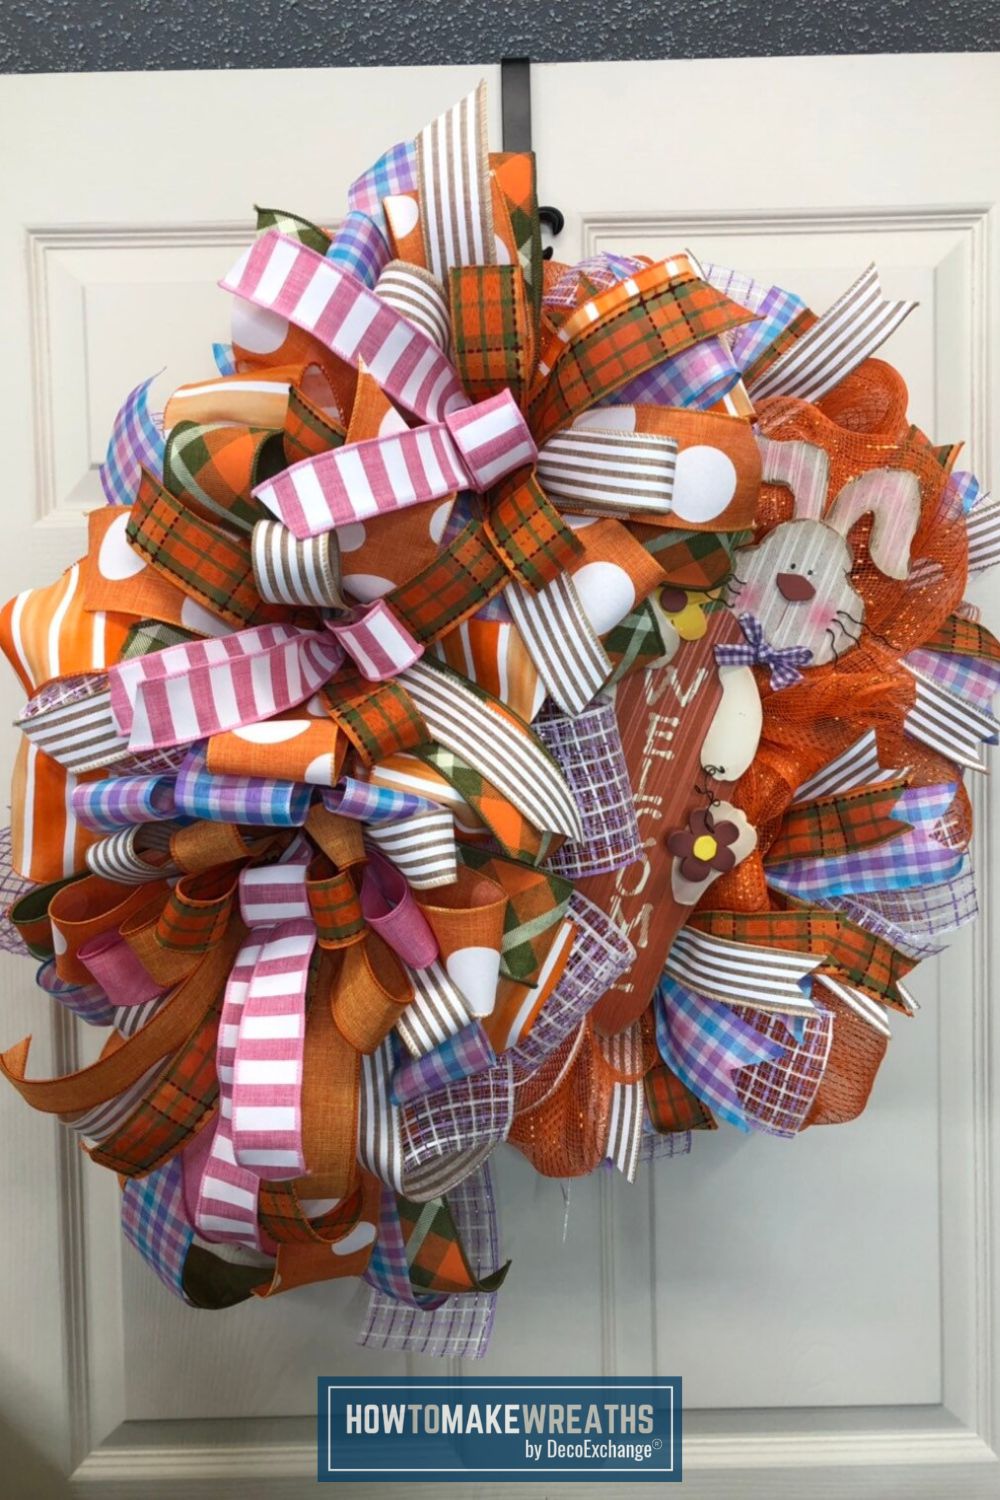
Today we’re making a fun and beautiful Welcome Easter Bunny Wreath. This festive wreath displays all the colors of the season to spray cheer across your front door.
Hey, y’all! We’ve been busy bees making Valentine’s and Mardi Gras wreaths, and now we’re switching gears to Easter!
Today, I’m showing you how to make a deco mesh Welcome Easter Bunny wreath. It has bows, poofs, and scrunches and cheers up a space with its fun, springtime colors.
Note: You’ll notice I used an evergreen wreath base instead of a wire one. That was simply because it was on sale – I’m always looking for effective ways to save money on supplies!
Let’s get started.
Grapevine Everyday Wreath Supplies Needed
Here’s a list of everything you’ll need to make this wreath.
- Easter welcome sign
- Evergreen wreath base
- Deco mesh, orange
- Deco mesh, cut into 12-inch strips (9)
- Sheet of craft foam
- Pipe cleaners
- 5-inch deco mesh ribbon
- 4-inch ribbon
- 3-inch ribbon (4)
- 2-inch ribbon (4)
- 1.5-inch ribbon (2)
- Staple gun
- Glue gun & glue
- Rotary cutter
- EZ Bow Maker
How To Make This Orange Welcome Easter Bunny Wreath
First up: the bows! There are three bows on this wreath. The first bow will be the biggest, the second bow is a medium size, and the third bow is the smallest.
Easter Bunny Wreath Bow
Here is a step-by-step tutorial for the largest bow. The remaining bows only vary slightly by being slightly smaller and with fewer ribbons. I’ll make a note about them in the printable card down below.
Step 1
Use the EZ Bow Maker to make your bow. Take the deco mesh ribbon and make 8-inch loops with 14-inch tails.
Step 2
Use your 4-inch ribbon to make 2 slightly smaller loops and 14-inch tails.
Step 3
Take your 3-inch ribbon and make a 7-inch loop with 14-inch tails.
Step 4
Next, take another 3-inch ribbon and make 2 slightly smaller loops and 14-inch tails.
Step 5
For the next later, grab your 3rd 3-inch ribbon and make 2 6-inch loops and 14-inch tails.
Step 6
Use your 2-inch ribbon to make 2 slightly smaller loops and 14-inch tails.
Step 7
Take your second 2-inch ribbon and make a 5-inch loop with same length tails.
Step 8
Use your third 2-inch ribbon to make 2 slightly smaller loops and 14-inch tails.
Step 9
Take your 1.5-inch ribbon and make a 4-inch loop with same length tails.
Step 10
Use your final 2-inch ribbon to make a slightly smaller center loop with same length tails.
Step 11
Your ribbon will be very thick. Pull it off your bow maker and tightly twist a pipe cleaner (by turning the bow) to secure it. Then, extend the ends of your pipe cleaner by attaching another pipe cleaner to each end.

Orange Easter Bow
Materials
- deco mesh 5-inch ribbon, cut into 14 inch strips
- 4" wired ribbon
- 3 2.5" wired ribbon
- 4 2" ribbon
- 2 1.5 wired ribbon
- EZ Bow Maker
- rotary cutter
Instructions
- Use your EZ Bow Maker and begin the first layer of your bow. Use the deco mesh ribbon and make 8-inch loops with 14-inch tails.
- Next, make 2 slightly smaller loops with your 4-inch ribbon and 14-inch tails.
- Make a 7-inch loop with 14-inch tails with your 3-inch ribbon
- For the next layer, take another 3-inch ribbon and make 2 slightly smaller loops and 14-inch tails.
- Make 2 6-inch loops and 14-inch tails with your 3rd 3-inch ribbon.
- Use your 2-inch ribbon to make 2 slightly smaller loops and 14-inch tails.
- With your second 2-inch ribbon, make a 5-inch loop with same length tails.
- Use the third 2-inch ribbon to make 2 slightly smaller loops and 14-inch tails.
- Take your 1.5-inch ribbon and make a 4-inch loop with 2 tails.
- Lastly, make a smaller center loop and 2 tails with the 2-inch ribbon.
- Your ribbon will be very thick. Pull it off your bow maker and turn the bow to tightly twist the pipe cleaner to secure it. Then attach pipe cleaners to both ends of your bow pipe cleaner to extend the ends of your pipe cleaner so it will attach to the wreath.
Notes
- Take your 4-inch ribbon and make a 6-inch loop with 8-inch tails.
- Use your first 3-inch ribbon and make a slightly smaller loop and 2 tails.
- For the next layers, grab your next 3-inch ribbon and make a 5-inch loop and same length tails.
- Use your last 3-inch ribbon to make a slightly smaller loop and 2 tails.
- With the first 2-inch ribbon, make a 2.5-inch loop and 2 tails.
- Repeat with your 2nd 2-inch ribbon.
- Take your 3rd 2-inch ribbon and make a center loop and 2 tails.
- Pull your bow off the EZ Bow Maker and secure it with a pipe cleaner.
- Use your 4-inch ribbon to make a loop and 2 tails.
- With the 3-inch ribbon, make a loop and 2 tails.
- Do this same process with your second 3-inch ribbon.
- Repeat again with a 3rd 3-inch ribbon.
- Take a 1.5-inch ribbon and make a loop and tails.
- Repeat with the 2nd 1.5-inch ribbon.
- Take your 2-inch ribbon and make a center loop with 2 tails.
- Remove the bow from the bow maker and secure it with a pipe cleaner.
Putting The Wreath Together
Follow these instructions to create a fun Easter wreath design!
Step 1
Take your evergreen wreath base and put it on your work table and fluff it out. Then, take your orange deco mesh and start a poof by folding the end under and curling in the sides. Use the greenery branches to attach the end of your poof to the wreath base.
Step 2
Make a 12” poof attached at about 8 inches apart. Continue this process all around the wreath (9 poofs around the outside of the wreath).
Step 3
Continue making poofs as you go around the wreath base again, this time on the inside to cover up the inner part of the wreath. Cut the mesh.
Step 4
Take your cut mesh pieces and scrunch them up, one at a time. Attach each one at the same spot where your poofs attach along the outside of your wreath base.
Step 5
Prepare to attach your bunny sign by taking a piece of craft foam and cutting out 3 1-inch squares. Stack the 3 squares on top of each other and put the stack on the back of the bunny head part of the sign.
Add your pipe cleaner to the top of the stack and use your staple gun to attach the entire stack to the sign. This method will prevent the staple from coming through the front of the sign. Add a little bit of hot glue to seal it.
Repeat this same process further down the sign, around the middle of the back of the carrot. Then again one final time at the bottom of the sign.
Step 6
Once the glue is dry, attach the sign by pushing the pipe cleaners directly through the mesh and the wreath frame then twist to secure in the back of the frame.
Step 7
Attach your large bow to your wreath with the pipe cleaners.
Step 8
Dovetail the bow tails. Fluff out your bow.
Step 9
Attach extra pipe cleaners to extend the length of the pipe cleaners on your 2nd bow so they will fit around your wreath. Attach your bow to the top of your wreath. Fluff it out and dovetail the tails.
Step 11
Cut your 5-inch deco mesh into 14-inch strips. Scrunch them up and attach them to the outside of the wreath back.
Step 12
Grab your 4th 3-inch ribbon and cut it into 14-inch strips. Repeat this with one of your 1.5-inch ribbons. And again with your 2nd 1.5-inch ribbon.
Step 13
Stack 4 strips of ribbon on top of each other. Scrunch in the middle and attach to the outside of your wreath. Repeat this process around the outside of the wreath.
Step 14
Extend the pipe cleaner by attaching 2 pipe cleaners. Attach to the wreath base, fluff it out.
Orange Welcome Easter Bunny Wreath
Materials
- Easter welcome sign
- Evergreen wreath base
- Deco mesh orange
- 9 Deco mesh cut into 12 inch strips
- Craft foam
- Pipe cleaners
- Stapler
Instructions
- Then take your orange deco mesh and start a poof by folding the end under and curling in the sides. Attach it to your fluffed out greenery base using the greenery branches to attach the end of your poof to the wreath base.
- Make a 12” poof attached at about 8 inches apart. Continue this process all around the wreath (9 poofs around the outside of the wreath).
- Repeat this process, this time on the inside to cover up the inner part of the wreath. Cut the mesh.
- Take your cut mesh pieces one at a time. Scrunch them in the center and attach each one at the same spot where your poofs attach along the outside of your wreath base.
- Prepare to attach your bunny sign by taking a piece of craft foam and cutting out 3 1-inch squares. Stack the 3 squares on top of each other and put the stack on the back of the bunny head part of the sign. Add your pipe cleaner to the top of the stack then use your staple gun to attach the entire stack to the sign. Add a dab of hot glue to seal it.Repeat this same process two more times: midway down the sign and again at the bottom.
- After the glue dries, attach the sign by pushing the pipe cleaners directly through the mesh and the wreath frame then twist to secure in the back of the frame.
- Attach your bow to your wreath using the pipe cleaners.
- Dovetail the bow tails. Fluff out your bow.
- Make another (smaller) bow using the instructions provided.
- Attach extra pipe cleaners to extend the length of the pipe cleaners on your bow so they will reach and attach to your wreath. Attach your bow to the top of your wreath and fluff it out and dovetail the tails.
- Cut your 5-inch deco mesh into 14-inch strips. Scrunch them up and attach them to the outside of the wreath back.
- Take your 4th 3-inch ribbon and cut it into 14-inch strips. Repeat this with your 1.5-inch ribbons.
- Stack 4 strips of ribbon on top of each other. Scrunch in the middle and attach to the outside of your wreath. Repeat this process around the outside of the wreath.
- Make your small bow following the instructions provided.
- Extend the pipe cleaner by attaching 2 pipe cleaners. Attach to the wreath base, fluff it out.
Video
Ready To Make Your Own Easter Wreath?
And, that’s it! This is a more detailed wreath than many I make, but doesn’t it look gorgeous when it’s done? Even though there are more steps, this wreath isn’t any harder to make- it just takes a little longer to complete.
If you love this wreath, check out our other Easter wreath tutorials:
If you need any help with centerpiece-making, bow-making, wreath-making, or crafting in general, be sure to check out more of our tutorials on How to Make Wreaths.
We would love to see your beautiful wreaths! Please share with us over at the How To Make Wreaths Facebook Group.
If you’re interested in more info on learning how to make wreaths or being in a community of like-minded crafters, check out our Creative Coaching Subscription Group.

Just pin this orange Easter Bunny Welcome wreath tutorial below to find the instructions later!