
I don’t have to tell y’all that birthdays are so much fun. There is cake, ice cream, and presents and who doesn’t love those things? Today I’m showing you how to make a birthday wreath that is as adorable as it is festive.
Birthday party decorations can be anything you want them to be. In this video I use deco mesh, super cute ribbon, and a fun sign to make this birthday wreath. This project was from a wreath kit that we put together but, even if you can’t get your hands on one, you can still duplicate the method using similar supplies. Either way I just know you are going to love the results!
How to Make a Birthday Wreath
Y’all, birthday celebrations are looking a bit different this year. We aren’t able to get together and party the way we usually do but that doesn’t mean we aren’t still celebrating. Drive by and virtual parties have become popular and people are still decorating and gifting. In fact, I have had way more requests for birthday wreaths than I ever have before. If you sell your wreaths that is something for you to keep in mind!
I designed this wreath to be as fabulous as the people it celebrates but I also tried to keep it to a lower price point. The thing is, you don’t leave a birthday wreath up for days and weeks at a time like you do other wreaths. I can’t ask people to pay top dollar for a wreath that will only be in the spotlight for a few hours. Keep that in mind too when you are designing your own birthday creations. One way to keep cost down is making funky bows which use less ribbon than other bows. I show you how to make one in this video but if you want to see more on how to make a funky bow I have a whole video for you to watch.
Why I love this wreath making method
The deco mesh method you will see in the video below is different from my usual way of doing poofs and then curls. It takes a little longer but the results are similar and you only have to do one step instead of two. The outcome is a nice thick wreath with amazingly good texture! It works really well with burlap too. I love doing it this way because I can use an entire 30 roll of mesh. There are no leftovers and no waste! You can also use this method to make use of leftover mesh from other projects. If you have a bunch of mesh ends with colors that work together you can use them to make another fabulous project. Wasting materials means wasting money so I love it when I can find ways to re-purpose leftovers! If you want more tips on how to use all your extra wreath supplies check out my post on that.

Funky Bow using the EZ Bow Maker
Instructions
- Get your EZ Bow Maker and ribbons.
- Take your 2.5" ribbon, measure 12" tail and a 6" loop on one side.
- Using the other 2.5" ribbon, continue measuring out an 8" tail and a loop slightly smaller with each layer. Repeat with the 1.5" ribbon.
- Then get your pipe cleaner and wrap around the center of your bow. Twist nice and tight.
- Trim your ribbon tails.
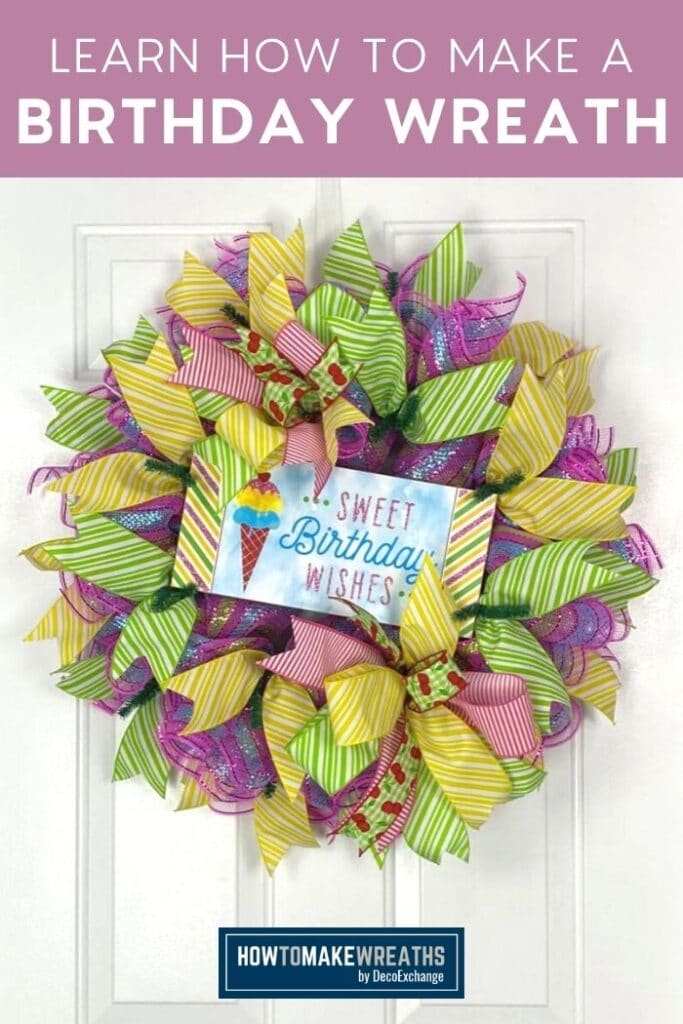
Birthday Wreath
Materials
- wreath form
- 21" deco mesh
- 3 2.5" wired ribbon
- 1 1.5 wired ribbon
- pipe cleaners
- scissors
- ribbon tail board
- 4 1″ mounting square
- sign/attachment
- staple gun
- 2 Funky bows see recipe above
Instructions
- Take your mesh and cut 26 12" strips.
- Take one strip and loosely curl it. Next you're going to attach it to the wreath frame. To do this, measure 5" from one end of the curl and pinch. Attach your pinch to a twist tie on the bottom rung of the wreath frame. Measure 5" from the other end of that curl and pinch. Attach that pinch to the next twist tie on the wreath frame. You will have a poof in the center of the two twist ties.
- Repeat along the bottom rung of the wreath frame starting the next curl in the twist tie where your last one ended.
- Repeat the same process on the top rung of the wreath frame.
- Add a second layer of curls around the top rung of the wreath frame.
- Next attach the wreath sign. First, attach mounting squares to each corner of the back of your sign. Next, staple a twist tie to each mounting square.
- Place the sign in the center of the wreath, putting your pipe cleaners through the whole. Use the pipe cleaners to secure the sign to the wreath frame.
- With each of your 2.5" ribbons, cut 8 10" ribbon tails. Dove tail the ends, fold each one in half and add one tail to each twist tie to the bottom rung of the wreath frame alternating the two different ribbons. This will use up 10 of your 16 ribbon tails.
- Attach a funky bow at the bottom right corner of the sign and then at the top left corner. Trim the tails.
- Take your remaining 6 ribbon tails and attach them to the twist ties on the top rung of the wreath frame alternating the two different ribbons. You won't need to put them where your bows are.
Birthdays give us an opportunity to celebrate the lives of the people we care about. When our own turn comes we also get the chance to look back on another year and celebrate our accomplishments while learning from our mistakes. This fun and festive wreath makes a great gift, yearly tradition, or addition to your shop. Cheers to all of you my friends and a Happy Birthday whenever yours comes around!

If you need any help with centerpiece-making, bow-making, wreath-making, or crafting in general, be sure to check out more of our tutorials on How to Make Wreaths.
We would love to see your beautiful summer wreaths! Please share with us over at the How To Make Wreaths Facebook Group.

We Think You’ll Enjoy These Related Posts:


