
I have a fun and unique project for you today. I’m using the Unique in the Creek wing board to make a butterfly-shaped deco mesh wreath. The results are super cute and I think you’re going to love it!
Nobody said that deco mesh wreaths always have to be round, y’all. Thanks to UITC we have lots of other options for our deco mesh creations. In the video below I show you how to use the wing board to make a butterfly-shaped deco mesh wreath that is bright and beautiful. It took a little ingenuity on my part since I didn’t really plan out the process, but I figured it out. I worked out the steps for you, so all you need to do is cut your mesh and get crafting!
The whole process is written out for you in the how-to instructions below, but I think your best bet will be to watch the video first. That way you get a better idea of how to make the different petals using the deco mesh. Then you can refer back to the written tutorial for the color patterns and which petal types to use.
How to Make a Butterfly-Shaped Deco Mesh Wreath
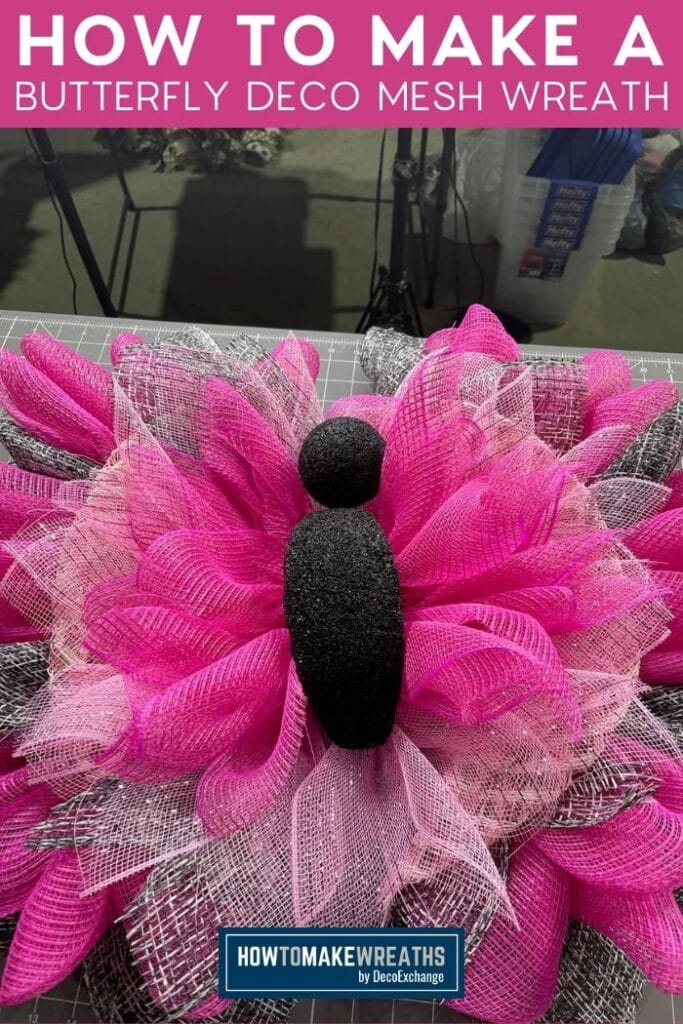
It’s not often that I swap out a bow for a little DIY in my projects; however, that’s exactly what I did today. The way I laid out the mesh on the wing board ends up beautifully in the end. If I hadn’t added the butterfly head and body it would look more like a flower than a butterfly. That’s ok though, the end result is what we are worried about, and I’m totally happy with it!
To make the head and body, I just grabbed some Styrofoam from the craft store and painted it black. I used a ball for the head and then cut a disk in half for the body. You can paint it black in any way you choose, but I think that spray paint is the easiest way to go. Then just use a healthy amount of hot glue to attach the head and the cut side of the disk to the wing board. Instant butterfly! You could even add some cute antennae to the head if you were feeling really froggy.
Building your butterfly wings
I used 4 types of 10″ mesh to fill in the wing board. I listed what I used in the recipe below but you can use any colors and patterns of mesh that you like. What I tried to do was mimic the pattern of actual butterfly wings. They usually have a darker shade around their wing edges. So, I used a black and white mesh for the outside row of my wings and then worked it inward a little bit. If you don’t want to use the same colors that I did, just choose your darkest colored mesh for those outside edges. Need help mixing and matching your summer colors? We have a post for that too!
I also used a few different petal types while building my wings. You can do the same or just choose the method that you like best and stick with that throughout. I like the contrast and texture that the different petals bring to the project but you can adapt your design however you like!

Butterfly-Shaped Deco Mesh Wreath
Materials
- Unique in the Creek Wing Board
- zip ties
- 4 10" deco mesh black and white, dark pink, light pink and white window pain, and light pink
- rotary cutter
- wire cutters
- styrofoam ball and styrofoam disk cut in half and painted black
- hot glue gun
Instructions
- Start by loading the wing board with the zip ties and closing the ties, but not all the way.
- Next, use the rotary cutters to cut 10" squares of your 4- 10" meshes.
- Start with the outside row of one of the wings and the black and white mesh. Lay a piece of mesh out and, beginning at one corner, scrunch it up the center. Then fold it in half at the thinnest point and add that point to a zip tie with about an inch going into the tie and the petal parts pointing outward. Secure down the zip tie. Repeat this process for the whole outside row of the wings. Then trim the zip tie ends with the wire cutters.
- Next, use the dark pink to make the next row in. Lay the mesh out, fold it corner to corner to make a triangle, then fold each of the side corners down towards the point to make a petal. Hold this in your hand and then make another one. Add the points of each petal to the same zip tie on the outside edge of the row and pull it tight.
- Now make two petals with the black and white mesh just like you did in the last step. Add them to the next twist tie in on the row you're working with. Then switch back to the pink for the next tie, skip one tie and repeat the pink.
- Now add two petals of the black and white to the next tie, then switch back to the dark pink for the next tie.
- For the next row, use the window pane mesh. Fold it corner to corner to make a triangle then do a small scrunch and pinch about 3 inches in from the point. Add one to each of the twist ties in that row.
- Go back to the black and white mesh for both outside ties of the next row, making the petals like you did in step 3.
- For the next row use the light pink mesh. Make the petals like you did in the last step but make two for each tie.
- Next, flip the board around and fill in the other wing just like you did the last one.
- Now fill in the center rows with the dark pink, making the petals like you did in step 3 and using two for each tie.
- Finally, use hot glue to attach your butterfly body and head to the center of your wing board.
Video
How cute is this butterfly-shaped wreath, y’all? I love how unique and colorful it is! If you loved this project and want to see more designs like this, check out our post on How to Make a Flower Wreath using the UITC Board. UITC has a lot of different shaped boards and only our imaginations can limit us on how we use them. For instance, this wing board can also be used to make angel wings. Or fairy wings! However you use it, I hope you have fun with this project!
Just pin this butterfly-shaped deco mesh wreath tutorial below to find the instructions later!

If you need any help with centerpiece-making, bow-making, wreath-making, or crafting in general, be sure to check out more of our tutorials on How to Make Wreaths.
We would love to see your beautiful summer wreaths! Please share with us over at the How To Make Wreaths Facebook Group.

If you love to craft, check out our Eat. Sleep. Craft. Repeat. t-shirts and click on the picture below!


