
If you haven’t used a UITC flower board before, now’s your chance! Learn how to create a beautiful flower wreath by utilizing this ingenious wreath-making tool.
Hey, y’all! If you follow me on Facebook and watch my Lives, you probably know that I’m constantly trying new wreath-making techniques and designs. In the past, I have been limited in my ability to create petal and leaf elements for wreaths.
That changes now!
The UITC board is one of my favorite tools. If you haven’t worked with one before, today’s post is going to be extra exciting because we’re opening up so many different wreath-making possibilities with just one simple tool. A board means you can create wreath bases without having to use pipe cleaners, which is a fun twist.
If you’re interested in using a UITC board, also check out the Pink and White Flower Wreath, DIY Sunflower Wreath, and DIY Poinsettia Wreath!
This UITC flower board also means that we can now use mesh in a different way to create petal and leaf shapes. I’m super excited about today’s project, so let’s jump right in.

How To Make A Flower Wreath Using The UITC Board
To help guide you, I made a video tutorial to show you all exactly how to use the UITC board.
NOTE: I always make my designs backward on these boards. Anyone know why? The simple answer is that it makes for a cleaner design in the end. Plus, I don’t want my customers to see the brand name labeled onto the board, leading to confusion.
Watch the video below to see exactly how I use the board to create a lovely flower wreath and feel free to make one alongside me!
Supplies Needed For This Flower Board Wreath
Here’s a complete list of the supplies you’ll need to make this mesh flower wreath.
- 1 UITC Flower Board Large
- 2-3 rolls 10″ poly burlap deco mesh
- flower center
- zip ties
- pliers
- mesh cutter
- hot glue gun
- floral pin
- pipe cleaners
How To Make A Flower Wreath With A UITC Board
In case you missed a step or two in the video, just follow these steps to put together this beautiful mesh flower wreath on a UITC board.
- Position the flower board so that the back is facing up.
- Loosely pre-fill the board with zip ties until almost the last row, towards the center.
- Cut (16) 10″ strips from your 2 poly burlap deco mesh.
- Take a square and fold it from corner to corner. Scrunch it in the center to look like a petal. Insert it into one of the zip ties and tighten it. Work from the outside of the flower board towards the middle. Repeat this process until you fill all the zip ties. Cut away any excess after the zip ties are tightened before continuing to the next row.
- After you fill all the zip tie spots, grab your flower center.
- Using floral pins (trimmed) and hot glue, attach the flower center to the wreath. Add weight to help the flower center dry well.
- Now, it’s time to add the leaves. Insert zip ties into all 8 holes paired with the holes parallel to it without closing them. Cut 11″ strips from your other deco mesh.
- Scrunch deco mesh from corner to corner to represent petals, insert into the zip tie, and tighten at the center. Trim away excess zip tie pieces.
- Trim away any frays you see on your wreath.
- Attach a pipe cleaner to the top as a hanging hook.
Note: Please grab the free printable instructional card at the bottom of this post if you want to print and follow the instructions for this project!
Make Your Own UITC Flower Wreath!
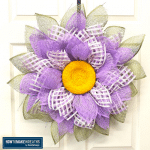
There you have the exact process for how to make a DIY flower wreath with a UITC board. Isn’t it perfect for summer decor on any front door? This wreath will look terrific on your door or fly off your shelves if you sell it.
If you love this wreath, you won’t want to miss these other fun designs:
- Honeycomb And Sunflower Door Hanger
- How to Make a Patriotic Red Bike Wheel
- DIY Summer Road Trip Inspired Wreath
- Fun Summer Decorating Ideas That’ll Brighten Your Doorway
If you need any help with centerpiece-making, bow-making, wreath-making, or crafting in general, be sure to check out more of our tutorials on How to Make Wreaths.
We would love to see your beautiful summer wreaths! Please share with us over at the How To Make Wreaths Facebook Group.
How to Make a Flower Wreath with UITC Board
Materials
Instructions
- Take flower board and flip it so the back is facing upward.
- Pre-fill the board with zipties. Not too tight, just until you hear the first click. Fill all the way to the 2nd to the last row towards the center.
- Take your 2 poly burlap deco mesh and cut 10" strips. You'll need about 16 piece.
- Get a piece of the square, fold corner to corner, then scrunch the diagonal center so it looks like a petal. Insert in to the zip ties. Tighten the zip tie. You will want to work on the outside and work you way in. Repeat this step until all zip ties are filled. NOTE: be sure to cut the excess after the zip ties are tightened before you continue to the next row.
- Once all the spots are filled and you don't see any more zip ties, get your flower center.
- Flip over your flower center, get floral pins (trimmed), and a lot of hot glue the flower center to the wreath. Add a weight so that it will dry well.
- To work on the leaves, add zip ties to all 8 holes paired with the holes parallel to it. Don't close it yet. Get your other poly burlap deco mesh and cut about 11" each piece.
- Scrunch deco mesh for leaf petals corner to corner, add to the zip tie and tighten at the center. Trim excess of the zip ties.
- Trim any frays you see and clean up your flower wreath.
- You can use a pipe cleaner at the top of your wreath to hang it.
Video
If you love to craft, check out our Eat. Sleep. Craft. Repeat. t-shirts and click on the picture below!

Just pin this flower wreath using the UITC board tutorial to save the instructions for later!


I need to get a list of all these supplies and how to order. Thanks…
Hi Betty! The supply list and links can be found at the end of the blog post. So happy you love the tutorial!
The tutorial was informative, lengthy but I will attempt it sometime.
Can’t wait to see how your wreath comes out! Share it on our How to Make Wreaths FB group!