
If you love neutral colors and farmhouse decor this tutorial is for you! Coach Fancy is showing you how to make a beautiful Home wreath kit, y’all are going to love it!
Wreath kits are amazing for a lot of reasons y’all. And this home wreath kit is one of the best! One reason wreath kits are the best is they take the guess work out of choosing your wreath supplies. You can leave the color and pattern selection to us. Also, you don’t have to worry if you’ll have enough supplies for the wreath, we promise that you will! You can also be sure that we will do a tutorial that will show you exactly how to assemble your wreath kit. Whether your new to wreath making or a crafting vet, sometimes a little to take off some of the pressure is just what you need!
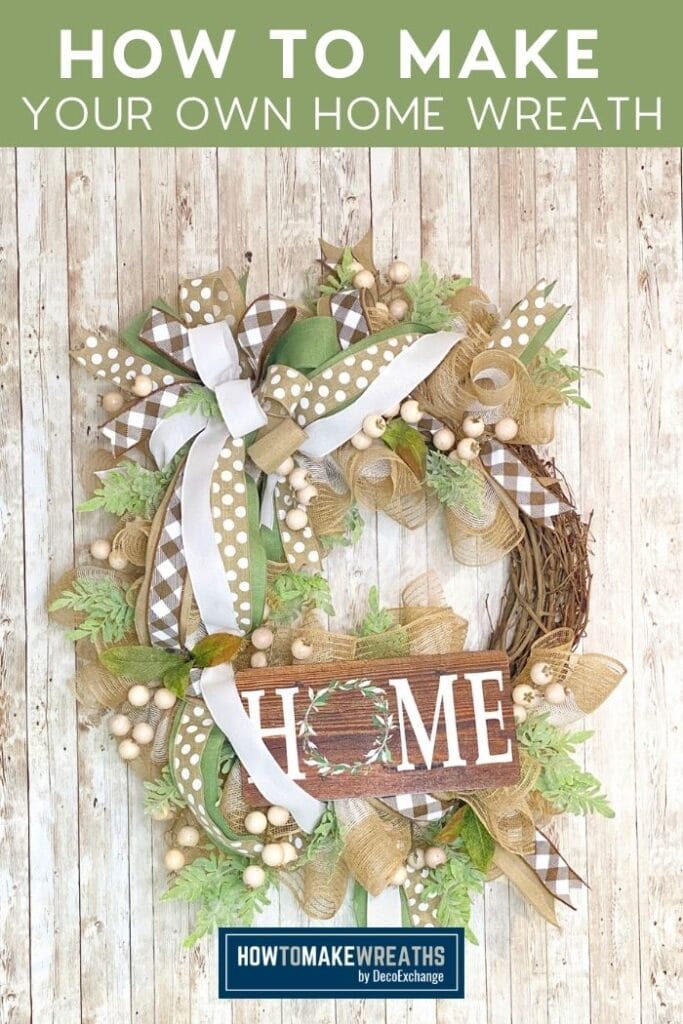
Home Wreath Kit with Coach Fancy
Y’all, I know that many of you worry about choosing the right combinations of colors and patterns for your wreaths. I tell y’all all the time not to make it too complicated. It’s kind of like picking out an outfit, if you’d wear the colors together, chances are they will also look fabulous together on a wreath! That being said, I know that decision fatigue is a real thing and sometimes it’s a relief to let someone else take those reigns. That’s where wreath kits come in y’all! We have you covered but if you want to learn more about choosing ribbon colors and patterns we have a post for that too!
In the video below Coach Fancy is showing you how to assemble this Home wreath kit and it is a fabulous one! Fancy loves kits too but she wants to make sure hers stand out from what everyone else is making with the kit. She shows you how to add some punch and pizzazz that will make your kit wreath your own unique creation. You can take those ideas and apply them to any wreath tutorial you watch!
Missed the kit? No worries!
If you missed out on grabbing this wreath kit, no worries! The recipe that we give you will work on any supplies you want to work with. You can either grab the same or similar ribbons that we used or decide to go a whole different way with the color scheme. Either way, you can still use the same techniques that Coach Fancy shows you to make a beautiful creation! Watch the video below and you’ll see what I mean.

Hand Bow
Materials
Instructions
- Start with one of the 2.5" ribbons, leave a tail and then make one loop on each side of your bow. Take the second 2.5" ribbon and do the same thing. You'll want all of these loops about the same size.
- Next use one of the 1.5" ribbons. Again, make a tail and two loops making these loops smaller than your last ones. Repeat with the next 1.5" ribbon and again with the last 2.5" ribbon.
- Use a pipe cleaner or zip tie to secure the bow in place. Cut your ribbons of your spools leaving really long tails.
Home Wreath Kit with Coach Fancy
Materials
Instructions
- Start by trimming any stray pieces from your grapevine wreath so clean it up.
- Next, use bolt cutters to make a cut through all the rungs of your wreath form. Then lay it on top of the grapevine wreath and use zip ties to secure it in place. Trim the ends of your zip ties.
- Now stand up all the twist ties on your wreath form.
- Cut 18 17" pieces of the 10" mesh. Roll the ends of the mesh and scrunch it towards the center to make a ruffle. Add the ruffle to a twist tie on the wreath form. Repeat until all the twist ties are filled.
- Add your bow to the wreath using one of the twist ties on the wreath form.
- Now add your long tails into some of the twist ties on the wreath form. Dovetail the ends of your ribbons.
- Next, use the ribbons to add tails behind your bow to make it look larger. Watch the video to see exactly how this is done.
- Attach the mounting squares to the back of your sign. Then add a pipe cleaner to each mounting square. Use those pipe cleaners to add the sign to the wreath.
- Take the greenery stems and trim them down into smaller pieces. Use hot glue to add the greenery into the wreath. Add a little bit into the center of your bow.
- Separate the berries from the main stem and use hot glue to add them into the wreath.
Video
And that’s the Home wreath y’all! This design is so different from what I typically make and I love it. Each of us makers has our own techniques and talents and it’s so great to be able to learn from each other. I love the way Fancy married a grapevine with a wreath form, what a unique way to add depth and texture to a wreath! And how fun is that greenery y’all? If you are a little intimidated by greenery don’t worry! We have a post that teaches you all about adding greenery to your wreaths. You can do it!
Just pin this everday home grapevine wreath tutorial below to find the instructions later!

CHECK OUT MORE GRAPEVINE WREATHS
If you need any help with centerpiece-making, bow-making, wreath-making, or crafting in general, be sure to check out more of our tutorials on How to Make Wreaths.
We would love to see your beautiful summer wreaths! Please share with us over at the How To Make Wreaths Facebook Group.


