
Burlap wreaths are popular for a reason: they look amazing and add that perfect farmhouse-style touch. Use this tutorial to learn how to make a burlap wreath with this beautiful ruffle method!
Hey y’all! We love bringing you different wreath tutorials. Due to the creativity involved with making wreaths and crafts, everyone has their own unique style and ways of approaching wreath-making.
Today, we are talking about burlap wreaths.
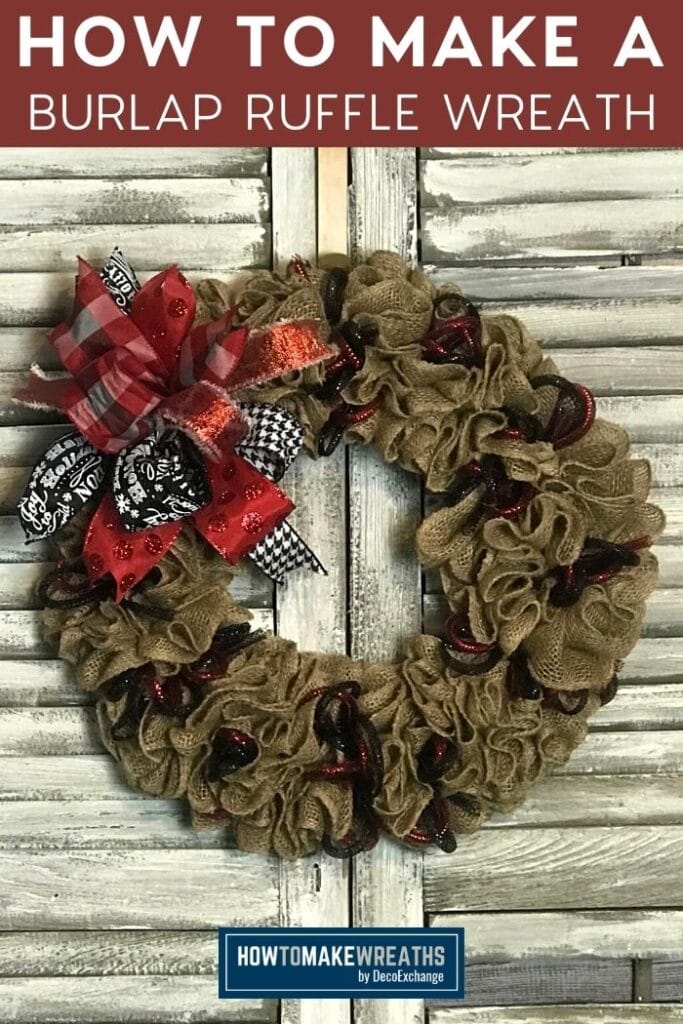
A burlap wreath always looks amazing, no matter whether you are going for a simple look or a more intricate design. When you want that farmhouse chic look, hang a burlap wreath – you can’t go wrong!
We have our own Simple Burlap Wreath that you can check out but, we wanted to show you another method for making an equally beautiful (but different) style: the ruffled burlap wreath.
How To Make A Burlap Wreath
To teach us this wreath tutorial, we asked our friend Debi, from Debi’s Wreaths and Things to show everyone how she makes her beautiful burlap ruffle wreaths.
A little about Debi…she is a mother of three, hardworking, Jesus-loving, entrepreneurial, wreath-making, wreath-teaching, crazy busy, STRONG woman. She’s taken a hobby and has made it into a part-time business with dreams to make it her full-time career.
She’s a seed planter. Teaching beginners is her favorite thing because she loves watching their eyes and seeing the “hooked” look they get when they have created their first wreath.
Learn how to make this ruffled burlap wreath with this simple tutorial. Then, once your basic wreath is made, you can just change out any attachments based on the season!
Burlap Ruffle Wreath Supplies
- 14.5 inch wire wreath frame

- (2) rolls of 5.5 inch burlap (30 feet long each roll)
- Zip Ties
- Ribbons of your choice (yes, wired) cut into 30 inches. I will use 5-6 pieces
- Pipe cleaner
- Scissors
- Attachments or enhancements that you want to add to your wreath. (Although this wreath is beautiful without attachments)
- Hot Glue Sticks (if adding attachments)
- Hot Glue Gun

 (30 feet long each roll)


Instructions On How To Make a Burlap Wreath
- Zip tie the end of your burlap onto the bottom of the 14.5-inch wreath frame. I like to use one of the 6 crossbars to start on. Your burlap will stay in place if you use one of the crossbars. We will begin on the bottom or outside row first.
- Take the edges of the burlap and bring them up (from the backside of the wreath frame) and use the bar as your guide. You will then begin to push the burlap up, creating your ruffle. Do this around all 6 sections of your frame. If you run out of burlap, add the zip tie to one of the crossbars and put the end you just finished and the end of the new roll of burlap into the zip tie and tighten. Then, finish the bottom row.
- When finished with the bottom row, cut the burlap and zip tie to the crossbar.
- Now we will begin on the top (or inner) row. This will be a little harder because we will have to use part of the bottom row to add our burlap. Zip tie your starting point and begin to ruffle. You will not need as much burlap for this row. If you run out, you can try to spread the ruffles out a bit or get a 3rd roll of burlap. Once you get used to making this wreath, you will learn exactly how much burlap is needed for your taste.
- Cut 5-6 wired ribbon strips to at least 30 inches.
- Make your 12-inch loops and hold all loops in one hand.
- Bring your pipe cleaner around what I like to call the neck of the ribbon and tighten.
- Bring some of your streamers up in between the pipe cleaner so that your steamers will go different directions. Tighten the pipe cleaner once you have your bow to your liking.
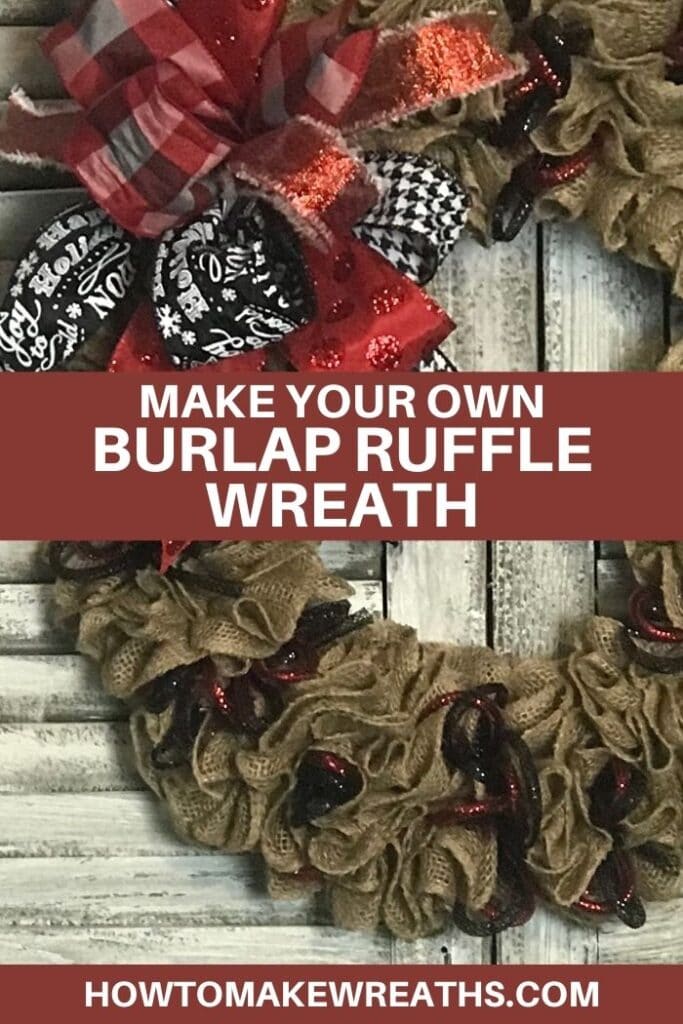
- Decide the best place for your bow and tie into the wreath.
- Add a hanger on the wreath for easy hanging. You can use a strong floral wire or pipe cleaner. Don’t skip this step. This will allow your customer to hang the wreath the way you envisioned it when you made the wreath. You don’t want them hanging the wreath upside down, taking a picture, and posting it to your page about how much they love the wreath (that’s hanging upside down!).
Ways To Customize Your Ruffled Burlap Wreath
It’s always fun to take a basic design and customize it so that it looks completely different with very little effort! Here are a few ideas of ways you can beautifully customize this burlap ruffle wreath.
Add Attachments
If you want to add attachments, add them by using hot glue and placing them on the wreath.
Hint: Make sure the attachments are small and lightweight. Leaves or berries would be perfect for this wreath. I don’t suggest using anything large that will take away from the beauty of this wreath.
Add a Bow
You can also make another bow to add across the bottom side of the wreath and add streamers.
Add Small Bow Ties
Another option is using mesh tubing and making small bow ties, tie them off with pipe cleaner, and add them to sections of the wreath.
How to Make a Burlap Wreath: Final Thoughts
And there you have it! A simple, yet beautiful burlap ruffle wreath that can be used no matter the season or holiday. It’s versatile and lots of fun to decorate!
As always, feel free to leave us a comment below or share this post with a friend. Your feedback helps us to know what types of content you want to see us create.
If you need any help with bow-making, wreath-making, or crafting in general, be sure to check out more of our tutorials on How to Make Wreaths.
How to Make a Ruffled Burlap Wreath
Equipment
Materials
- 1 14.5 inch wire wreath frame
- 2 rolls 5.5 inch burlap each roll is 30 feet long
- Zip Ties
- 5-6 pieces Ribbon of your color choice use wired ribbon; cut each piece to 30 inches
- Pipe cleaner
- Attachments or enhancements that you want to add to your wreath. Completely optional, since this wreath is beautiful without attachments
- Hot Glue Sticks if adding attachments
- Hot Glue Gun if adding attachments
Instructions
- Zip tie the end of your burlap onto the bottom of the 14.5-inch wreath frame. I recommend starting on one of the 6 crossbars so that your burlap stays in place. Begin on the bottom (or outside) row first.
- Take the edges of the burlap and bring them up (from the backside of the wreath frame). Use the bar as your guide. You will then begin to push the burlap up, creating your ruffle. Do this around all 6 sections of your frame. If you run out of burlap, add the zip tie to one of the crossbars and put the end you just finished and the end of the new roll of burlap into the zip tie and tighten. Then finish the bottom row.
- When finished with the bottom row, cut the burlap and zip tie it to the crossbar.
- Now begin on the top (or inner) row – it will be a little harder because we will have to use part of the bottom row to add our burlap. Zip tie your starting point and begin to ruffle. You will not need as much burlap for this row, but if you run out, see note below. Once you get used to making this wreath, you'll learn exactly how much burlap is needed for your taste.
- Cut 5-6 wired ribbon strips to at least 30 inches.
- Make your 12-inch loops and hold all loops in one hand.
- Bring your pipe cleaner around what I like to call the neck of the ribbon and tighten.
- Bring some of your streamers up in between the pipe cleaner so that your steamers go different directions. Tighten the pipe cleaner once you have finished arranging your bow.
- Decide the best place for your bow and tie into the wreath.
- Add a hanger on the wreath for easy hanging. You can use a strong floral wire or pipe cleaner. Don’t skip this step because it will allow your customer to hang the wreath the way you intended.
Video
Notes
Share With Us!
We would love to see your beautiful ruffle wreaths! Please share with us over at the How To Make Wreaths Facebook Group.

Learn how to start, operate, and scale your creative business!
Get more info about business and creative coaching at The Makers University.
Finally, if you’re interested in more info on learning how to make wreaths, where to buy supplies, and being in a community of like-minded crafters, check out our Creative Coaching Subscription Group.
CHECK OUT MORE FALL GRAPEVINE WREATHS


This is gorgeous. A friend wants me to make one for her, but she wants it I. Red/gold. Do you recommend putting poinsettias around it?
that could work for sure! be creative!