
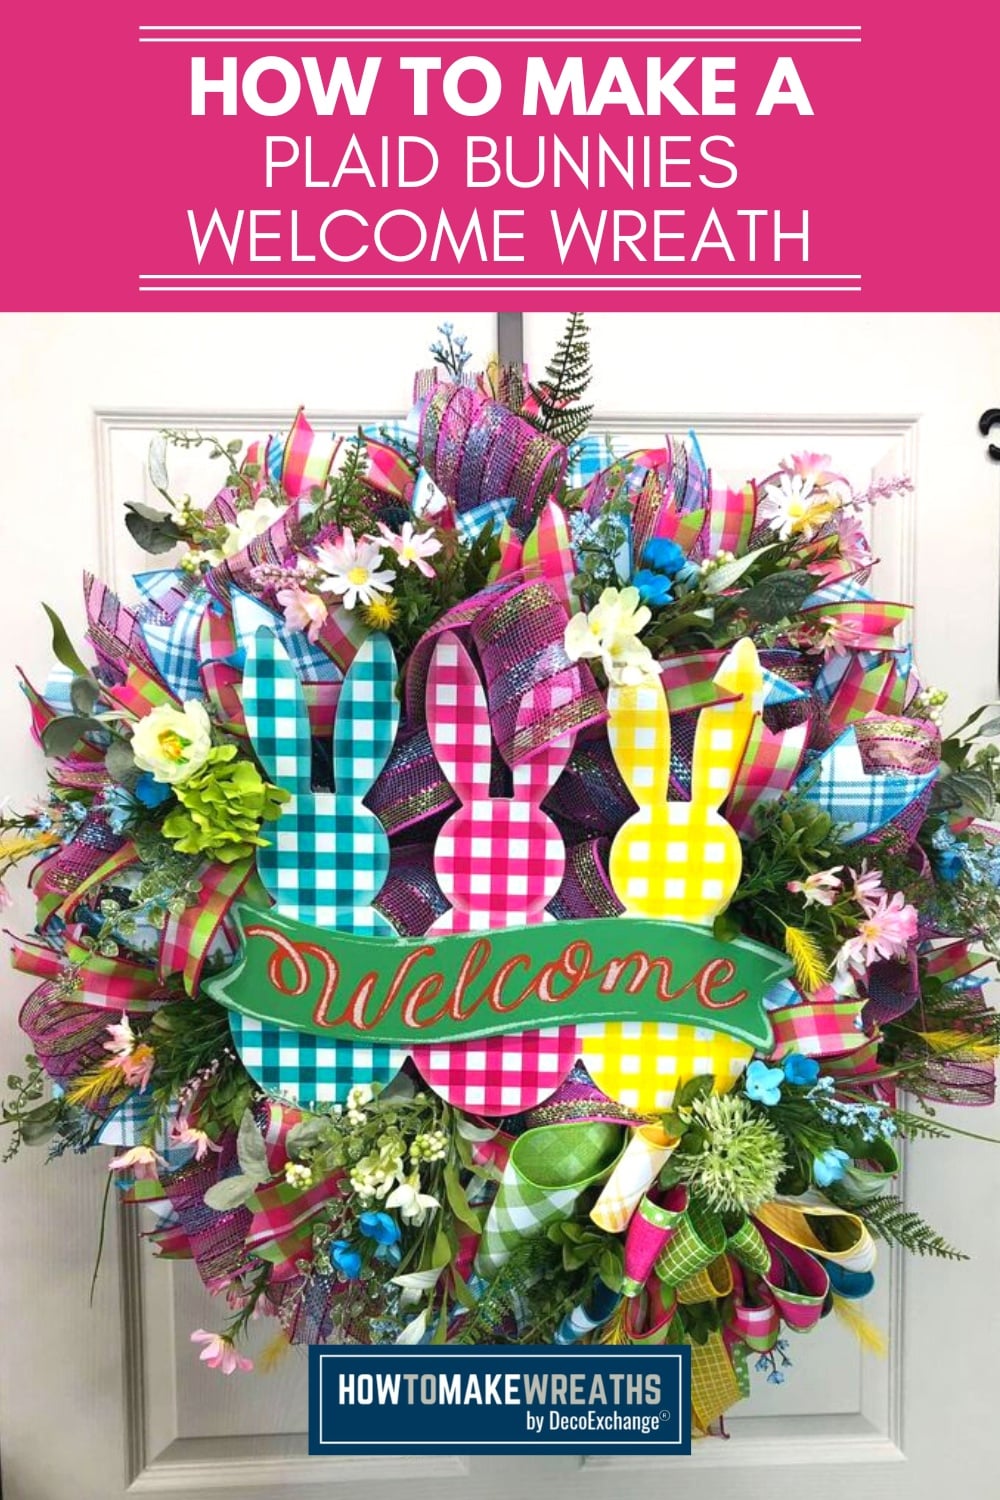
Spring has sprung (almost)! Today I’m showing you how to make a plaid bunny wreath DIY project that includes an adorable sign and some fabulous ribbons. It’ll brighten up any front porch!
Hey, y’all! There are so many different wreath designs that I love to make. I love grapevines, florals, deco mesh…you name it. But one of my favorite things to make is a deco mesh wreath with an awesome wreath sign.
And finding a new wreath attachment is also one of my favorite things. It’s a little bit like Christmas! I found this super cute Easter sign and couldn’t wait to add it to a wreath design because I know you’re going to love it too.
Easter is such a fun season to craft for y’all! After all the repetitive colors that we use for winter wreaths, I love branching out into the bright colors of spring. Spring is all about new life and new beginnings. I love the hope and possibilities that come with that.
If you want more spring wreath-making inspiration, please check out our Simple Basic Grapevine Wreath Idea, Spring Lemon Door Hanger, and Easy Spring Moss Wreath designs.
How To Make A Bunny Wreath DIY Project
This design is a tweak on my signature deco mesh wreath, and I love how it turned out! I’m going to walk you through the entire process, and if you want, you can print out the recipe cards below and take the directions with you.
Supplies Needed
Here’s everything you’ll need to gather for this project. I’ve added a few handy links to help you easily find certain items.
- Wreath sign
- Wreath form
- 21″ deco mesh
- 10″ deco mesh
- 4″ ribbon mesh
- (5) 2.5″ wired ribbon
- (3) 1.5″ wired ribbon
- Greenery sprays
- Floral sprays
- Hot glue gun or glue pot
- Scissors
- Craft foam
- Pipe cleaners
- Staple gun
- Wire cutters
- Rotary cutter
- EZ Bow Maker
Bunny Wreath DIY Instructions
What better way to usher in spring than to have a new Easter wreath in your shop or on your front door?
Step 1
Take your 21″ mesh and make 10″ poufs around the outside ring of pipe cleaners on your frame. Then do the same thing around the inside ring.
Step 2
Cut (18) 20″ strips out of the 10″ mesh. Take a strip and make a ruffle by curling the ends and scrunching the ends into the center.
Add your ruffle to a pipe cleaner and repeat the process until you have a ruffle in each pipe cleaner around the frame.
Step 3
Cut (18) 30″ strips from the 4″ mesh ribbon. Make an awareness ribbon with each one.
Fold the ribbon in half and then fold it in half again. Then, at the second fold, pinch, twist, and add it to one of the pipe cleaners on the outside rung of the wreath frame.
Make an awareness ribbon for each pipe cleaner all around the outside and the inside of the frame.
Step 4
Next, prepare your sign. Cut four squares of craft foam. Dab hot glue onto the back of the sign in four different areas and place a pipe cleaner on top of each dab to hold it in place. Then, attach a piece of craft foam and the pipe cleaner to the sign with a staple gun.
Cut your ribbon tails while the glue is drying.
Step 5
Take the 2.5″ ribbon and cut (18) 14″ strips. Next, cut (36) 14″ strips of the 1.5″ ribbon. Dovetail all the ribbon tail ends.
Stack (1) 2.5″ tail and (2) 1.5″ tails. Fold them in half and then pinch the center together. Insert the ribbon tail stack into a pipe cleaner attached to the wreath form.
Repeat the process all the way around the wreath.
Step 6
Add your Easter sign to the center of the wreath using the pipe cleaners you attached to the back of the sign.
Step 7
Let’s make the bow for our plaid bunny wreath!
- Take the 2.5″ ribbon and the EZ Bow Maker and make 12″ tails and (2) 7″ loops.
- Repeat the same process with the next 2.5″ ribbon, making 4 loops for this layer.
- Next, grab the third 2.5″ ribbon and make 12″ tails and (2) 6.5″ loops.
- Repeat the same process with the fourth 2.5″ ribbon, making 4 same-size loops for this layer.
- With the last 2.5″ ribbon, make a tail and (2) 6″ loops.
- Now switch to the 1.5″ ribbon and make a tail and 4 same-size loops.
- With the second 1.5″ ribbon, make a tail and (2) 5.5″ loops. Finally, take the last 1.5″ ribbon and make 2 tails and (1) 5″ loop for the center.
- Take two of your pipe cleaners and twist their ends together to create one longer pipe cleaner.
- Wrap the extra-long pipe cleaner around the center of the bow to hold it in place, and twist it off at the back.
Step 8
Attach your bow to the wreath at the bottom right part of your sign using the pipe cleaner that secures your bow.
Dovetail the ends of your bow tails.
Step 9
Use the wire cutters to trim your greenery and floral sprays (cutting sprigs off the main stem).
Use hot glue to attach them evenly through the wreath to the ties on the frame. While you’re at it, add a few to your bow, too, to create a cohesive bunny wreath DIY design.
Tips About Wreath Signs
If there’s one thing I’ve learned about wreath attachments, it’s that you need to get creative. In other words, don’t limit yourself to only using things that were intended to be wreath signs.
I always keep an eye out for anything that I can adapt into an attachment. Don’t be afraid to get innovative! For example, I’ve taken the stake off of a yard sign and used it as a wreath sign. Think outside the box – I promise you’ll be happy you did!
DIY Bunny Wreath FAQs
If you have any questions about making this project, you’ve come to the right place! Here are some questions I frequently see readers ask about making this wreath design. Please leave your question in the comments if you don’t see it already answered below.
Is there another way I can attach pipe cleaners to the sign?
Yes! There are so many different types of wreath signs and attachments that you can use. That means there are lots of different ways to attach them.
For example, if you love metal attachments, have a quality metal hole punch on hand. For this wreath sign, you could use mounting squares instead of craft foam and pipe cleaners. I used those because it’s what I had when I made this wreath.
Learn more about my favorite wreath-making tools or how to attach signs to your wreaths to help improve your skills!
How can I customize this bunny wreath design?
I love encouraging my readers to take my designs and turn them into unique creations of their own. To do that, play around with using different ribbon colors and patterns, different mesh colors, another sign, etc.
Make This Bunny Wreath DIY Design For Your Store Inventory!
This wreath is different from my usual deco mesh creations, but I love it y’all! It’s very rare that I add greenery and florals to my deco mesh, but it really worked for this project.
There’s just something about spring that says it’s okay to add pretty flowers wherever you want. If you would rather leave out the stems, by all means, do that! Just add another bow or two instead. However you decide to finish this wreath, I hope you enjoy creating it and adapting it to make your own unique product!
If you want more spring crafting inspiration, check out these popular designs:
- Grapevine Wreath For Spring
- Deco Mesh Spring Wreath
- Spring Carrot Wreath
- Spring Floral Grapevine Wreath
Pin this plaid bunny wreath DIY tutorial below to save the instructions for later!

If you need any help with centerpiece-making, bow-making, wreath-making, or crafting in general, be sure to check out more of our tutorials on How to Make Wreaths.
We would love to see your beautiful wreaths! Please share with us over at the How To Make Wreaths Facebook Group.
If you are interested in more info on learning how to make wreaths, where to buy supplies, and being in a community of like-minded crafters, check out our Creative Coaching Subscription Group.


Easter Bow
Instructions
- Start with a 2.5" ribbon and make a 12" tail. Place the tail into the EZ Bow Maker and then make 2 7" loops. Then trim the ribbon from the spool. Repeat the same process with the next 2.5" ribbon but make 4 loops this time.
- Next take another 2.5" ribbon and measure another 12" tail and make 2 loops that are slightly smaller than your last ones. Repeat the same process with the next 2.5" ribbon but make 4 loops this time.
- Make a tail and 2 loops with the next 2.5" ribbon and then switch to the 1.5" ribbon and make a tail and 4 loops. With the next 1.5" ribbon make a tail and 2 loops. With the final 1.5" ribbon make 2 tails and 1 loop.
- With your first 1.5" ribbon make a tail and 4 loops. Then make a tail and 2 loops with the last 1.5" ribbon.
- Take two pipe cleaners and twist the ends together to make one long pipe cleaner. Remove your bow from the bow maker and use the long pipe cleaner to secure the center of the bow twisting it off at the back.
Plaid Bunny Wreath DIY Design
Materials
Instructions
- Take your 21" mesh and fold over the end then add it into one of the ties on the top rung of the wreath frame. Then make a 10" poof and secure it into the next tie. Continue around the top rung and then the bottom one.
- Take the 10" mesh and cut it into 18 20" strips. Then curl the ends in a little bit and scrunch it up the center to make a ruffle. Add that ruffle to a tie and repeat until all the ties have ruffle.
- Now cut the 4" mesh ribbon into 18 30" strips. Make an awareness ribbon with each one. To do this fold the ribbon in half and then in half again. At the second fold pinch and twist and then add the twist into one of the ties on the top rung of the wreath frame. Repeat all around the top and then the bottom.
- Next, attach 4 pipe cleaners to the back of your sign. To do this cut 4 squares of craft foam then put hot glue on the back of the sign, place a pipe cleaner on top of that, then use the staple gun to attach the foam and pipe cleaner. While the glue is drying cut your ribbon tails.
- Cut 18 14" strips of the 2.5" ribbon then dove tail the ends. Next cut 36 14" strips of the 1.5" ribbon and dove tail the ends. Take one of the 2.5" tails and two of thee 1.5" tails and place them on top of each other. Fold the tails in half and pinch the center together. Attach the center pinch to a twist tie on the wreath frame. Repeat with the remaining ribbon tails and twist ties.
- Now add your wreath sign to the center of you wreath by poking the pipe cleaners through the mesh and attaching them to your wreath frame.
- Next attach your bow to the bottom right of your sign in the same way that you did the sign. Dovetail the ends of your bow tails.
- Use the wire cutters to trim your greenery and floral sprays. Use hot glue to attach them evenly through the wreath to the ties on the frame. Be sure to add some to your bow too.
Video
If you’re a dog lover or know someone who is, check out our Support Dog Rescue t-shirts and click on the picture below!


Can’t wait to start!!!
So cute
Awesome info will put to work for me thank you!