
Start getting ready for the busy fall and holiday season now by making this eye-catching deco mesh fall wreath idea. This is a classic that will become a seasonal staple in your online store.
Hey, y’all! We have been busy little bees cranking out fall wreath designs, and I hope that (if you’re a Craftpreneur) you’re starting to focus on fall designs too.
This time of year is busy for Craftpreneurs, but it’s super rewarding too because it never gets old hearing the cha-ching of a sale!
Fall is one of my favorite seasons for wreath-making because there’s an endless supply of inspiration! If you are seeking more ideas, check out our Hello Pumpkin Autumn Grapevine Wreath, Scarecrow Deco Mesh Wreath, and Hello Fall Mesh Wreath designs!
How To Make This “I Love Fall” Deco Mesh Wreath Idea
Well, what are we waiting for? Let’s get started on this beautiful design! Here’s everything you need to know in order to make this fall deco mesh wreath idea.
Supplies Needed
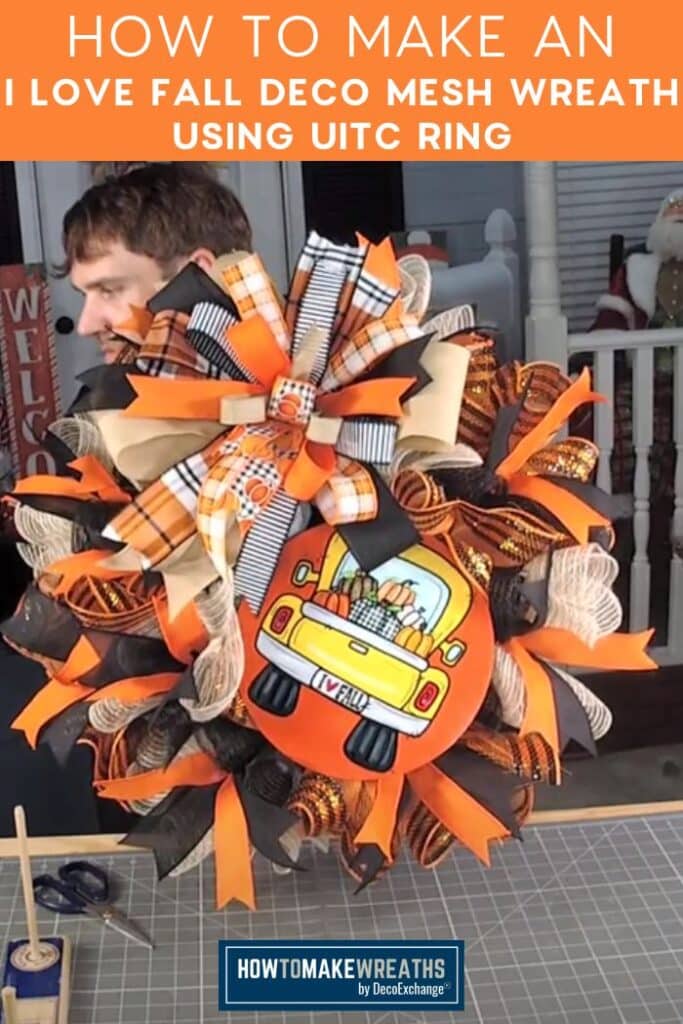
- UITC ring wreath board frame
- (8) 12-inch strips of 21” black and white deco mesh
- (8) 30” strips of 10” mesh (4 each of orange and beige deco mesh)
- (8) 15” strips of 10” mesh (4 each of orange and beige deco mesh)
- “I love fall” sign
- (1) 4” ribbon
- (2) 2.5” ribbons
- (4) 1.5” ribbons
- (1) ⅞” burlap ribbon
- 1” mounting squares (rated for outdoors)
- Super glue
- Pipe cleaners
- Rotary cutter
- Scissors
- EZ Bow Maker
- Ribbon tail board
Instructions
Follow along as I guide you through the process step-by-step of making this fun fall deco mesh wreath. You’re going to love what we do with mesh in this design!
Step 1
Begin by taking your ring wreath frame and adding pipe cleaners to it. There are two rings of holes (8 pipe cleaners on the inside ring and 8 pipe cleaners on the outside ring).
Alternate outside, inside, outside, all the way around the ring.
Step 2
Take your 21” black and white deco mesh and cut (8) 12″ strips. Roll up the mesh strip into a tube, measure about 5” from the end of the tube, and tie it into one of the pipe cleaners on the inner ring.
Do the same thing with the other end of the tube and insert it into the adjacent pipe cleaner to create a “pouf.” Fluff out the middle “pouf” portion to make it fuller.
Continue this process all the way around the ring.
Step 3
Take your 30” strips of mesh and make ruffles out of them. Alternating colors, insert one ruffle into each pipe cleaner on the outer ring of the frame as you work your way around.
Repeat the same process around the inner ring of the frame using the 15” strips of mesh and alternating colors. Offset the colors of these ruffles from the ruffles on the outer ring.
Step 4
Prepare your sign by adding a dab of super glue to the top, bottom, and both sides of the sign. Place a mounting square on top of the glue, then caulk around each mounting square with hot glue.
Insert a pipe cleaner into each mounting square. Set the sign aside and let it dry.
Step 5
Let’s make a simple bow.
Take your 4” ribbon and make one 12” tail to the bottom, two 7” loops, and one shorter (8”) tail towards the top (in an “X” shape).
Repeat the process with your first 2.5” ribbon, making an 8” tail to the top (opposite side from the layer below), two 6.5” loops, and a long 12” tail towards the bottom.
And repeat again with your second 2.5” ribbon, making the loops smaller at 6” and following the pattern of the long tail towards the bottom and the short tail towards the top.
Add another layer (following the process) with your first 1.5” ribbon, making the loops 5.5”.
Next, take your second 1.5” ribbon and follow the same process, making both loops around 5”.
Now, grab your third 1.5” ribbon and make two loops around 4.5” with two 8” tails.
Next, grab the ⅞” burlap ribbon and follow the same process, making the loops about 4”.
Finally, grab the last 1.5” ribbon and make one 4” center loop with two tails.
Grab a 20” zip tie and wrap it around the center of your bow. Twist it tight by twisting the bow, not the twist tie.
Attach your bow (using the pipe cleaner) to the left side of the wreath base and dovetail the ribbon tails
Step 6
Using the pipe cleaners on the back of the sign, attach the sign to the bottom right side of the wreath base.
Step 7
Let’s make some ribbon tails!
Cut (8) 14” ribbon tails from your 2.5” ribbon.
Next, cut (8) 14” ribbon tails from 1.5” ribbon.
Dovetail all the ends and stack a 1.5” tail on top of a 4” ribbon tail.
Step 8
Take one ribbon tail stack and fold it in the middle. Pinch it, then fold it, and insert it into one of the pipe cleaners on the wreath.
Work your way around the outside of the wreath.
Step 9
Trim off excess pipe cleaner pieces and add a pipe cleaner to the top of the wreath board frame to create a hanger.
Fluff everything out, dovetail any ends of ribbon you missed, and your wreath is complete!
Try This “I Love Fall” Deco Mesh Wreath Idea Yourself!
I hope you love this design as much as I do. It’s a breeze to whip together! With all those gorgeous fall colors, your customers will snatch this wreath right out from under you in a flash!
If you love this deco mesh fall wreath design, be sure to check out these designs too:
- How To Make A Fall Deco Mesh Wreath
- Simple Fall Grapevine Wreath
- Fall Harvest Wreath
- How To Make A Beautiful Purple And Cream Fall Centerpiece
If you need any help with centerpiece-making, bow-making, wreath-making, or crafting in general, be sure to check out more of our tutorials on How to Make Wreaths.
We would love to see your beautiful wreaths! Please share with us over at the How To Make Wreaths Facebook Group.
If you’re interested in more info on learning how to make wreaths or being in a community of like-minded crafters, check out our Creative Coaching Subscription Group.


“I Love Fall” Deco Mesh Fall Wreath Idea
Materials
- UITC Ring Wreath Board
- 8 12-inch strips of 21” black and white deco mesh
- 8 30” strips of 10” mesh 4 each of orange and beige deco mesh
- 8 15” strips of 10” mesh 4 each of orange and beige deco mesh
- “I love fall” sign
- 1 4" wired ribbon
- 2 2.5" wired ribbon
- 4 1.5" wired ribbon
- 1 7/8" burlap ribbon
- 1″ mounting squares
- Super glue
- Pipe cleaners
- Rotary cutter
- Scissors
- EZ Bow Maker
- Ribbon tail board
Instructions
- Begin by adding pipe cleaners to your UTIC ring and adding pipe cleaners to it. You want 8 pipe cleaners in the inside ring and 8 pipe cleaners in the outside ring, alternating between the two as you make your way around the ring.
- Cut 12" strips from your 21” black and white deco mesh. Roll the mesh strip into a tube shape, measure about 5” from the end of the tube, pinch, and tie it into one of the pipe cleaners on the inner ring.Do the same thing with the other end of the tube and insert it into the adjacent pipe cleaner to create a “pouf.” Fluff out the middle portion to make it fuller.Do this all the way around the ring.
- Take your 30” strips of mesh and make ruffles, alternating colors as you insert one ruffle into each pipe cleaner on the outer ring of the frame. Repeat all the way around the outer ring.Then take the 15" strips and repeat the same process around the inner ring of the frame. Offset the colors of these ruffles from the ruffles on the outer ring.
- Prepare your sign by adding a dab of super glue to the top, bottom, and both sides of the sign. Place a mounting square on top of the glue, then caulk around each mounting square with hot glue. Insert a pipe cleaner into each mounting square. Set the sign aside and let it dry.
- Grab your EZ Bow Maker and make a bow.Take your 4” ribbon and make one 12” tail to the bottom, two 7” loops, and one shorter (8”) tail towards the top (in an “X” shape).Repeat the process with your first 2.5” ribbon, making an 8” tail to the top (opposite side from the layer below), two 6.5” loops, and a long 12” tail towards the bottom. And repeat again, with your second 2.5” ribbon, making the loops smaller at 6” and following the pattern of the long tail towards the bottom and the short tail towards the top.Add another layer using the same process with your first 1.5” ribbon, making the loops 5.5”.Next, take your second 1.5” ribbon and follow the pattern, making both loops around 5”.Now, grab your third 1.5” ribbon and make two loops around 4.5” with two 8” tails.Next, grab the ⅞” burlap ribbon and make two 8" tails with loops about 4”.Finally, grab the last 1.5” ribbon and make one 4” center loop with two tails.Grab a 20” zip tie and wrap it around the center of your bow. Twist it tight by twisting the bow, not the twist tie. Attach your bow (using the pipe cleaner) to the left side of the wreath base and dovetail the ribbon tails.
- Using the pipe cleaners on the back of the sign, attach the sign to bottom right side of the wreath base.
- It's time to make some ribbon tails.Cut (8) 14” ribbon tails from your 2.5” ribbon.Next, cut (8) 14” ribbon tails from 1.5” ribbon.Dovetail all the ends and stack a 1.5” tail on top of a 4” ribbon tail.
- Take one ribbon tail stack and fold it in the middle. Pinch it, then fold it, and insert it into one of the pipe cleaners on the wreath.Work your way around the outside of the wreath.
- Trim off excess pipe cleaner pieces and add a pipe cleaner to the top of the wreath board frame to create a hanger.Fluff everything out, dovetail any ends of ribbon you missed, and your wreath is complete!
Video
Just pin this deco mesh fall wreath tutorial to save these instructions for next time!

If you love to craft, check out our Eat. Sleep. Craft. Repeat. t-shirts and click on the picture below!


