Today, I’m unwrapping the November 2020 mystery box and showing you how to turn an adorable face sign into a beautiful mesh snowman wreath you can enjoy all winter long!
Hey, y’all! There is just something super cute about snowman wreaths. Whether you choose to go rustic with something like this Burlap Snowman Wreath or more traditional with deco mesh, you can’t go wrong.
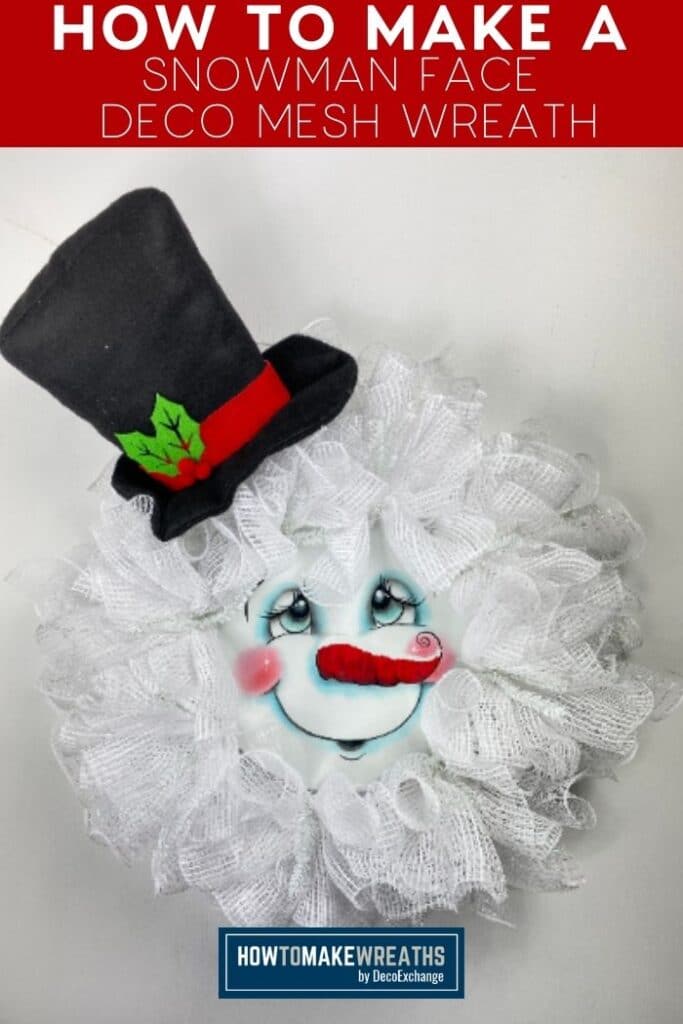
This time, I decided to make a deco mesh version with a super cute snowman face that I had. Y’all, you aren’t gonna believe how easy this wreath is to make!
Bonus: This is actually from one of our kits – the November Mystery Box, in fact, which you can purchase here if you want it. We still have some in stock!
Deco Mesh Snowman Wreath Tutorial
In the video below I show you step-by-step how to make this adorable wreath that’s perfect for and brings cheer all winter long. The face sign is adorable, but the addition of the hat just makes this wreath what it is, which is perfect for any front door!
And, if you buy the kit, you have everything you need in one convenient place so you don’t even need to gather supplies!
Supplies Needed:
- 1 wire wreath form
- 1 snowman face sign
- Superglue
- Pipe cleaners
- 2 colors of mesh
- Zip tie
- Scissors
- Roller cutter
How to Make Your Snowman Mesh Wreath
Follow these steps and in 20 minutes or less, you’ll have an adorable snowman wreath to hang on your door!
Step 1
Take your snowman sign and turn it over. Add a dab of glue to the top, bottom, and both sides. Then, attach your mounts to those glue spots.
Step 2
Take 2 pipe cleaners and cut them in half. Then, slip each half pipe cleaner through your glued-on mounts. Twist to secure.
Step 3
Now, grab your wire wreath frame, and with the pipe cleaners already attached and pulled away from the center, take your snowman face sign and use the pipe cleaners on the back to attach it right in the middle of your wire wreath frame.
I recommend attaching opposite sides first to make sure that your sign is centered.
Step 4
Take your higher quality mesh (not the iridescent) and cut it to 35 inches. You need 8 of these.
Step 5
Take the thinner mesh (the iridescent one) and cut it to 30 inches. You need 10 of these.
Step 6
Start with your ruffles on the bottom layer. With your first piece of iridescent mesh, curl the ends under, then scrunch the ends towards the middle to create your ruffle.
Add it to your wreath frame by tying one of the bottom pipe cleaners around the middle of your ruffle.
Repeat this 9 more times.
Step 7
Time to do the layers on the top layer. Take your thicker mesh that’s 35 inches long and repeat the same process: curl the ends, scrunch into the middle, and tie to your frame using white pipe cleaners.
Step 8
Add the hat by inserting the stem between the top layer of the mesh and the bottom layer of mesh.
Use a zip tie to secure the stem to the frame. Tighten and cut off the excess.
Step 9
Fluff out the mesh, removing it just a tad from around the sign so you can see the entire face but not enough to expose the wreath frame.
I hope you love this mesh DIY snowman wreath design! Don’t forget to look for and buy the kit in case we have any left as you read this post.
If the kits are sold out, you can easily gather these supplies yourself and grab the sign on DecoExchange.

Mesh Snowman Wreath
Equipment
- Rotary Cutter
Materials
- 1 wreath form
- 1 snowman face sign
- super glue
- pipe cleaners
- 2 rolls 10" deco mesh
- zip ties
Instructions
- Add a dab of glue on the back of your face sign at the top, bottom, and both sides (4 dabs total). Then attach your mounts in those spots.
- Cut 2 pipe cleaners in half. Slip each half through your glued-on mounts and twist to secure.
- grab your wire wreath frame, with the pipe cleaners pulled away from the center. Attach your snowman face sign with the pipe cleaners on the back. Tie them to the center of the wire wreath frame. I recommend attaching opposite sides first to make sure that your sign is centered.
- Take your thicker mesh (not the iridescent one) and cut it to 35 inches. Do it 7 more times for a total of 8.
- Take your thinner mesh (the one that's iridescent) and cut it to 30 inches. Do it 9 more times for a total of 10.
- Start with your bottom ruffle layer. Using the iridescent mesh, curl the ends under, then scrunch the ends towards the middle to create your ruffle.Use the pipe cleaners on the bottom layer of the wreath frame and tie one around the middle of each ruffle. Do this process 10 times total.
- Next, move to the ruffles on the top layer. Create ruffles with each of the 8 pieces of mesh and attach to the top layer of the wreath frame with pipe cleaners.
- Insert the stem of the hat between the top layer of mesh and the bottom layer of mesh. Then secure it on the back of the wreath frame with a zip tie.
- Fluff out the mesh on your wreath, making sure that you can see the face but not the wreath frame.
Video
Love this Snowman Wreath? Here are More Wreaths You’ll Love
- Christmas Grapevine Wreath
- Deco Mesh Elf Wreath
- DIY Poinsettia Wreath
- DIY Christmas Wreath
- Vintage Santa Wreath
- Christmas Tree Shaped Door Hanger
- Santa Stop Here Wreath
- Christmas pancake wreath
If you need any help with centerpiece-making, bow-making, wreath-making, or crafting in general, be sure to check out more of our tutorials on How to Make Wreaths.
We would love to see your beautiful wreaths! Please share with us over at the How To Make Wreaths Facebook Group.