
Y’all know that I love big, beautiful, fluffy wreaths! But, in colder climates, some people like to put wreaths between their doors. You need a thinner wreath to do that, so Coach Mel is showing us how to make a Christmas Pancake wreath!
I know that Christmas may feel far away, but in the crafting world, it is never too early to get started on your Christmas items! In the video below, Coach Mel, from Sincerely Creative Mom, helps me to step outside my comfort zone. We make a much thinner wreath than I’m used to. I have to admit that I really love the results!
How to Make a Christmas Pancake Wreath
I always say that you need to train your clients. You teach them to use your products so that they see and love your vision. However, it is also good to offer products that appeal to as many people as possible. Coach Mel is from Michigan. People who live in colder climates use storm doors to keep the outside weather out. Many northerners like to hang their wreaths between the storm door and the main door. (Although, y’all, our wreaths are made to withstand the elements. So you CAN hang them on the outside of a storm door!). So Mely Mel convinced me that we need to teach y’all how to make a pancake wreath that will fit between the doors and still look beautiful!
When you watch the video, you will learn the new crafting skills that you need to make a thinner wreath. Mel and I also talk about how to craft your wreaths without “touching it twice”. If you’ve been following me for awhile, this is not the first time you’ve heard this! When you are selling your wreaths, time is money. The less time that you spend on each wreath is more money in your pocket! So, it’s good practice to put your wreaths together in such a way that you don’t need to go back and readjust. We show you some easy ways to make that happen.
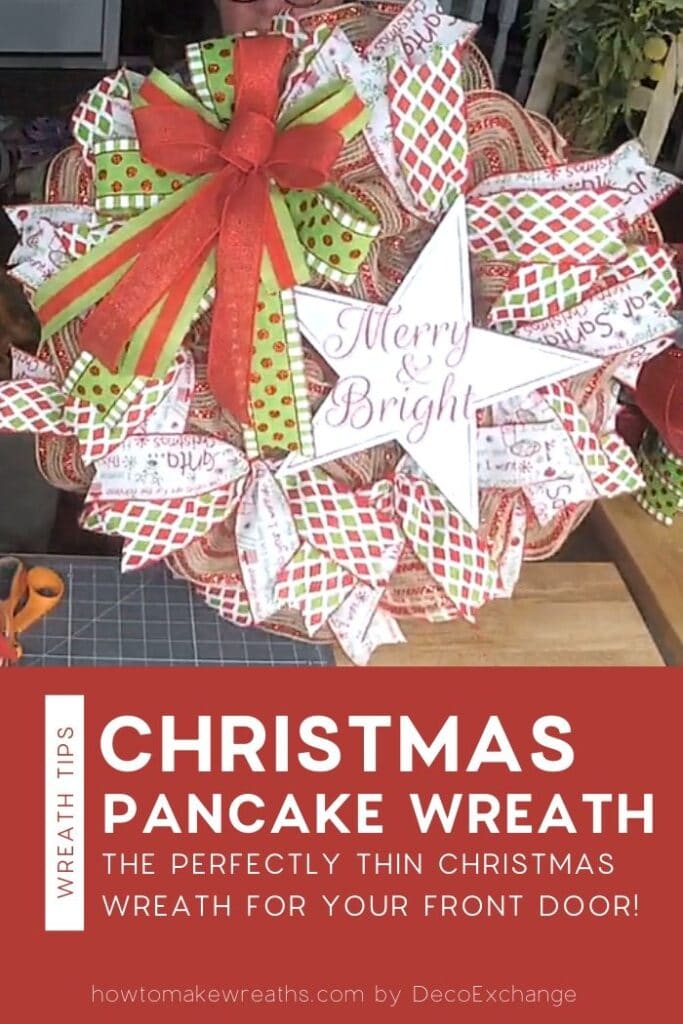
And, don’t worry y’all, just because we are making a thinner wreath does not mean that we won’t be adding a beautiful bow! We are making it a little smaller than one of my signature bows but the result is still gorgeous. We show you two different ways to use the EZ Bow Maker to make the perfect bows. If you want to see more about how to use the EZ Bow Maker, I have a whole post for that! We also attach an adorable “Merry and Bright” sign to our wreaths. Some signs can be a little tricky to attach, if you need help in that department, check out our post on how to attach wreath signs.

Terri Bow on the EZ Bowmaker
Instructions
- Take your first 2 1/2" ribbon and measure an 8" tail. Next make a 5" loop on one both sides securing the center of your loops between the pegs on the EZ Bowmaker. Trim ribbon from spool.
- Repeat this process with your second 2 1/2" ribbon.
- Using your 1 1/2" ribbon use the same method but make your loops slightly smaller than your previous ones.
- Pinch your bow in the center and twist a pipe cleaner around your pinch to hold the bow together.
- Fluff your loops into a beautiful Terri bow.
Merry and Bright Pancake Wreath
Materials
Instructions
- Take your wreath form and attach 6 pipe cleaners to the top rail and 6 to the bottom rail; alternate the spots you put the pipe cleaners between top and bottom so they end up looking like a zig-zag pattern.
- Cut your 10" mesh into 18, 20" strips.
- Take one piece of mesh and scrunch it up the center to make a ruffle. Attach the center or your ruffle to one of the pipe cleaners on the bottom rung of the wreath form.
- Next, overlap the edges of your ruffle so they form a sort of circle and then fold all of the mesh under.
- Repeat this process on the remaining pipe cleaners along the bottom rung and then the top rung.
- With both of your 2 1/2" ribbons, use a ribbon board to cut 12 13" ribbon tails. Dove tail the ends.
- Put one pattern of ribbon tail on top of the other. Fold them in half and pinch at the center. Attach to one pipe cleaner on the bottom rung of the wreath form. Arrange your ribbon tails so they are pointing towards the outside of the wreath. (It should look like a sunburst when they are all attached).
- Then, using wire cutters, trim the ends of the pipe cleaner. Repeat this process with the remaining pipe cleaners on the bottom rung of the wreath form.
- Next, take your remaining mesh strips and attach them to the pipe cleaners on the top rung using the previously used "pancake" method.
- Then, attach your remaining ribbon tails to the top rung of the wreath frame in the same way you did the previous ones.
- Staple 4 pipe cleaners to the back of your wreath sign then use the pipe cleaners to attach the sign to the right side of your wreath.
- Finally, attach your Terri bow to the top left corner of your wreath sign.
They say that “Christmas comes just once a year”. But for craftprenuers, that’s just not true! We get to enjoy playing with Christmas crafts all year round. Adding this beautiful pancake wreath to your skill set and inventory is a great way to fill a need for your customers and keep that holiday spirit alive!

If you need any help with centerpiece-making, bow-making, wreath-making, or crafting in general, be sure to check out more of our tutorials on How to Make Wreaths.
We would love to see your beautiful summer wreaths! Please share with us over at the How To Make Wreaths Facebook Group.

We Think You’ll Enjoy These Related Posts:


