
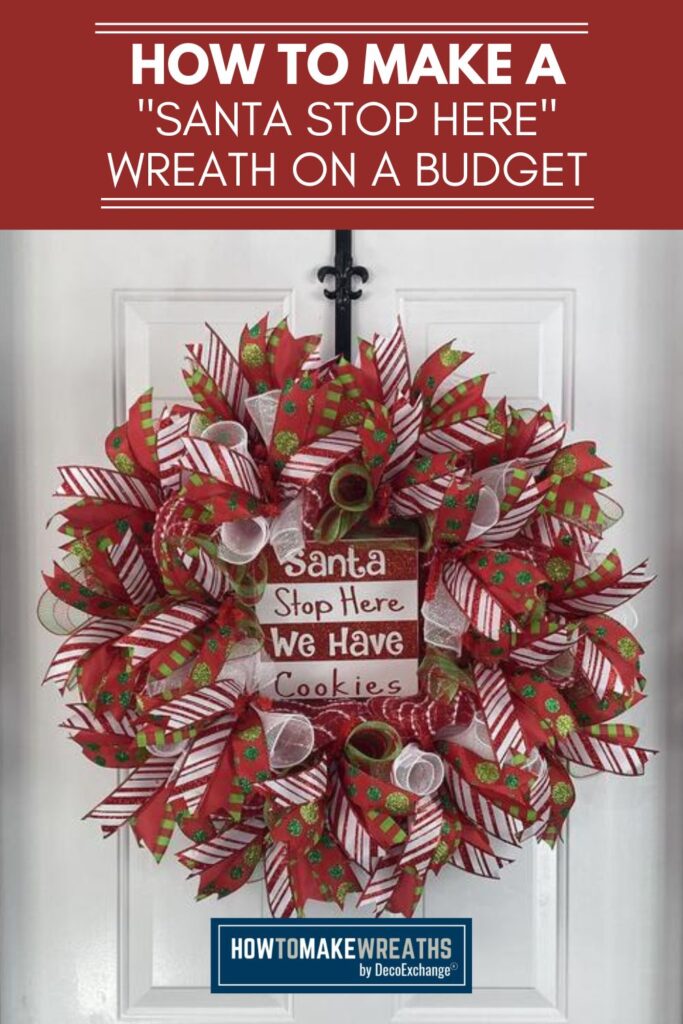
I’m showing you how to make an adorable “Santa Stop Here” wreath that is perfect for crafting on a budget. All you need are some basic wreath-making supplies and a cute Santa Stop Here sign to create a holiday wreath your customers will rush to buy.
Hey, y’all! We are in full swing into crafting for ALL the winter holidays – especially Christmas! This time of year is a busy one over at the Wreath Chateau, for sure.
But, it’s never too busy to show you a new design or technique that we’re trying out or finding success with using.
In fact, we love to teach you everything we can about wreath-making and about selling your creations online. One of the qualities of successful Craftpreneurs is that they’re constantly working to improve their craft (or their business).
So, as we continue to learn how to branch out into new markets, we share our experience with you. Today, we have a new market that we’ve been testing, and that market needs wreaths that are less expensive than my usual creations.
So today, I am showing you how to make a Christmas deco mesh wreath with a “Santa Stop Here” sign that will cost less to make but still look amazing.
If you can’t get enough holiday craft designs, be sure to check out our Meet Me Under the Mistletoe Christmas Wreath, DIY Merry Christmas Deco Mesh Wreath, and Simple DIY Christmas Grapevine Wreath Idea ideas!
A Cute Santa Stop Here Sign For A New Seller’s Market
Y’all know that big and beautiful wreaths are my passion. And, if you’ve been following me for a while, you also know that I say you need to appeal to your perfect customer and not worry about the rest.
I still firmly believe that philosophy, for the most part. However, today I am going to amend it a bit. We have been doing some serious homework about selling on Amazon. And what we have found is a little surprising. It turns out that what sells on Amazon is the opposite of what sells on Etsy.
The wreaths that are selling well on Amazon are in the $85-$90 range and have far less detail than what we normally create.
We want Amazon to drive traffic to our shop, so we need to appeal to what its shoppers want. So, our plan is to offer the wreath that Amazon shoppers seek. That way, we bring them into our shop and show them our higher quality items.
Hopefully, that strategy will allow us to convert some people to loving our more detailed creations!
Another thing we’ve learned is that we also need to be able to create multiple of these items (quickly). The most popular sellers had at least 4 of their wreaths listed.
Using fewer supplies will help designs take less time to create. But we also need a good reproduction process. We have a whole post for you if you want to learn more about creating multiple of your handmade wreath designs.
Christmas is the busiest time for selling online, and we want to help you be successful in every way that we can!
How To Make A Santa Stop Here Wreath
Remember, this design is less intricate than our normal wreaths, but that doesn’t mean it’s boring! In fact, this Santa Stop Here sign makes it cute and appealing to a wide base of customers.
Supplies Needed
Here’s everything you’ll need to gather to make this wreath.
- Wreath form
- “Santa stop here” sign/attachment
- 21″ deco mesh
- (2) 10″ deco mesh
- (2) 2.5″ wired ribbons
- (1) 1.5 wired ribbon
- Scissors
- Ribbon tailboard
- Rotary cutter
- Staple gun
- Pipe cleaners
Video Tutorial
Sometimes you just need to see creation in action, right? Follow along as I make this wreath – and join me!
Instructions
If you don’t like watching the videos or you missed a step along the way, here are the written directions to follow.
Step 1
Fold the end of your 21″ mesh over and attach it to a zip tie on the top of your wreath frame. Make an 8″ poof and attach it to the next tie on the wreath frame.
Follow this process around the outside of the wreath frame and then again around the inside of your frame.
Step 2
Next, use a rotary cutter to cut (9) 15″ strips out of your 10″ mesh. Make them into ruffles by curling under each end and then scrunching up the center.
Insert one ruffle into every other zip tie on the wreath frame.
Step 3
Now, cut (18) 12″ strips from your second 10″ mesh.
Make these strips into curls. Take two at a time and crisscross them. Add one pair to the zip ties around the wreath frame that won’t have ruffles.
Step 4
Next, cut (18) 14″ ribbon tails of each of your three ribbons. Dovetail all of the ends.
Step 5
Layer one of each of your three ribbon tails on top of each other and fold it in half. Pinch the stack in the middle and insert one stack into each zip tie on the wreath frame.
Step 6
Now let’s attach our sign. Use a staple gun to attach a pipe cleaner to each corner of the back of your sign.
Pro Tip: If your sign is thin, be sure to attach a square of adhesive fun foam first, so your staples don’t pop through the front of the sign.
Step 7
Finally, use the pipe cleaners to attach the sign to the wreath frame.
Make A Christmas Wreath With A Santa Stop Here Sign Yourself!
So that’s it y’all! This is a pretty quick and simple project. We did it on a budget, but it still looks fabulous enough for us to put our name on.
When it comes to our business, we have to constantly break out of our comfort zones and adapt because you never know what might work better. I challenged myself to make this work, and I did it! If I can do it, I know that you can do it too.
I hope you have fun with this project and our other holiday projects too! If you want even more holiday crafting inspiration, check out these popular designs:
- DIY Christmas Wrapped Candy Cane Wreath
- I’ll Be Gnome For Christmas Grapevine Wreath
- Grapevine Christmas Pine Wreath
- Christmas Glitter Bow by Hand
- Bark Less Wag More Dog Christmas Wreath
If you need any help with centerpiece-making, bow-making, wreath-making, or crafting in general, be sure to check out more of our tutorials on How to Make Wreaths.
We would love to see your beautiful summer wreaths! Please share with us over at the How To Make Wreaths Facebook Group.

Learn how to start, operate, and scale your creative business!
Get more info about business and creative coaching at The Makers University.

Santa Stop Here Wreath
Materials
Instructions
- Take your 21" mesh, fold over the end and attach to a tie on the top of your wreath frame. Measure an 8" poof and attach to the next tie on the wreath frame. Continue this process around the top of the wreath frame and then on the bottom.
- Next, take your first 10" mesh and use a rotary cutter to cut 9 15" strips. Make them into ruffles by curling under each end and then scrunching up the center. Attach the center point to every other tie on the wreath frame.
- Then, take your second 10" mesh and cut 18 12" strips. Make these into curls two at a time and crisscross them. Add the center point to every other tie on the wreath frame.
- Next, cut 18 14" tails of each of your three ribbons, dove tail the ends.
- Layer your three ribbons on top of each other and fold in half. Attach the center point to each tie on the wreath frame.
- Now it's time to attach the sign. Use a staple gun to attach a pipe cleaner to each corner of your sign. If your sign is thin be sure to attach a square of adhesive fun foam first so your staples don't pop through the front of the sign.
- Finally, use the pipe cleaners to work through the mesh and attach the sign to the wreath frame.
Video
Just pin this Santa Stop Here wreath tutorial to save the instructions for next time!

CHECK OUT MORE GRAPEVINE WREATHS

