
Christmas comes but once a year y’all but Christmas wreaths are made alllll year long! Today I’m showing you how to make an adorable deco mesh elf wreath that is festive and fun!
Elves are extremely popular for Christmas down here in Louisiana so I often work them into my holiday designs. In the video below I show you step-by-step how to make a fabulous deco mesh elf wreath. Using beautiful ribbons, ombre deco mesh, and a super cute sign, I make a Christmas creation that is perfect for any front door!
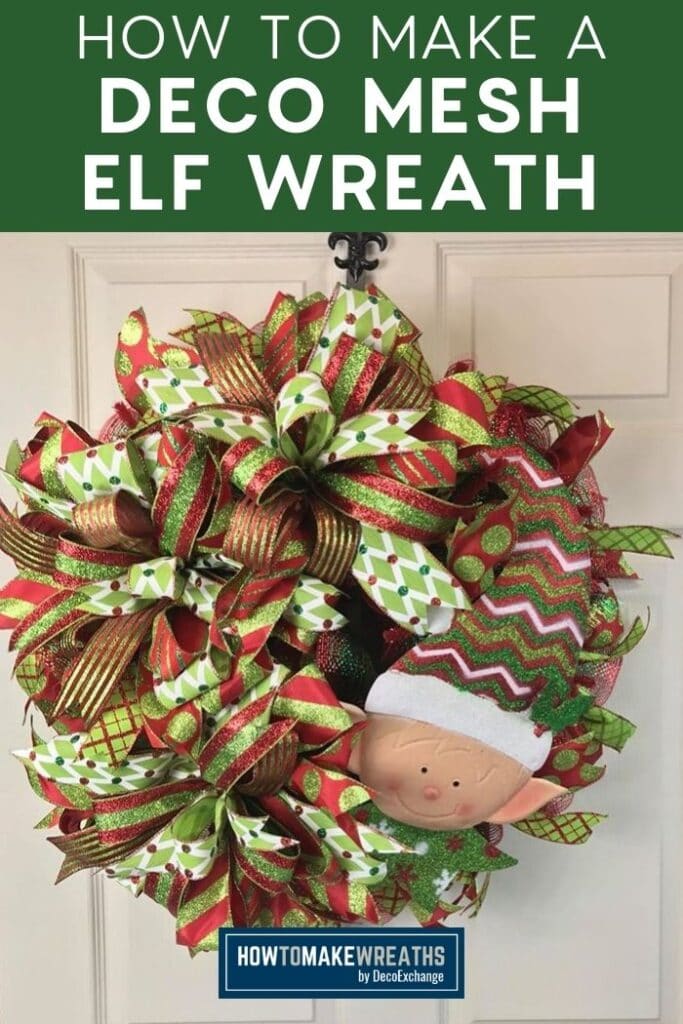
Deco Mesh Elf Wreath
Deco mesh, bows, and Christmas go hand in hand y’all! The beautiful wreaths we make with them fit perfectly into festive holiday decor. There are so many different types of Christmas supplies available that you can literally make a different Christmas wreath every day of the year. We only have room to display so many wreaths in our house though y’all. The fun part about selling the wreaths we make is that I get to try out so many different designs and styles without tripping over them all!
Another thing I love about Christmas decor is that it always seems like there is room for more. You may run out of places to put wreaths but every other surface in your house is still fair game. Many of you know that I hate to waste crafting supplies. When it comes to Christmas decor, all of those leftover ribbons can find a home. You can use them on your tree, make bows to add beauty to your packages, or add them to your light fixtures. One of my favorite projects to make with leftovers is a simple Christmas centerpiece, I made a tutorial for that too!
Wreath Maker Pro Tip:
The elf sign I used for this wreath is metal. I absolutely love the way metal signs look in Christmas wreaths because they add an extra layer of shine. However, to attach a metal sign to the wreath without any wires or strings showing, you have to be able to punch holes through the metal. In the past I have used everything from a hammer and nail to a drill to do this. But now I have a much simpler way. Prepare for a life changing tip y’all… I give you the metal hole punch! It’s cheap, it’s easy to find, and it puts a perfect hole in your metal signs each and every time! No more nonsense, y’all! If you want to know more about the tools I use I have a whole post on my favorite wreath making tools!

Making a Terri Bow
Instructions
- Start by measuring out a piece of 24-inch wire. You’re going to need to cut and have 2 of these per bow.
- Next, take your first ribbon of choice (start with your 1.5" ribbons then move to your 2.5" ribbons after that) and set it aside. Grab one of the wires that you just cut and fold it in half. Measure the ribbon out about 6 inches, give it a pinch, and tie it off with the wire.
- Take that ribbon and wrap it around your center peg. Give it a little pinch on the bottom then tie it with the wire and wrap the wire around the bottom peg. Tie if off on the top. Doing this gives you a center loop.
- Now it’s time to add your second wire. Take the second piece of cut wire and fold it in half. Work it through the bottom of the ribbon that is the newly created center ribbon and twist it off using the wire.
- Take your ribbon and loop up and around the center ribbon and around the next pegs on the left and right of the center ribbon. Then, tie it off at the bottom.
- At this point, you’ll do the same with your remaining ribbons as well. Follow the same steps of grabbing your third wire, folding in half, circling around the bottom center loop and around the next two pegs on the left and right that are currently empty.
- For the final step of using up the four cut wires, do this exact same process again with the fourth ribbon and fourth wire.
- Do these steps over and over again until you’ve come to the end of the pegs. On the final peg, I like to use two ribbons at a time (instead of just one) and loop around the bottom and tie it off just to get it a bit of extra pizzazz.
- Once tied, pull off the pegs and you’ve created your very own wreath bow!
Deco Mesh Elf Wreath
Materials
- wreath form
- 10" deco mesh
- 1.5 wired ribbon
- 2.5" wired ribbon
- sign/attachment
- pipe cleaners
- scissors
- metal hole punch
- 3 Terri bows see recipe above
Instructions
- Take your 10" mesh and cut 18 30" strips.
- Take one strip, scrunch it down the middle, and gather it in the center. Attach to a twist tie on the bottom rung of your wreath form. Repeat this process at every twist tie all along the bottom and then the top rung.
- Grab your 1 1/2" ribbon and cut 18 14" ribbon tails, then dove tail the ends. Repeat with the 2 1/2" ribbon.
- Layer one 2 1/2" ribbon and one 1 1/2" ribbon together. Fold in the center then give that center point a little twist. Start on the bottom rung and attach one to each twist tie. Repeat with the top rung.
- Next use the metal hole punch to make two holes in your wreath attachment. Put a pipe cleaner through each hole and then use those pipe cleaners to attach the sign on the right side of the wreath.
- Add one Terri bow to the top, bottom, then left of your wreath.
Video
Crafting for Christmas is one of my favorite things y’all. Because there is so much variety when it comes to supplies, it just never seems to get old. Grab a nice warm beverage and snuggle in to watch the video and learn to make this adorable elf wreath. Unless of course it’s still hot where you live, then grab something cool and dream of snow!

If you need any help with centerpiece-making, bow-making, wreath-making, or crafting in general, be sure to check out more of our tutorials on How to Make Wreaths.
We would love to see your beautiful summer wreaths! Please share with us over at the How To Make Wreaths Facebook Group.


Like the beginning