
Do you need a quick and easy DIY Christmas wreath you can make in just 30 minutes? This cute vintage Santa mesh Christmas wreath is just the design you need!
Hey, y’all! The holiday season is busy, right? The season is busy for everyone, but it’s “the busy season” for wreath makers, Craftpreneurs, and other crafters.

When you are busy juggling all that you need to do during the holidays, or trying to fulfill orders for customers, DIY Christmas wreath designs that take a long time to make just won’t cut it.
There’s simply not enough time!
That’s why you need a Christmas wreath that you can make quickly and easily, and I have just the design for you! You can make this vintage Santa mesh Christmas wreath in just 30 minutes.
How does that sound for the busy season?
DIY Christmas Wreath: Vintage Santa
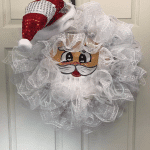
Just look at that face! Who can resist it? Well, if you’re a Craftpreneur, your customers can’t. And if you’re looking for a front door Christmas wreath for your own home, this guy works well for that too.
Your neighbors will all want to know where you bought him!
This vintage Santa wreath would round out any throwback style Christmas decor, right? We’re picturing Rudolf, candy canes, and elves all in their plastic glory hanging out on the front lawn, while our Santa here greets all your guests at the front door. That grin goes for miles!
Grab the directions below and for anyone who prefers to watch a tutorial video, we’ve got you covered. We like making things as simple as possible.

How To Make This Vintage Santa Mesh Christmas Wreath
You know we love working with deco mesh! There are so many techniques from the minimal fray ruffle to poof and ruffle. I love them all!
Do you have a personal favorite? Let us know in the comments.
Check out the poof and ruffle in action in this wreath. It’s a technique that allows you to quickly and beautifully cover a wreath in mesh.
Note: We got our vintage Santa face from Out in the Country Blanks. They have so many designs- we definitely recommend checking them out.
Supplies Needed:
- (2) Rolls of 10″ White Snowball Mesh
- (1) 15-24″ white work frame
- (1) Santa Face (from Out in the Country Blanks)
- (1) Santa Hat
- (6) pipe cleaners
- Staple Gun with staples smaller than 1/4″
Additional Optional Items:
DIY Christmas Wreath Directions & Video Tutorial
Note: Make sure to watch the video tutorial above for more detailed instructions.
- Attach 4 pipe cleaners around the back edge of the Santa face.
- Attach Santa face to the center of the 15-24″ work-frame.
- Cut your 10″ snowball mesh into 30″ strips – you need 18 of them total. (You need one per twist tie on your work frame)
- Take each piece of 30″ mesh, lay it flat, and scrunch it up. Start from the cut edge to the other. It should look like a giant ruffle/bow tie in your hand.
- Add the 30″ ruffle into each twist tie on the work-frame.
- Attach two pipe cleaners to each side of your Santa hat and secure it onto the top of your wreath – I prefer mine at an angle.
- (Optional) take your deco mesh tubing and cut 18 strips that are 24″ long.
- (Optional) Make a bow tie with the tubing and add it to each twist.
The fun doesn’t stop with just Santa. Check out all of the cute faces available from Out in the Country Blanks & More:

Have you made a wreath with one of the faces from Out In The Country Blanks & More? If so… I’d love to see it. Please share it with us in our Facebook Group!
We Help With More Than Just Wreath Designs!
If you need any help with wreath-making, centerpiece-making, bow-making, or crafting in general, be sure to check out more of our tutorials on How to Make Wreaths. We regularly put up new designs as well as tutorials covering different techniques to help you expand your skills.
Finally, if you’re interested in more info on learning how to make wreaths, where to buy supplies, and being in a community of like-minded crafters, check out our Creative Coaching Subscription Group.
I hope this tutorial and video help you make your own DIY Christmas wreath. Don’t forget to let us know what else you would like to see from us!
More Christmas Posts You’ll Love:
- How to Make a Christmas Pancake Wreath
- How to Make a Christmas Funky Bow
- Simple Christmas Grapevine Wreath
Vintage Santa DIY Christmas Wreath
Equipment
- Rotary Cutter
- Cutting Mat
- Deco Mesh Tubing
Materials
- 2 rolls 10″ White Snowball Mesh
- 1 15-24″ white work frame
- 1 Santa Face From Out in the Country Blanks
- 1 Santa Hat
- 6 pipe cleaners
- Staple Gun with staples smaller than 1/4″
Instructions
- Attach 4 pipe cleaners all around the back edge of the Santa face.
- Attach the Santa face to the center of the 15-24″ frame.
- Cut your 10″ snow ball mesh into 30″ strips – you will need 18 total strips.
- Take each piece of 30″ mesh and lay it flat. Then scrunch it up. Start from the cut edge to the other. It should look like a giant ruffle/bow tie in your hand.
- Add the 30″ ruffle into each twist tie on the frame.
- Attach two pipe cleaners to each side of your Santa hat and secure it onto the top of your wreath.
- (Optional) take your deco mesh tubing and cut 18 strips that are 24″ long.
- (Optional) Make a bow tie with the tubing and add it into each twist.


I love this…i am going to try some faces I will have to order the stuff to make one after the 2nd when I get my check I can’t wait thanks for saying where I can get the faces.
Me too, but my check doesn’t come til the 7th.
Have been wanting to try the faces! Thanks for the instruction!
I am going to have to try faces also!
Love this, and really appreciate your time and effort you put into our community ?♀️?? It’s Wonderful Wednesday, hope you are enjoying this beautiful day ?♀️??
I love the Santa face wreath. Looks easy to do, all I need is to find a painted face, or be brave enough to paint one.
Thanks Damon and Parker. Love the blog.
I enjoy these videos, I hope you continue to post, I always pick up a good tip when watching. Thanks!
The Santa is adorable! Thank you for all the info in your blog. I appreciate you and Parker very much. I am planning to doing a craft show October 5 & 6 here in Athens. It is “The Old Fiddlers Convention”. Approximately 26,000 people from all over the US. Trying very hard to get prepared for this. If you have time look up this convention in Athens,Alabama. Any help would help me. Thanks again to your family. How is Danielle?
Love the video. Enjoyed
totally cute!
I know you said you attach the mesh to the white pipe cleaners on the frame and you have a team but exactly where on the frame do you put the white pipe cleaners
as above, how many pipe cleaners for the wire frame? Wireath is fabulist, where can I get instruction to make the face? Is that information available,, or. Must I
Order one?
Out In The Country sell them she also has videos how to make wreaths, she come on every day at 9:00 cst time
So cute! Just wondering what you put in between the pipe cleaner spend the face before stapling it. Looked like you put a little something there. Thanks!
Sometimes I use felt if the board is too thin and im worried about the staple poking through.
How do you attach the pipe cleaners to the face? Staple or drill holes?
Hi Donna! We have various methods depending on the type of material your wreath sign is made out of. Here’s a few ideas. https://howtomakewreaths.com/four-simple-methods-of-attaching-a-sign-to-your-wreath/
this post should help you out – https://howtomakewreaths.com/four-simple-methods-of-attaching-a-sign-to-your-wreath/
How do you attach the pipe cleaners to the face???? I’ve asked 3 times….anyone out there have a suggestion?
we have a whole post dedicated to attaching signs – check it out here: https://howtomakewreaths.com/four-simple-methods-of-attaching-a-sign-to-your-wreath/
check out this post it should clear up any confusion – https://howtomakewreaths.com/four-simple-methods-of-attaching-a-sign-to-your-wreath/
I don’t see the video for making this santa wreath. Can you help me
Hi Becky! The tutorial video is at the very bottom of the post in supply and instruction card that you are able to print.
Where do you place the twist ties on the frame