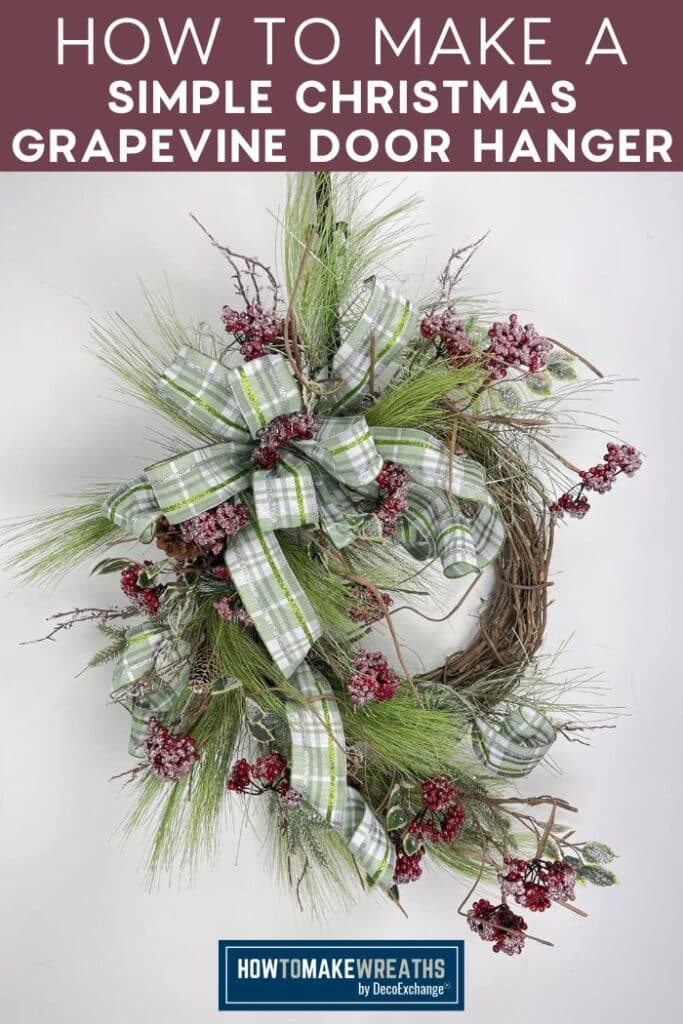
If you need an elegant but simple Christmas wreath design that you can use to stock up your inventory, try making this basic Christmas grapevine wreath! It comes together very quickly and will sell out in a flash, thanks to those gorgeous frosted red berries.
Hey, Y’all! Today I have a new simple Christmas wreath design that you’re going to LOVE.
Craftpreneurs of all types know that the holiday season is one of the most hectic times of the year. The secret to making money without losing your mind or spending all your time working is to supplement some of your more time-intensive designs with quick and easy designs that customers love.
I have an eye-catching, popular design for you today that only takes about 30 minutes to make, and it will SELL.
We’ve offered many holiday tutorials in the past, so feel free to try several of them out so you have variety in your inventory! If you’re looking for more customer-favorite ideas, check out our Grapevine Christmas Pine Wreath, Holiday Grapevine Wreath With Christmas Picks, and Simple DIY Christmas Wreath designs.

Supplies Needed To Make A Simple Christmas Wreath
Here’s what you’ll need to make this elegant (and easy) holiday wreath.
- 18” circle grapevine wreath form
- 2 pine evergreen picks
- 2 frosted pine evergreen picks
- 3 frosted red berry picks
- Zip ties
- Pipe cleaners
- (1) 2.5” ribbon
- Hot glue gun and glue sticks
- Bolt cutters
- Pick machine (optional)
- EZ Bow Maker
How To Make A Simple Christmas Wreath With Frosted Berries
Follow this wreath tutorial to use a combination of Christmas greenery to create a beautifully festive grapevine wreath!
Step 1
Prepare your grapevine base by inspecting it to see if there are any leaves or stems that stick out too far. If you see any, cut them off.
Step 2
Next, we’re going to make our bow.
Take your EZ Bow Maker and your first 2.5” ribbon and measure (2) 13-inch tails with (6) 6-inch loops. Each side will have 3 loose loops and a tail that hangs down.
Use a pipe cleaner around the middle to hold it together and attach it to the top of your grapevine wreath base.
Step 3
Take your pine evergreen picks and trim off the excess length of the pick stem with bolt cutters.
Add a dab of hot glue and insert one pick into the wreath base on each side of the bow to add some greenery. Let the pick on the left side hang down a little farther to beef up the overall design.
Curl the ribbon tails.
Step 4
Take one of the frosted evergreen picks and add a dab of hot glue to the end. Insert it into the wreath frame on top of the pine pick on the left side to add some winter texture.
Use a small zip tie to secure the picks to the wreath frame near the bottom so they don’t bend or get misshapen.
Step 5
Take your red berry picks and spread out the stems to make them look more natural. Trim off any excess length on the stems and insert the pick underneath your bow on the left side.
Insert the second red berries pick into the design toward the bottom of the wreath.
Layer these picks into the overall design by pulling some of the pine stems and pinecones through to the front. This creates an overall cohesive design.
Step 6
Repeat the process by adding a red berries pick to the right of the bow, too. Since the greenery is less prominent on this side, trim the berry pick down so it’s smaller and proportional to the greenery.
A second piece of the berries pick can be inserted further down on the right side to spread them out while adding color and texture.
If you want to, pull one of the berry bunches through the bow so it sticks out of the bow.
Step 7
Take your ribbon and cut a 36” piece. We’re going to use it to make fake ribbon tails. Measure down about 8 inches from one end, pinch the ribbon in the middle, and fold it so that the sides come together. Use a zip tie (or pipe cleaner) to hold it this way and attach it to the wreath.
Note: you can also use a pick machine to add a pick right to the end and insert it into the wreath.
Step 8
Insert your ribbon tail under the left side of the bow, pulling the shorter tail toward the top of the design and letting the long tail hang down.
Grab the long tail around the middle of the way down and use a small zip tie to attach the tail to the wreath frame so that it creates almost a pouf between attachment points.
Step 9
Cut three more strips of ribbon (8” long) to add more ribbon tails on either side of the long tail and one in the upper right of the design.
Step 10
Fluff out your bow and the Christmas picks so that it looks the way you want it to. Also, go ahead and curl the ribbon tails under.
Your wreath is now complete!
Simple Christmas Wreaths Make Great Inventory Fillers
Isn’t this wreath beautiful and elegant? I love how the design comes together and looks like one cohesive piece.
When you’re trying to build your holiday inventory, it helps to have some designs that don’t take a lot of time so you can quickly stock up. This design is both quick and easy to make, and it is a reliable seller, so it will become a staple in your store.
If you want to make this design a little more casual or rustic, you could always make your own Decoupaged Wood Christmas Sign and add it to the wreath! Just keep in mind that doing that will take more time AND change the ideal customer who wants to buy your wreath.
If you love Christmas wreath designs, make sure to check out some of these other popular designs:
- How To Make A Christmas Door Hanger
- Meet Me Under the Mistletoe Christmas Wreath
- Merry Christmas Wreath
- I’ll Be Gnome For Christmas Grapevine Wreath
- Christmas Wreath with Glitter Ribbon
If you need any help with centerpiece-making, bow-making, wreath-making, or crafting in general, be sure to check out more of our tutorials on How to Make Wreaths.
We would love to see your beautiful wreaths! Please share with us over at the How To Make Wreaths Facebook Group.
If you’re interested in more info on learning how to make wreaths or being in a community of like-minded crafters, check out our Creative Coaching Subscription Group.
Simple Christmas Wreath With Frosted Berries
Materials
- 18” circle grapevine wreath form
- 2 Pine evergreen picks
- 2 Frosted pine evergreen picks
- 3 Frosted red berry picks
- Zip ties
- Pipe cleaners
- 2.5" wired ribbon
- Hot glue gun
- Pick machine
- EZ Bow Maker
Instructions
- Inspect your grapevine base to see if there is anything that sticks out too far. If you see anything, cut it off.
- Make a bow.Take your EZ Bow Maker and your first 2.5” ribbon and measure (2) 13-inch tails with (6) 6-inch loops. Each side will have 3 loose loops and a tail that hangs down. Wrap a pipe cleaner around the middle and twist it tightly then attach it to the top of your grapevine wreath base.
- Trim off the excess length of the evergreen pine stems with bolt cutters. Add a dab of hot glue and insert one pick into the wreath base on each side of the bow to add some greenery. Let the pick on the left side hang down further.
- Insert the frosted evergreen picks and secure them with a dab of hot glue. Use a small zip tie to secure the picks to the wreath frame near the bottom, so they aren't loose.
- Insert the red berry stems into the design on the left side of the bow. One stem will go underneath the bow, and another stem will go in toward the bottom of the wreath design. Pull some of the pine stems and pinecones forward to layer these picks into the overall design.
- Next, add a red berries pick to the right of the bow, too.A second piece of the berries pick can be inserted further down on the right side to spread them out while adding color and texture. If you want to, pull one of the berry bunches through the bow, so it sticks out of the bow.
- Cut a 36" piece of your ribbon and measure down about 8 inches from one end. Pinch the ribbon and fold it so that the sides come together. Use a zip tie to hold it and attach it to the wreath.
- Insert your ribbon tail under the left side of the bow. Grab the long tail around the middle of the way down and use a small zip tie to attach the tail to the wreath frame so that it creates a pouf between attachment points.
- Cut three 8" strips of ribbon and add two ribbon tails on the sides of the long tail as well as one in the upper right of the wreath.
- Fluff out your design and curl all the ribbon tails under.
Just pin this simple Christmas wreath tutorial to save these instructions for a later time!

If you love to craft, check out our Eat. Sleep. Craft. Repeat. t-shirts and click on the picture below!


