
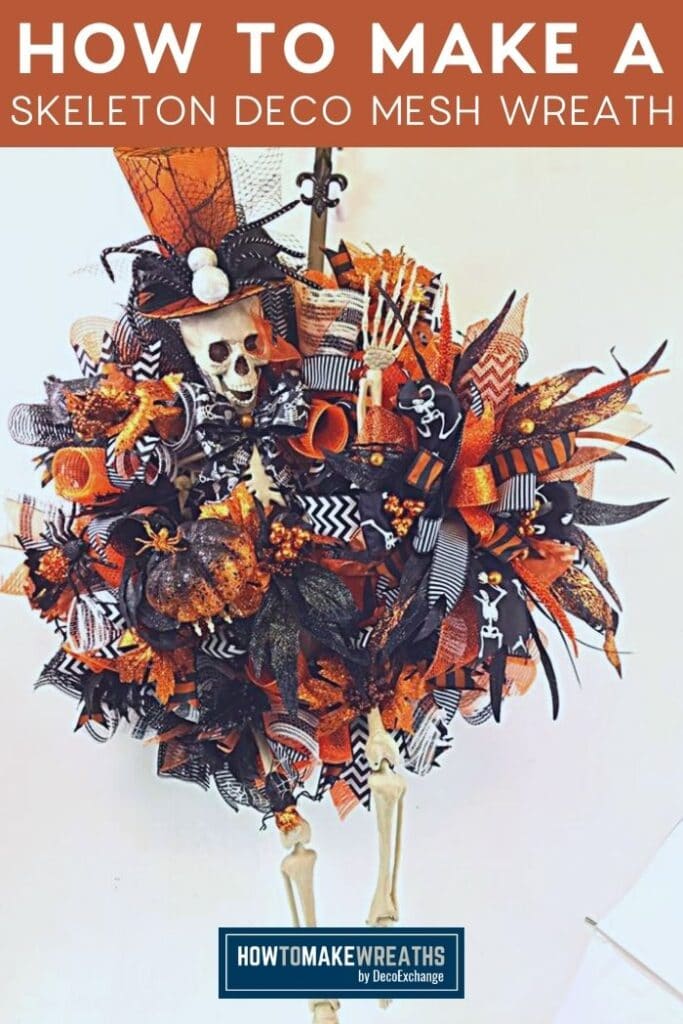
Halloween is such a fun holiday to craft for y’all. There are so many designs and characters to choose from. Today I’m showing you how to make a skeleton deco mesh wreath that is super fun and festive!
When it comes to Halloween there is no shortage of design options and characters to choose from. You can go spooky or cute, creepy or whimsical. This skeleton deco mesh wreath is a combo of spooky and whimsical. The skeleton is just the right amount of creepy but all the ribbons, mesh, and foliage turn him into a bit of a softy. Watch the video below to learn how to make the magic happen!
Skeleton Deco Mesh Wreath
The skeleton I use for this wreath is a classic in Halloween decor. Y’all, nothing says October 31 like a skeleton on display! Using an actual one instead of a painted sign or attachment does provide its own set of challenges though. As you know, skeletons have joints and those joints don’t always stay where you put them. That’s okay though! We all know that zip ties and hot glue is a crafter’s best friend.
When you are working with pieces like this, decide just how you want them positioned and then add in your ties and hot glue to make them cooperate. Just remember that you will probably need to use quite a bit of glue. When you use a lot of glue you will need to hold it in place while it drys. Let go too soon and you’ll be starting all over. If you want to learn more about adding wreath signs and attachments we have a post for that too!
For the bow in this wreath I use Pro Bow the Hand bow maker. I love the ways the bows come out when I use this tool. Until you get the hang of it though, this method looks a little tricky. I don’t want you to be intimidated though, it’s easy peasy once you’ve had a little practice. You’ll see me make the bow in the video but if you want a more in depth tutorial check out my post on how to make a Terri bow using Pro Bow the Hand!

Terri Bow
Instructions
- Measure out 4 pieces of floral wire about 24-inches each. Cut the floral wire with your wire cutters. Start at row D of the Pro Bow.
- Let's start with our first 1.5" ribbon. Measure out about 7-inches for the tail. Take a wire and fold it in half, give it a pinch around the ribbon, and we're going to tie it off. Wrap the ribbon around your center peg. Pinch on the bottom peg, twist, and tie it off on the top.
- Now that you have your center loop, you'll need to add your second wire. Fold the wire in half and work it through.
- Take your first 2.5" ribbon, measure out about 7-inches for the tail. Take a wire and fold it in half, give it a pinch around the ribbon, and we're going to tie if off. Wrap the ribbon around the next peg. Pinch on the bottom peg, twist, and loop on the other side. Cut the tail. Tie off with the wire.
- Repeat the steps above (alternating the 1.5" and the 2.5" ribbons until all the pegs are used working your way outwards from the center peg. Once you're done, tie off, unwrap the first wire from the top and bottom from when you first started. Take off your bow from the Pro Bow.
Skeleton Deco Mesh Wreath
Materials
- wreath form
- sign/attachment skeleton
- small black hat
- small spider
- small pumpkin
- 2 21" deco mesh I use one black and one orange
- 2 1.5" wired ribbon
- 2 2.5" wired ribbon
- 5 floral stems I used 5 different types of Halloween foliage: black leaves, orange and black grasses, orange and black feathered grasses
- Halloween ball stem
- scissors
- wire cutters
- hot glue gun
- zip ties
- floral pin
- ribbon tail board
Instructions
- Start by cutting 13 10" strips of both 21" meshes.
- Roll one up lengthwise to make a loose curl. Measure 5 inches from one side and attach that to a tie on the top of the wreath form. Measure 5 inches from the other side and attach that point to the next tie. You will have a nice poof in the middle.
- Next, take a strip of the other color mesh and do the same. Start in the same tie that you ended your last one with. Repeat this process, alternating colors, around the top and then bottom of the wreath form.
- Go back to the top of the form and add another layer of curls in the same way but with the opposite color. (If orange is already there, this time add black)
- Attach your skeleton to the left side of the wreath by using a zip tie around his neck and through his pelvic bone. Turn the wreath over and trim the ends of the zip ties.
- Next, use your ribbon tail board to cut 9 14" tails of each of your ribbon patterns and dove tail the ends.
- Take one of the 1.5" and lay it on top of a 2.5". Fold in the middle and pinch. Attach the pinch to one of the ties on the bottom of the wreath form.
- Now repeat with the other 1.5" and 2.5" ribbon and place that in the next tie. Continue to alternate the two ribbon tail combinations around the bottom of the form. Then, repeat along the top.
- Now your skeleton needs a hat! Put the end of a leftover floral pick or stem into the hat and secure it with hot glue.
- Put hot glue in the hole on your skeleton's head and insert the other end of your floral pick/stem into the hole. Hold it in place until the glue dries.
- Use hot glue to secure your skeleton's joints in the positions that you want them.
- Add your Terri bow (see recipe above) to the right side of the wreath. Weave the floral wire through the meshes until it gets to the wire frame on the back and twist it off.
- Take the black leaves and trim them into sections. Use hot glue to attach one or two leaves to each twist tie along the top and then bottom layer of the wreath.
- Take your pumpkin and push a floral pin up through the skeleton's hand and into the pumpkin to secure it in the palm of his hand.
- Use hot glue to attach the spider to the top of the pumpkin.
- Use hot glue to attach the orange and black grasses evenly throughout the wreath.
- Attach the black feathered grasses evenly around the bow using hot glue. Put them between the last ribbon and the second to last ribbon. Work some in towards the center of the bow.
- Repeat with the orange feathered grasses.
- Use hot glue to add Halloween balls to the center of the bow.
- Now your skeleton needs a bow tie! Take a 1.5" ribbon and make one longer loop with one shorter loop on either side of it. Hot glue the center to keep it secure. Cut the long loop and dovetail the ends, this will give you tails for your bow.
- Use hot glue to attach to bow to the skeleton's neck bone, hold it in place while it dries.
- Finally, glue one Halloween ball to the center of his bow and you'll have a festive Halloween wreath with one well dressed skeleton!
Video
Y’all, this skeleton deco mesh wreath may have a lot of steps but the results are worth every single one of them. There are a lot of little tips in this video that will explain each step and help make this design easier to duplicate so be sure to check it out. You’ll never see a better dressed skeleton or a Halloween wreath with more texture and dimension!
Just pin this skeleton wreath below to find the instructions later!

CHECK OUT MORE GRAPEVINE WREATHS
If you need any help with centerpiece-making, bow-making, wreath-making, or crafting in general, be sure to check out more of our tutorials on How to Make Wreaths.
We would love to see your beautiful summer wreaths! Please share with us over at the How To Make Wreaths Facebook Group.


