
Have you been noticing Halloween wreaths everywhere you look? Learn how to make a Halloween wreath yourself (it’s easier than it may seem!) with this complete tutorial to guide you through the process.
Hey, y’all! Around this time of year, sales and interest in wreaths really start to pick up. People want to decorate for the season and the upcoming holidays! It all begins with colorful fall wreaths, and that spills right into festive Halloween wreaths.
Halloween is one of my very favorite holidays to create decor for because the items are just so much fun and the final products look incredible! If you like to get crafty, making a Halloween wreath yourself is a snap – and probably takes as much time as you would spend shopping for one to buy (or maybe less!).
I made this DIY Halloween wreath Live on Facebook about 2 years ago. It’s still so stinkin’ popular that I thought I would share the video tutorial with you in case you missed it the first time.
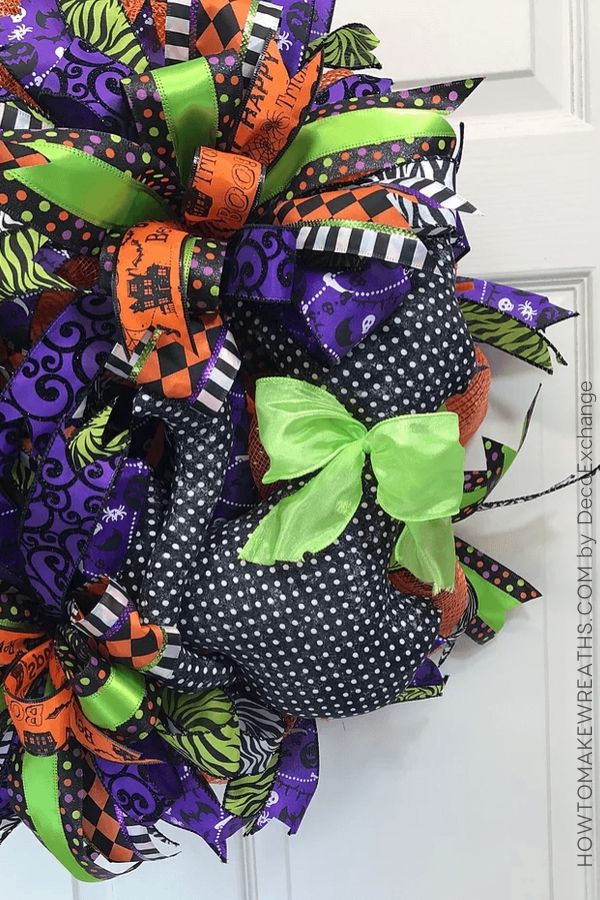
The mix of ribbon in this design gives the entire wreath crazy depth and character. If you prefer a colorful and festive not-so-scary Halloween-themed wreath, this is the perfect wreath for your front door.
And, while you’re here, make sure you check out these other Halloween wreath tutorials too! I just know you’ll love our Witch and Broom: Halloween Deco Mesh Wreath and DIY Halloween Ghost Wreath.

How To Make A Halloween Wreath: Full Tutorial
If there’s one thing I’ve learned over the years, it’s that different people learn in different ways. With that in mind, I’m covering this tutorial in as many ways as I can.
First, you’ll find my original Facebook Live video. Then, down below that, I’m also including a list of project supplies, written out directions, and some notes to help clear up any potential confusion.
Watch The Full Halloween Wreath Video Tutorial
Here’s the original video in its entirety so you can see the complete process for making a Halloween wreath from start to finish.
Halloween Wreath Supplies Needed
Here’s a list of everything you’ll need to complete this project. Please note that some links may be affiliate links.
- 1.5″ Ribbon
- 2.5″ Ribbon
- The wreath frame was handmade and adding an extra ring to the center.
- 10″ mesh
- Pro Bow the Hand Bow Maker
- Fluff Box
- Wreath attachment/sign (optional)
- Hot glue gun and hot glue
- Scissors
How To Make A Halloween Wreath: Step By Step
Follow this process to make your wreath. This is a Halloween-themed wreath but the same basic process can work for ANY wreath theme!
Step 1
Prepare your wreath frame. If you bought it, you probaby don’t need to do much (if anything). If you need to make it, go ahead and get that done first.
Step 2
Start working on your poufs. Grab the end of your mesh and let the roll drop to the ground. Fold the end over (so it doesn’t fray) and scrunch the sides into the middle.
Step 3
Beginning on the inside of the wreath frame, attach the end of your mesh to the frame using the pipe cleaner. Measure out 10 inches and attach the mesh at that mark with the next pipe cleaner on the frame. Work your way around the frame, completing 3 rows of pouf with your mesh.
Step 4
Pull out your ribbon and let’s make some ribbon tails with your Pro Bow (or your Ribbon Tail Board). Pull out your 4 ribbons and make 15 ribbon tails with each ribbons. Dovetail the ends.
Step 5
Pair your ribbon tails together, fold them in the middle then give the middle a pinch and tie it into a pipe cleaner. Alternate ribbon pairs as you make your way around the wreath frame.
Step 6
Use your Pro Bow and make 3 Terri Bows for your wreath. Use your Fluff Box to fluff out and arrange your bow. Attach your bows to your wreath at the top, the left side, and the bottom.
Step 7
I decided to add a stuffed cat as a great finishing touch. If you want to add one, hot glue pipe cleaners to the back of the cat/attachment. Then, use those pipe cleaners to add the attachment to the wreath in the open space not taken up with a bow. Secure it in place with a few dabs of hot glue.
Step 8
Fluff everything and arrange it so you can see all the elements of this gorgeous wreath!
Important Wreath Notes
If you’re new to making wreaths, there may be a few things that seem confusing right at first. Here are a few notes to try to help clear things up for you.
- I normally stock up on frames, but I didn’t have any Halloween frames in stock so I had to make it! Buying a wreath frame is faster, but costs more. If you prefer to do it yourself, you can learn How To Make A Wreath Frame – it’s easy!
- This wreath was made on a 15-24″ wreath frame using 10″ mesh. The 10″ poofs were done on all THREE rings of the wreath.
- All the ribbon tails were 14″ long and were grouped in pairs of (1) 1.5″ ribbon and (1) 2.5″ ribbon. We added 2 ribbon tails to every twist tie on the top and bottom ring.
- We then made 3 Terri bows on the Pro Bow the Hand Bow Maker, which consisted of 7 ribbons total! 4 of the ribbons were 1.5″ and 3 were 2.5″. For more info, check out How to Make a Wreath Bow on the Pro Bow.
- We finished the wreath off by a adding the adorable little cat, that was designed by a member of my coaching group!!
Make This Design Yourself
Halloween wreaths are HOT, y’all! Make sure you give this design a try whether you want to put it on your own door or sell it. You can’t go wrong! And, if you love Halloween wreaths, be sure to check out our other designs:
- Eat Drink And Be Scary Halloween Wreath
- Witch and Broom: Halloween Deco Mesh Wreath
- DIY Halloween Ghost Wreath
- Simple Spider DIY Halloween Wreath
- Quick Halloween Grapevine Wreath
As always, feel free to leave us a comment below or share this post with a friend. We appreciate getting your feedback and can’t way to provide y’all with more amazing content!
If you’re need of any help with bow-making, wreath-making, or crafting in general, be sure to check out more of our tutorials on How to Make Wreaths.
We would love to see your Halloween wreaths! Please share with us over at the How To Make Wreaths Facebook Group.
If you’re interested in more info on learning how to make wreaths, where to buy supplies, and being in a community of like-minded crafters, check out our Creative Coaching Subscription Group.


DIY Halloween Wreath Tutorial
Materials
Instructions
- Prepare your wreath frame.
- Start working on your poufs. Grab the end of your mesh and let the roll drop to the ground. Fold the end under and scrunch the sides into the middle.
- Beginning on the inside of the wreath frame, pick a pipe cleaner and attach the end of your mesh to the frame using the pipe cleaner. Measure out 10 inches and attach the mesh at that mark with the next pipe cleaner on the frame. Work your way around the frame, completing 3 rows of pouf with your mesh.
- Pull out your ribbon and your Pro Bow to make ribbon tails. Pull out your 4 ribbons and make 15 ribbon tails with each ribbon. Dovetail the ends.
- Pair your ribbon tails together, fold each pair in the middle and give it a pinch then tie it into a pipe cleaner. Alternate ribbon pairs as you make your way around the wreath frame, adding one pair into each pipe cleaner.
- Using the Pro Bow The Hand, make 3 Terri Bows for your wreath. Use a Fluff Box to fluff out and arrange your bows and attach them to your wreath one at a time at the top, the left side, and the bottom of your wreath.
- If you want to add an attachment, hot glue pipe cleaners to the back of it and then use those pipe cleaners to add the attachment to the wreath in the open space not taken up with a bow. Secure it in place with a few extra dabs of hot glue.
- Fluff everything and arrange it so you can see all the elements of this gorgeous wreath!
Just pin this DIY Halloween wreath tutorial to save the instructions and video for later!


