
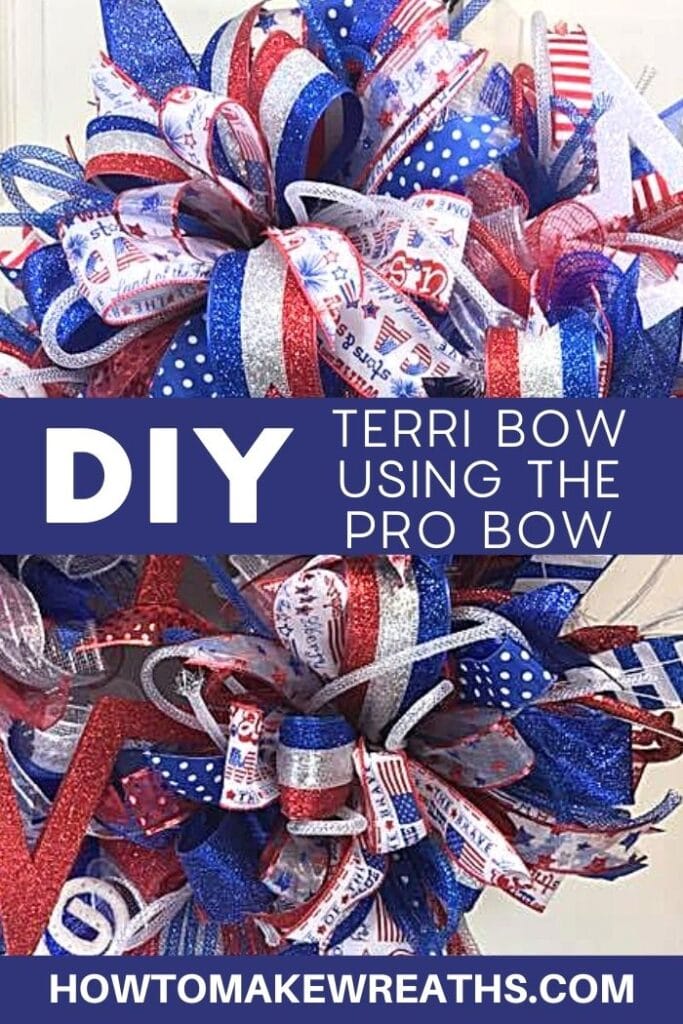
Learn how to make a patriotic wreath featuring the Terri Bow! Watch as I show you the secret to making the bows, and how I put them all together to create a gorgeous finished look using the ‘Pro Bow The Hand’. This is a festive display that’s perfect for the 4th of July or any other patriotic holiday!
Hey, y’all! I’m excited about the wreath I’m showing you today! This large deco mesh wreath base was the perfect item to use to create a one-of-a-kind patriotic wreath. I had a blast using the ‘Pro Bow The Hand’ to make Terri Bows.
Making bows is one of my favorite parts of wreath-making. They make such a statement on a wreath and always add just the right touch of flair.
If you’ve been following my wreaths for a while, you probably know that I make several different types of bows. Sometimes I use the Pro Bow the Hand. Then, at other times, I use the EZ Bow Maker or even just my hands.
Terri Bows are a little more complex than other types of bows, so even though I have made Terri Bows by hand, I definitely prefer to use some type of bow maker. I’ve shared how to make Terri Bows using the EZ Bow Maker.
After publishing that post, I received several requests to share how to make a Terri Bow using the ‘Pro Bow The Hand’.
Well, your wish is my command! Today, I’m sharing with you exactly how to do that, and I’ve even got a video tutorial to walk you through the process! Let’s get started.

How To Use Pro Bow The Hand To Make A Terri Bow
Let’s talk about this Terri Bow for a second. The biggest tip I can give you about making a great Terri Bow is that you’ve got to have the right ribbon. You really need a good, wide ribbon. It also should be a firmer ribbon – so this is not the time to use any silk!
A soft ribbon won’t hold its shape well, and that is the opposite of what we want here.
Your standard craft store ribbon probably won’t do the trick Here’s where I recommend you get a good ribbon for this patriotic wreath and all your Terri Bows!
Video Tutorial
I know first hand that people learn best in different ways. That’s why I try to offer a variety of ways to show you how to make wreaths.
For this post on using the Pro Bow to make a Terri Bow, I’m including a video tutorial to walk you through the process. But don’t worry – there are written instructions down below if you find that more helpful!
Supplies Needed
Instructions
I realize the ‘Pro Bow The Hand’ can look a little intimidating. I want to reassure you that the process for making bows is simple enough that once you do it a couple of times, you’ll have it mastered!
Step 1
Select the ribbons you’ll use then measure out 4 pieces of floral wire about 24-inches each. Use the wire cutters to cut the wire.
Step 2
Take your first ribbon and measure out 7-inches for the tail. Take a wire and fold it in half, give it a pinch around the ribbon, and tie it off. Wrap the ribbon around your center peg then pinch the bottom peg, twist, and tie it off on the top.
This is your center loop.
Step 3
Now it’s time to add your second wire. Fold the wire in half and work it through.
Step 4
Take your 2.5″ ribbon and measure out a 7-inch tail. Take a wire and fold it in half, give it a pinch around the ribbon, and we’re going to tie it off. Wrap the ribbon around the next peg. Pinch on the bottom peg, twist, and loop on the other side.
Dovetail the ends and tie the ribbon off with the wire.
Step 5
Repeat step 4 until all the pegs are used. You’ll work your way out from the center peg. Once you’re done, tie off, unwrap the first wire from the top and bottom from when you first started. Take off your bow from the Pro Bow.
Step 6
Place the bow in the center of your fluff box and wrap the wires on the side hooks to keep it in place. Fluff out your bow by starting with the outside ribbons and working your way to the center.
As you can see, the key to making this patriotic wreath is really nailing those Terri Bows.
Make sure to grab a bow maker…this design will be impossible to do without one, y’all!
FAQs
Here are a few answers to questions I frequently see readers ask to help you out even more.
Is the Pro Bow Maker the same as the EZ Bow Maker?
Short answer: no. Even though both of these items help make the process of creating bows easier, they are designed (and used!) very differently.
Can I use high-quality ribbon that doesn’t have wire?
When it comes to making bows, I don’t ever advocate for using a ribbon that doesn’t have wire in it. Wired ribbon does a MUCH better job of maintaining its shape so that your bows always look their best.
More Bow-Making Inspiration
If you love making bows (or want to increase your skill level!), check out these other great bow tutorials.
- How To Make A 3-2-1 Layered Bow
- Handmade Bow Tutorial: The Damon Bow
- How To Make A Funky Bow Wreath For Christmas
- How To Choose Ribbon Colors And Patterns For Your Project
If you haven’t joined our Facebook group How To Make Wreaths Facebook Group, make sure you head on over there. Share your latest grapevine design!
If you need any help with centerpiece-making, bow-making, wreath-making, or crafting in general, be sure to check out more of our tutorials on How to Make Wreaths.
Finally, if you’re interested in more info on learning how to make wreaths, where to buy supplies, and being in a community of like-minded crafters, check out our Creative Coaching Subscription Group.


How to Make a Patriotic Terri Bow using the Pro Bow
Instructions
- Sort out what ribbons you will be using. Measure out 4 pieces of floral wire about 24-inches each. Cut the floral wire with your wire cutters.
- Let's start with our first ribbon. Measure out about 7-inches for the tail. Take a wire and fold it in half, give it a pinch around the ribbon, and we're going to tie it off. Wrap the ribbon around your center peg. Pinch on the bottom peg, twist, and tie it off on the top.
- Now that you have your center loop, you'll need to add your second wire. Fold the wire in half and work it through.
- Take your 2.5" ribbon, trim into a dovetail, Measure out about 7-inches for the tail. Take a wire and fold it in half, give it a pinch around the ribbon, and we're going to tie if off. Wrap the ribbon around the next peg. Pinch on the bottom peg, twist, and loop on the other side. Cut the dovetail. Tie off with the wire.
- Repeat the step above until all the pegs are used working your way outwards from the center peg. Once you're done, tie off, unwrap the first wire from the top and bottom from when you first started. Take off your bow from the Pro Bow.
- Take your fluff box, place the bow in the center and wrap the wires on the side hooks to keep it in place. Fluff out your bow, start with the outside and work your way to the center.
Just pin this Terri bow using the Pro Bow the Hand tutorial below to find the instructions later!
If you’re a dog lover or know someone who is, check out our Support Dog Rescue t-shirts and click on the picture below!


